Tag Archives: Portugal

The Battle of Toulouse 10 April 1814

Napoleon abdicated on 6 April 1814, but news did not reach the south of France until after Wellington’s Anglo-Portuguese and Spanish army had fought a battle against Marshal Nicolas Soult’s French army at Toulouse.

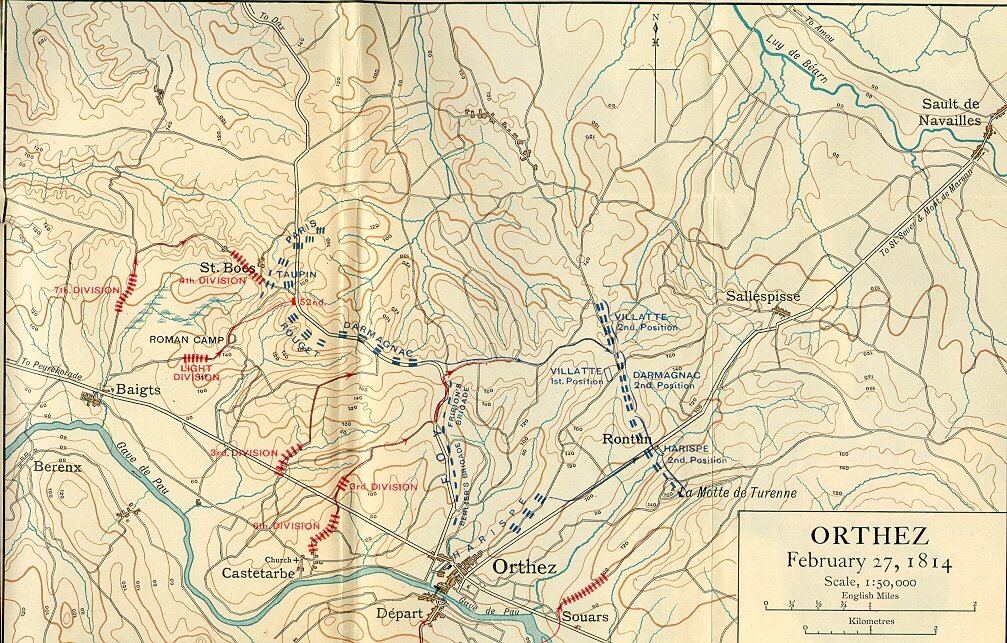
Wellington had defeated Soult at Orthez on 27 February. The 4th and 7th Divisions of Wellington’s army, commanded by Lord Beresford, entered Bordeaux without a fight on 12 March. The mayor, Jean-Baptiste Lynch, grandson of an Irish Jacobite, and many of the locals supported the Bourbon King Louis XVIII. Wellington encountered little opposition from partisans in south west France. Ralph Ashby comments that:

The area was hardly a Bonapartist stronghold to begin with…Bourbon sympathies ran higher than elsewhere in France.

More importantly, Wellington was the one Allied army commander who kept a tight rein on his troops. Looting was absolutely forbidden, on pain of hanging…Wellington took care of his supply lines, and paid for requisitions in full.[1]

The 7th Division remained at Bordeaux, but Beresford and the 4th Division rejoined the army on 18 March. whereupon it resumed its pursuit of Soult across south west France. On 20 March Soult managed to evade an attempt to pin his army against the Pyrenees at Tarbes. Two of the roads east were cut, but the French held the one to Toulouse for long enough to escape.

Jac Weller points out that Wellington had a number of problems: he would be outnumbered if Soult could combine with Marshal Louis Gabriel Suchet’s army, which was in Catalonia; operating in enemy territory, he had poor maps and lacks the accurate intelligence that he had received in Spain and Portugal; and he was not fully informed about the course of the campaign further north.[2]

Toulouse was on the east of the Garonne, a wide river. It contained a large arsenal and was surrounded by thick walls, but it lacked outworks, meaning that Wellington’s siege train could breach its walls if the guns could get close enough. The suburb of St Cyprien, to the west of the river, was fortified.

Crossing the Garonne was difficult. The first attempt was made at Portet five miles south of Toulouse after dark on 27 March. It had to be abandoned because the pontoon bridge was 80 feet too short to cross the river there.

The Garonne narrowed three miles further south above its junction with the Ariège. On 30 March the pontoon bridge was laid there, and 13,000 men under Sir Rowland Hill crossed.[3] However, they could not cross the Ariège because there was no bridge across it and no other pontoon. Moreover, there was no road capable of carrying wheeled transport to Toulouse.

The second attempt had to be abandoned, with the troops returning across the pontoon. The French did not discover the first attempt at all, and did not find out about the second one until a day later. Soult sent two divisions, with two more in reserve, to confront Hill once he had crossed the Ariège, but the lack of roads prevented the French advancing. Soult concluded that the British move had been a feint.

Wellington now realised that he could only cross the Garonne north of Toulouse. A suitable spot was found, and 18,000 men under Beresford crossed on 4 April. The pontoon bridge was barely wide enough to cross the river at this point. It was broken after heavy rain caused the river to rise, isolating the troops who had crossed. They were, however, in a strong defensive position, and Soult did not attack them. Sir Charles Oman says that he thought that most of Wellington’s army had crossed the Garonne.[4] By 7 April the river had fallen, and the bridge had been repaired.

Wellington’s 49,000 men began the assault on Toulouse and its 42,000 defenders on 10 April. Hill’s corps was to demonstrate at St Cyprien to the west of the Garonne. On the other side of the river Sir Thomas Picton’s 3rd Division and Karl von Alten’s Light Division were to threaten the Toulouse. The main attack was to be made further north, against the Calvinet ridge, which looked down on the city.

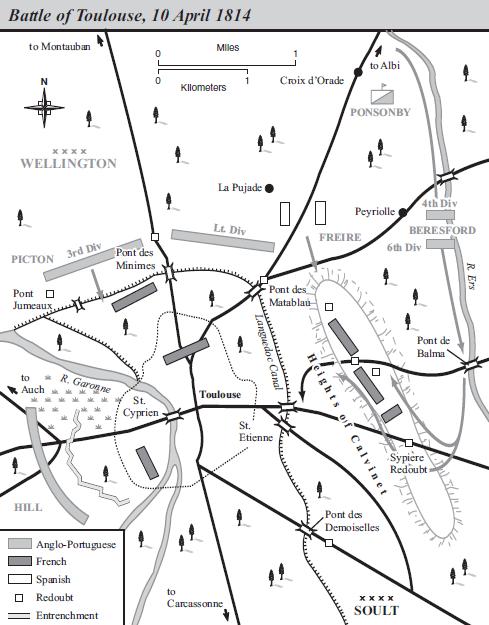
The Calvinet would be attacked from the north by two Spanish divisions under General Manuel Freire, supported by Portuguese artillery, and from the east by the 4th and 6th Division commanded by Beresford. Beresford’s troops had to march further in order to get into position, so Freire was ordered to wait until they were ready.

The attack did not go to plan. Hill’s demonstration was well executed, but failed to fool Soult, who moved troops from St Cyprien to the Calvinet. Picton pushed on too far, taking unnecessary casualties for no benefit. Freire launched his attack before Beresford was in position.

Wellington, seeing Freire’s move, sent orders to Beresford to attack the Calvinet immediately rather than waiting to get into the originally planned position, even though this meant that his troops would be attacking a strongly defended part of the ridge. Freire’s assault had been beaten back by the time that Beresford received this order, so he ignored it and continued with the original plan, which was to attack the ridge at a more weakly defended point.

Beresford’s troops advanced towards the ridge, beat off a French counter-attack, and took part of the ridge with relatively light casualties. Beresford waited until his artillery had been brought up before resuming the assault. His men took the rest of the ridge with help from a further attack by Freire. It was forced back, but helped Beresford by distracting a large number of French troops.

Soult still held Toulouse, but his positions were vulnerable to artillery fire from the Calvinet, and his supplies would last only a month. Wellington expected him to counter-attack on 11 April, but Soult, concerned that enemy cavalry was moving to cut him off, decided to retreat to Carcassonne.

Both side claimed to have won the Battle of Toulouse. Wellington took the city, but suffered more casualties: his army lost 655 killed, 16 missing and 3,887 wounded against French casualties of 322 killed, 541 missing and 2,373 wounded. Peter Snow writes that Wellington ‘described his rather dubious victory as a “very serious affair with the enemy in which we defeated them completely.”‘[5]

It was very unfortunate that the poor communications meant that such a bloody battle was fought after Napoleon’s abdication. On Soult 17 April he received formal notification of Napoleon’s abdication. He signed an armistice the same day, which required the French to evacuate fortresses in Spain, but not those in France. However, two further actions took place before these orders reached every garrison.

On 14 April General Pierre Thouvenot, the French garrison commander at Bayonne, ordered his troops to sally out against the enemy troops blockading the fortress, although he had been informally informed of Napoleon’s abdication by then. British casualties were 150 killed, 457 wounded, excluding men captured, and 236 captured: many of the prisoners were also wounded, amongst them Sir John Hope, the commander of the blockading force. The French lost 111 killed, 778 wounded and 16 missing.

The garrison of Barcelona sallied against their besiegers two days later, but in this case they were unaware of Napoleon’s abdication.

Thouvenot eventually surrendered on April 27 after receiving a copy of Soult’s armistice the day before.Oman argues that the sally would have achieved nothing even if the war was continuing, noting that Wellington called Thouvenot ‘a blackguard’.[6]

The Napoleonic War was now apparently over, but it was to resume a year later.


[1] R. Ashby, Napoleon against Great Odds: The Emperor and the Defenders of France, 1814 (Santa Barbara, CA: Praeger, 2010), p. 130.

[2] J. Weller, Wellington in the Peninsula 1808-1814 (London: Greenhill, 1992), p. 351.

[3] Troop numbers are from C. W. C. Oman, A History of the Peninsular War, 7 vols. (Oxford: Clarendon Press, 1902-30). vol. vii. pp. 456-57, 556-60.

[4] Ibid. vol. vii, p. 460.

[5] P. Snow, To War with Wellington: From the Peninsula to Waterloo (London: John Murray, 2010), p. 229.

[6] Oman, Peninsular. vol. vii, p. 508.

Advertisement

5 Comments

Filed under War History

The Battle of Orthez 27 February 1814

After the Allied victory at the Battles of the Nive on 9-12 December 1814 Wellington paused his offensive. He left the 18,000 British and Portuguese troops of the 1st and 5th Divisions and three independent brigades plus 16,000 Spaniards to besiege Bayonne under the command of Sir John Hope. This left him with a field army of 48,000 men. The French commander Marshal Nicolas Soult had 62,500 men, but 17,000 of them were at Bayonne and 3,500 more were garrisoning St Jean Pied-de-Port and Navarrenx, leaving him with a field army potentially 42,000 strong.[1]

The weather improved in early February, and Wellington began his offensive on 14 February. St Jean Pied-de-Port was invested by Spanish guerrillas. On 23 February the French fortress of Navarrenx, which was too strong to attack, was masked by Morillo’s Division, the only Spanish troops in Wellington’s field army

Also on 23 February Hope ferried part of his corps across the Adour. The next day, the Allies, supported by Royal Navy boats on the Adour, completed construction of a pontoon bridge across the river. Bayonne was now surrounded.

By 27 February Wellington’s army had crossed four defensible rivers and was facing Soult’s army across the River Gave de Pau at Orthez. Soult had about 36,000 men and 48 guns, with another division of 3,750 conscripts on the way to reinforce him.[2] They were drawn up along an L shaped ridge, which ran a mile north from Orthez at right angles to the Gave de Pau before heading 3 miles west parallel to the river. Three smaller ridges extended from the main ridge to the river. The village of St Boes was situated at the western end of the ridge.

Wellington had 43,000 men and 54 guns.[3] Early on 27 February five of his seven infantry divisions and most of his cavalry crossed the river. The 2nd and Le Cor’s Portuguese Divisions and some light cavalry under Sir Rowland Hill remained on the south bank at Orthez opposite the eastern end of the ridge.

Hill’s orders were to skirmish and demonstrate at Orthez. He was not to cross the river there, but could cross further east if the attack in the west succeeded. The main assault, commanded by Lord Beresford, would be made at 8:30 am by the 4th Division, supported by the 7th, on St Boes from the western end of the ridge. Its intention was to turn the French western flank.

The French centre would be pinned by an attack by the Sir Thomas Picton’s 3rd Division along the most easterly and the centre of the three smaller ridges, supported by the 6th Division.

The Light Division would take a ruined Roman Camp at the north end of the most westerly of the three lesser ridges, the only one that did not connect directly to the main ridge. Wellington would then direct operations from the Roman Camp.

The attempt to turn the French right flank at St Boes failed, whilst Picton was halted just out of enemy artillery range. The Light Division took the Roman Camp. Wellington now changed his plan. The 3rd and 6th Divisions would launch a full scale assault rather than a pinning attack in the centre, the 7th Division would replace the 4th in the west and the 1/52nd (Oxfordshire) Battalion of the Light Division would attack the flank of the French troops defending St Boes. Only two British and three Portuguese battalions of the Light Division were left in reserve: two other British battalions of that division were not on the battlefield.

The second attack started at 11:30 am. The co-ordinated assaults at St Boes and along the eastern and central less ridges all succeeded in breaking the French line, forcing Soult to order his army to retreat after two hours of fierce fighting. Hill took most of his corps two miles east to a ford across the river when he saw that the Allied attacks were succeeding.

Jac Weller notes that the French had usually managed to successfully retreat after their defeats in the Peninsular.[4] On this occasion they were helped by Wellington being wounded after a bullet hit the hilt of his sword, forcing it against his hip and thigh. He had more cavalry than Soult, which might have turned a victory into a rout had he been in a position to properly direct its pursuit, but Wellington’s wound meant that he could not keep up with the advance.

Soult lost just over 4,000 men, including 1,350 prisoners: 1,060 of those captured came from units that covered the retreat. Wellington suffered 2,164 casualties: only 48 were from Hill’s corps.[5]

Sir Charles Oman contends that this battle showed that

with fairly equal numbers in the field, passive defence is very helpless against an active offensive concentrated on certain limited points, unless the defender uses adequate reserves for counter-attacks.[6]

Wellington took ‘a considerable risk’ in his final assault, when he attacked five enemy divisions with five of his own, but he knew from past experience that Soult would not launch a counter-attack.[7]


[1] J. Weller, Wellington in the Peninsula 1808-1814 (London: Greenhill, 1992), pp. 342, 363.

[2] C. W. C. Oman, A History of the Peninsular War, 7 vols. (Oxford: Clarendon Press, 1902-30). vol. xii, p. 355.

[3] Ibid., p. 357.

[4] Weller, Peninsula, p. 349.

[5] Oman, Peninsular. vol. vii, pp. 372-73.

[6] Ibid., p. 374.

[7] Ibid., p. 375.

3 Comments

Filed under War History

The Battles of the Nive 9-12 December 1813.

Wellington’s army successfully crossed the River Nivelle on 10 November 1813. Marshal Nicolas Soult, the French commander, managed to retreat his troops to the River Nive, the next defensive line.

Heavy rains delayed Wellington’s advance until early December. He had 36,000 British, 23,000 Portuguese and 4,000 Spanish infantry in France: Soult had slightly more men. Another 40,000 Spaniards had been left behind because Wellington feared that they would take revenge for the atrocities and privations inflicted on Spain by the French over the previous six years.[1] This would cause the French civilian population to resist, guaranteeing the failure of Wellington’s invasion.

On 21 November Wellington told Lord Bathurst, the Secretary of State for War, that:

our success, and everything, depends upon our moderation and justice, and upon the good conduct of our troops. I despair of the Spaniards. They are in so miserable a state, that it is really hardly fair to expect that they will refrain from plundering a beautiful country, into which they enter as conquerors; particularly adverting to the miseries which their own country has suffered from its invaders. Without any pay and food, they must plunder, and if they plunder, they will ruin us all.[2]

Wellington also had problems with the Spanish government. Charles Esdaile notes that ‘it remained hard to discount the possibility of a complete rupture in relations.’[3]

Wellington’s army was in a position where it was safer to advance than to remain stationary. It was in a narrow salient with the coast to its west, the Nive to its east and the River Adour to its north. The two rivers met at the city of Bayonne.

Wellington’s plan was that part of his army, commanded by Sir Rowland Hill, would cross the Nive and advance on Bayonne. The rest of the army, under Sir John Hope, would remain on the west bank of the Nive and also advance north.

The French had destroyed the bridges across the Nive south of Bayonne. However, there were three bridges in Bayonne, allowing Soult to concentrate his army against either Hill or Hope in an attempt to defeat the enemy in detail.

Hill’s corps waded across the Nive at three fords near Cambo, meeting little resistance. Other Allied troops, commanded by Lord Beresford, crossed the Nive via a pontoon bridge further north. A bridge at Ustaritz was repaired, so the two corps could remain in contact with each other.

Hope advanced to Bayonne, expecting the French to remain in their fortifications. At about 9:00 am on 10 December, however, a French attack from Bayonne took him by surprise. There were two roads heading south from Bayonne between the Nive and the sea. One headed diagonally towards the sea and then south close to the coast. The other, to Ustariz, remained close to the Nive. Widespread woods and marshes meant that most of the fighting was near the roads.

The initial French attack along the coast road forced Hope’s pickets back three miles. Fierce fighting at a large farmhouse called the Chateau Barrouillet initially went badly for the Allies, who were outnumbered three to two. However, reinforcements arrived and stabilised the line. Both sides lost about 1,500 to 1,600 men killed, wounded and captured.

Meanwhile on the Ustariz road the Light Division was forced to retreat two miles to a strong defensive position at the Chateau and Church of Arcangues. As well as the two buildings, there was a hill with hedges and stone walls at its summit and marshy ravines at both ends. The Allies were able to hold off the enemy, inflicting over 400 casualties for the loss of 225 of their own men.

The French suffered slightly more casualties over the two actions, but they received a heavier blow in the evening. A German unit in French service, the Nassau Regiment, followed secret orders issued to its commander, General August von Kruse, by the Duke of Nassau after Napoleon’s defeat at Leipzig to defect to the Allies. Soult lost 1,400 men directly. He and Marshal Louis Gabriel Suchet, commanding French troops in north west Spain, decided that they must disband all their German units, totalling 3,000 men.[4]

Soult now switched his attention to Hill’s corps on the east bank of the Nive, which he attacked at St Pierre on 13 December. Rain had caused the Nive to rise, sweeping away the Allied pontoon bridge the day before.

The Allied troops were at first pushed back in a bloody battle. However, once Hill learnt that reinforcements were on their way across the now repaired pontoon bridge he launched a counter-attack. The French were forced back to Bayonne. They lost 3,300 men killed, wounded and captured against 1,775 Allied casualties.

Wellington was now able to put artillery on the south bank of the River Adour, stopping traffic along it to Bayonne. This made it impossible to supply both the population and Soult’s army. Consequently he withdrew most of his army from Bayonne on 14 December, although he left a garrison that did not surrender until 27 April, three weeks after Napoleon abdicated.

An unusual feature of these battles was that Wellington left the bulk of the fighting to Hope and Hill, rather than following his usual practice of being at the key point himself. Jac Weller argues that Wellington realised that he would have to appoint somebody to an independent command at some point. The importance of seniority in the British Army meant that it had to be Beresford, who had already commanded at Albuera, Hill or Hope. Weller suggests that ‘at the Nive and St Pierre Wellington tried out the other two as independent commanders without too much risk.’[5]


[1] Troop numbers are from J. Weller, Wellington in the Peninsula 1808-1814 (London: Greenhill, 1992), pp. 327-41.

[2] Quoted in Ibid. Footnote 1, p. 326.

[3] C. J. Esdaile, The Peninsular War: A New History (London: Allen Lane, 2002), p. 479.

[4] Ibid., p. 481.

[5] Weller, Peninsula, p. 338.

1 Comment

Filed under War History

The Battle of the Nivelle 10 November 1813

The Duke of Wellington’s Allied army of British, Spanish and Portuguese troops captured San Sebastian on 31 August 1813, and on 7 October invaded France by crossing the River Bidassoa.

The advance was then delayed, allowing the French, commanded by Marshal Nicolas Soult, to retreat to the River Nivelle. As Charles Esdaile says, ‘the reasons were political.’[1] The French had been cleared out of Iberia, apart from the blockaded and starving garrison of Pamplona, and some in Portugal and Spain were reluctant to participate in an invasion of France. There was also the risk that Napoleon would win his German campaign, allowing him to move huge number of reinforcements to the Franco-Spanish border.

Pamplona surrendered on 31 October, meaning that there was no justification for further delay. The political disputes were overcome, allowing Wellington to use his entire army offensively

The Nivelle itself was not a formidable obstacle, but it was overlooked by hills that had been fortified. Wellington decided to attack to the centre-left of the 20 mile long French position. An assault on the extreme French left was rejected because the mountain passes there were often blocked by snow in winter. The right flank, from the sea to the village of Ascain, was too strongly defended.

Wellington was aware that the French had a strong position, but believed that it could be taken. He told the senior officers of the Light Division that:

‘It appears difficult, but the enemy have not men to man the works and lines they occupy. They dare not concentrate a sufficient body to resist the attacks I shall make upon them. I can pour a greater force on certain points than they can concentrate to resist me.’[2]

Sir John Hope was ordered to demonstrate between the coast and Ascain with 23,000 men in order to tie down an equal number of French troops. The main attack would come between Ascain and the Mondarrain mountain, where the 26,000 men of Sir Rowland Hill’s corps and the 29,000 of Lord Beresford’s corps would be opposed by 40,000 Frenchmen.[3]

The key French position was a hill called the Lesser Rhune, separated from the Great Rhune, taken by the Allies just after they crossed the Bidassoa, by a ravine. The Light Division was selected to attack the Lesser Rhune. Success would expose the flanks of the French troops either side of it.Battle of the Nivelle 10 November 1813

There were three separate enclosed fieldworks along the crest of the Lesser Rhune, and it appeared to be almost impregnable against an assault across the ravine from the Great Rhune. However, Wellington worked out a route that enabled the Light Division to descend into the valley and manoeuvre into a position to attack the Lesser Rhune’s flank. The fieldworks would not then be able to support each other against the attackers, and could be taken one after the other.

The Light Division began its attack before dawn, and had taken the Lesser Rhune by 8 am. The rest of the Allied army then advanced. The French were forced to retreat in order to avoid having their flanks turned.

The French lost 4,500 men killed, wounded and captured, plus 59 guns, and the Allies 2,700 men.[4] The November day was short, and the onset of darkness probably saved the French from a disaster. Soult was able to establish a new line along the next river, the Nive.


[1] C. J. Esdaile, The Peninsular War: A New History (London: Allen Lane, 2002), p. 476.

[2] Quoted in J. Weller, Wellington in the Peninsula 1808-1814 (London: Greenhill, 1992), p. 320.

[3] Ibid.

[4] Ibid., p. 325.

2 Comments

Filed under War History

The Crossing of the Bidassoa 7 October 1813.

The capture of San Sebastian on 31 August 1813 left Pamplona as the only Spanish city in French hands. It was surrounded and was being slowly starved into submission.

On 7 October Wellington’s Allied Army of British, Spanish and Portuguese troops invaded France by crossing the River Bidassoa, which was overlooked by the crests of the Pyrenees on the French side. Marshal Nicolas Soult’s French army had tried unsuccessfully to cross the Bidassoa at Irun and Vera on 31 August in an attempt to relieve San Sebastian.

The 1st Division, another British brigade, a Portuguese brigade and two Spanish division forded the river at Irun. The Light Division and three Spanish divisions crossed at Vera, helped by a demonstration by the 6th Division. Unknown to the French, the Bidassoa could be forded near the mouth of the river at low tide. Spanish shrimpers who worked the area led the British 5th Division across three fords at daybreak.

The British divisions all contained Portuguese as well as British troops, except for the 1st Division, which had two British brigades and one of the King’s German Legion, comprised of German expatriates: many of them were from Hanover, whose Elector was also the British King. See Wikipedia for an order of battle.

The 5th Division was across the river before it was spotted by the French. The attack at Irun began when the morning fog lifted at 7:25 am. The 1st Division was half way across the river before it was fired upon. By 11:30 am the Allied objectives in this area had been taken, and Wellington ordered a halt.

Fighting was fiercer at Vera. The Light Division encountered the Star redoubt, but took it after probing for weak spots. It then reached the crest overlooking the river, which were defended by fresh troops, earthworks and artillery. The rapid attack took the crest in several places, and the other defenders retreated.

The Spanish were held up by a hill on the Allied right called the Rhune. However, the French evacuated it the next day in order to avoid being out flanked.

The Allies had crossed the river and quickly taken their objectives. Jac Weller gives Allied casualties as 400 dead and wounded at Irun and 800 at Vera. French casualties were 450 men and all their artillery and most of their baggage at Irun and 1,250 men at Vera.[1] Charles Esdaile says that Allied casualties totalled 1,600 men, half of them Spanish.[2]

Soult fell back to a new defensive line along the River Nivelle.


[1] J. Weller, Wellington in the Peninsula 1808-1814 (London: Greenhill, 1992), pp. 314-17.

[2] C. J. Esdaile, The Peninsular War: A New History (London: Allen Lane, 2002), p. 476.

5 Comments

Filed under War History

The Siege of San Sebastian 1813

Following Wellington’s victory at Vitoria his Allied army of British, Portuguese and Spanish troops began the siege of San Sebastian on 7 July 1813, with Sir Thomas Graham in command. The Allied army was in a position to assault the fortress by 22 July, but Graham delayed for three days, allowing the French commander, General Emmanuel Rey, to reinforce his defences; the attack failed.

Marshal Nicolas Soult had been put in command of the French army in the Pyrenees on 12 July. He rallied, reorganised  and reinforced the army that had been beaten at Vitoria, and launched a counter-attack. He forced the Allies to retreat after the battles of Maya and Roncesvalles on 25 July, but was defeated by Wellington in two battles at Sorauren on 28 and 30 July.

Wellington was therefore able to resume the siege of San Sebastian. Extra guns were unloaded from ships on 6 August. More arrived in three convoys between 19 and 23 August, along with 92 members of the newly formed Corps of Sappers and Miners. Previously Wellington’s only engineers had been officers, with the manual work being done by infantrymen. He now had specialist troops with which to conduct the siege.

The bombardment began on 26 August, employing the following guns:

6 x 18 pounders

24 x 24 pounders

4 x 68 pound carronades

9 x 8 inch howitzers

9 x 10 inch mortars with 6 more still to be landed

1 x 12 inch mortar

A further 15 x 24 pounders, 8 x 18 pounders and 4 x 10 inch mortars had been delivered, but they were on traversing platforms intended to be secured to a fortress. The recoil effect meant that guns being fired from temporary emplacements in a siege needed wheeled carriages. However, they had come with a supply of ammunition, and their barrels could be used to replace those of any that were damaged in the siege.[1]

A decoy attack was made on 29 August in an attempt to trick the garrison into prematurely detonating mines placed to defend the breach in the wall, but they were not fooled. The engineer officers stated on 30 August that the breach was practicable for an assault, but others feared that the wall had fallen in a manner that created many obstacles for an attacker.

Wellington decided to launch the attack at 11am on 31 August at low tide: the fortress was on the coast. The breach was, as many had thought, difficult, and the attackers struggled at first.

Graham, probably after consulting Colonel Alexander Dickson, his artillery commander, ordered the siege guns to fire in support of the attacking infantry. This was a very unusual tactic for the period, because of the risk of hitting the attackers, but it worked. The town was taken by 2pm, but the French still held the castle.

As had happened in Wellington’s previous successful sieges, Ciudad Rodrigo and Badajoz, British discipline held during the attack, but broke down afterwards. Soldiers went on drunken pillages of rape, theft and murder. The town caught fire. Some Spaniards accused Wellington of deliberately setting it alight, but Jac Weller claims that, if he had wanted to do so, he could have done so as part of the initial bombardment, resulting in fewer casualties to the attackers.[2]

Charles Esdaile notes that some, including Wellington, justified the sack on the grounds that the population of San Sebastian were pro-French and had fought for the defenders.[3] However, Esdaile goes on to argue that it was ‘a disgrace – a war crime, indeed. And in political terms, of course, it was a disaster.’[4]

See this blog for accounts of the sack of San Sebastian, some in English, some Spanish.

The castle surrendered on 8 September after an artillery bombardment. Casualties in the siege were 3,700 Allied and 2,500 French killed and wounded and 1,000 French captured.[5] Sir Richard Fletcher, Wellington’s engineer commander, was amongst the dead.

Wellington was not at San Sebastian on 31 August, as he had received intelligence that Soult was planning an attack to relieve the siege. Three French divisions attacked the same number of Spanish ones defending a ridge at San Marcial, overlooking the River Bidassoa.

The first two French attacks were beaten off. The third managed to get a foothold on the ridge, but the Spanish brought up another division and forced the French back. The Spanish proved to be the equal to the French in individual combat. Casualties were 2,500 French and 1,700 Spanish. Another French attempt to cross the Bidassoa, at Vera, was also defeated, with 1,300 French and 850 Allied casualties.

Any French threat to Spain was now ended. Pamplona was still in French hands, but was starved into submission by 30 October.

Much of this account is based on Frederick Myatt’s British Sieges of the Peninsular War, which itself relies heavily on the letters of Lieutenant-Colonel Augustus Frazer of the Royal Artillery.[6] They are available online at archive.org.


[1] F. Myatt, British Sieges of the Peninsular War (Tunbridge Wells: Spellmount, 1987), pp. 168-69.

[2] J. Weller, Wellington in the Peninsula 1808-1814 (London: Greenhill, 1992), p. 307.

[3] C. J. Esdaile, The Peninsular War: A New History (London: Allen Lane, 2002), p. 469.

[4] Ibid., p. 470.

[5] Weller, Peninsula, pp. 307-11.

[6] Myatt, British Sieges, pp. 167-90.


[1] F. Myatt, British Sieges of the Peninsular War (Tunbridge Wells: Spellmount, 1987), pp. 168-69.

[2] J. Weller, Wellington in the Peninsula 1808-1814 (London: Greenhill, 1992), p. 307.

[3] C. J. Esdaile, The Peninsular War: A New History (London: Allen Lane, 2002), p. 469.

[4] Ibid., p. 470.

[5] Weller, Peninsula, pp. 307-11.

5 Comments

Filed under War History

The Battle of Sorauren, 28-30 July.

On 25 July 1813 French troops commanded by Marshal Nicolas Soult attacked the Allies at Maya and Roncesvalles with the intention of relieving the siege of San Sebastian and the blockade of Pamplona. The Allies, contrary to Wellington’s orders, gave ground.

Wellington, accompanied by only his ADC, Fitzroy Somerset, rode towards the Allied army on 27 July. They reached the village of Sorauren, 10 miles from Pamplona, just ahead of the advancing French. The Allied army was drawn up along a ridge to the southeast, latter called Cole’s ridge after General Sir Lowry Cole. Wellington joined it to the cheers of the troops.

The French took up position along a ridge to the north of the one occupied by the Allied army, later called Clausel’s ridge after General Bertrand Clausel.  They were not ready to attack that day. A thunderstorm in the afternoon boosted Allied morale because there had been one before the battle of Salamanca. It delayed the arrival of reinforcements to both sides.

On 28 July Soult’s 30,000 men attacked Wellington’s 24,000 across the valley between the two ridges. Fighting was fierce, but the French assaults were beaten off. Allied casualties were 1,358 British, 1,102 Portuguese and 192 Spaniards dead or wounded. Around 4,000 French troops were killed or wounded.[1]

Soult’s offensive had failed, and his army was now in a position where it could not be supplied. His obvious course of action was to retreat the way that he had come. However, he was informed that the three divisions of General Jean-Baptiste Drouet, Count D’Erlon, which had missed the battle, were now to his right and rear. Soult decided to join Drouet in an attempt to cut Wellington off from San Sebastian.

Soult’s attempt to disengage on the night of 29-30 July could have succeeded only if it was conducted in complete secrecy, but Allied pickets heard the sound of troops moving in the early hours of 30 July. At daybreak French troops could be seen withdrawing, and were bombarded by the Allied artillery.

Wellington then launched a series of co-ordinated attacks. The Allies were out-numbered, but French morale was very low and they were routed. The battle was over by noon.

Soult was able to withdraw the survivors of his army to France without another major battle, but his nine day offensive cost him 13,500 casualties out of 60,000. The Allies lost 7,100 out of 40,000 men actually engaged in combat.[2]

Charles Esdaile notes that it is hard to see what Soult hoped his offensive would achieve. He could not have resupplied Pamplona even if he reached it, and it would have been difficult to keep his attacking force supplied.[3]


[1] J. Weller, Wellington in the Peninsula 1808-1814, (London: Greenhill, 1992), p. 296.

[2] Ibid., p. 300.

[3] C. J. Esdaile, The Peninsular War: A New History (London: Allen Lane, 2002), p. 460.

5 Comments

Filed under War History

The Siege of Burgos and Wellington’s Retreat, 1812.

This post leads on from previous ones on the Battles of Salamanca and Garcia Hernandez.

Wellington was faced with a dilemma after his army liberated Madrid. Politically he could not fall back to Salamanca, but he faced the risk of being counter-attacked by a larger French forces from more than one direction.

The French had withdrawn their garrisons to Burgos and Valencia. According to Charles Esdaile they could field at least 100,000 men against the 60,000 of Wellington’s Anglo-Portuguese army, which might be increased to 70,000 by the addition of Spanish regulars. The guerrillas were good at harassing the enemy, but they could not resist a French counter-offensive.[1]

In late August General Bertrand Clausel advanced on Valladolid, north of Madrid, intending to relieve the isolated French garrisons of Astorga, Toro and Zamora. Wellington, seeing a chance to defeat part of the French army before it concentrated against him, moved north with 21,000 men.

Wellington had taken what Esdaile describes as ‘a serious risk’[2] by moving with such a small force, but it was politically impossible for him to take more troops from Madrid. He hoped to receive support from General Fransisco Castaños’s Spanish 6th Army, which had just taken Astorgas.

In the event, the Spanish, who were short of supplies and artillery, moved slowly, and Clausel was able to retreat, taking the garrisons of Toro and Zamora with him.

Esdaile argues that Wellington should then have gone back to Madrid. He faced two French armies, and have could looked for an opportunity to win a major victory by concentrating against one of them.[3] Instead, he decided to advance on Burgos.

Click here for a link to map of Burgos in 1812.

The city was being pillaged by guerrillas, but a well supplied French garrison of veterans occupied a strong position in Burgos Castle. Esdaile compares General Jean-Louis Dubreton, its commander, to General Armand Phillipon, who had successfully defended Badajoz in 1811 and inflicted heavy casualties on the attackers before being forced to surrender the city in April 1812.[4]

Burgos had nine heavy guns, 11 field guns and six howitzers. The garrison of 2,000 men had no permanent shelter. Frederick Myatt argues that the fortress could resist guerrillas or an army without siege guns but not an army well equipped with a siege train and engineers. [5]

However, Wellington had only three 18 pounder guns, five 24 pounder howitzers, five engineer officers, eight Royal Military Artificers, 10 assistant engineers and 81 tradesmen. His army was short of tools, although it found some French ones in the town.

Burgos was invested by the British 1st and 6th Divisions and two Portuguese brigades on 19 September. The 5th and 7th Divisions were positioned to the north-east to guard against a French attempt to lift the siege.

Wellington’s shortage of artillery meant that he had to concentrate on digging and mining, with his guns being used mainly to support assaults. An outer works, the Hornwork, was captured on the first evening of the siege, but at the cost of heavy casualties; 421 Allied compared with 198 French dead, wounded and captured according to Jac Weller.[6] Seven French field guns were taken as well as 60 prisoners.[7]

An attack on the castle’s outer wall on 22 September failed, and Wellington then concentrated on mining. The miners had to operate under fire from the castle, with little support from their own guns, and it often rained.

By 29 September the miners believed that they had reached the scarp wall and a mine was detonated that evening. The subsequent attack failed after troops became lost and failed to find the breach. In the morning it was revealed that it was not a good one, and that the French were working at shoring up their defences. The mine had been detonated too far forward, as the foundations that the miners had met were ancient ones rather than the those of the wall.

The failure damaged Allied morale; Myatt points out that the French had:

‘the reasonable hope that relief would arrive. The British…[were] feeling (perhaps rightly) that they were attempting a hopeless task with quite inadequate support’[8]

The British worked on a second mine. They also set up a battery 60 yards from the outer wall, which was ready by 1 October. The French moved their guns to deal with this new threat and destroyed the battery the same day. The damaged guns were withdrawn and a new position prepared that night. The French artillery destroyed it before the guns could be moved into it.

It was intended to detonate the second mine on 3 October, but problems with the rocky ground meant that it was not ready until the next day. British guns made a breach 60 feet wide in the wall, which was extended to 100 feet when the mine detonated. The British attack succeeded in taking the breach with relatively light casualties.

Preparations now began for an assault on the second wall, but these were hampered by French sorties and poor weather. The attack was planned for 17 October, but Wellington delayed it for a day as he thought that the breach made in the second wall was inadequate. A third mine was detonated  underneath the church of San Roman.

The French beat off the attack on 18 October. Wellington had, according to Jac Weller, 24,000 Anglo-Portuguese troops and 10,000 Spaniards around Burgos. He was now faced with 53,000 French soldiers commanded by General Joseph Souham, who had replaced Clausel. Another French army was advancing on Madrid from Valencia.

Wellington therefore called off the siege and withdrew on the night of 21 October. The French suffered 623 dead, wounded and captured during the siege, but inflicted 2,059 casualties on the besiegers.[9]

Wellington’s rearguard fought an action against French cavalry at Venta del Pozo on 23 October. He initially hoped to make a stand along the River Carrión forty miles to the north-east of Valladolid and to join up with General Sir Rowland Hill’s corps from Madrid.

A series of engagements took place between 25 and 29 October, known collectively as the Battle of Tordesillas. The French captured the bridge over the Carrión at Palencia on 25 October and the bridge over the Duero at Tordesillas on 29 October. Wellington was therefore forced to retreat and ordered Hill to do the same

Hill had been preparing to fight a battle against the advancing French, commanded by Marshal Nicholas Soult. Instead, his rearguard fought an action against the French at Aranjuez on 30 October and he abandoned Madrid the next day. Wellington and Hill combined near Salamanca on 8 November and took up a strong defensive position. The French arrived six days later.

Soult moved to the west to threaten Wellington’s communications with Ciudad Rodrigo. Marshal Auguste Marmont had tried a similar manoeuvre in June and had been defeated after being caught on the march. Soult avoided this by staying further away from Wellington.

This left Wellington with the options of attacking a force that outnumbered him 95,000 to 70,000 or retreating. He chose to retire to Ciudad Rodrigo; it started to rain heavily just after the withdrawal began.

Esdaile says that ‘the French pursuit was none too vigorous.’[10] However, the Allies still lost 6,000 killed, wounded and missing. They included Sir Edward Paget, Wellington’s newly arrived second-in-command, who was captured on 17 November. Discipline and morale broke down as the troops retreated in bad weather, echoing the retreat to Coruña in 1809.

Wellington had lost much of the ground that he had won earlier in the year. However, the Allies still held the fortresses of Ciudad Rodrigo and Badajoz, known as the keys to Spain. An army invading Spain from Portugal had to hold these, so Wellington had a better starting point for his 1813 offensive than he had possessed in 1812.


[1] C. J. Esdaile, The Peninsular War: A New History (London: Allen Lane, 2002), p. 409.

[2] Ibid., p. 410.

[3] Ibid., p. 411.

[4] Ibid.

[5] F. Myatt, British Sieges of the Peninsular War (Tunbridge Wells: Spellmount, 1987), p. 134.

[6] J. Weller, Wellington in the Peninsula 1808-1814, New ed. (London: Greenhill, 1992), p. 236.

[7] Myatt, British Sieges, pp. 136-37.

[8] Ibid., p. 142.

[9] Weller, Peninsula, pp. 237-38.

[10] Esdaile, Peninsular War, p. 418.

2 Comments

Filed under War History

Allied Liberation of Madrid, 12 August 1812.

As described in this post, on 22 July 1812 Wellington‘s Anglo-Portuguese army defeated the French at the battle of Salamanca. On 6 August Wellington moved towards Madrid with about 60,000 men.The French and their Spanish allies had 210,000 troops in Spain, but many of these were spread around the country in garrisons. Others were in Andalusia in the south under the command of Marshal Nicolas Soult

King Joseph Bonaparte and Marshal Jean Jourdan had only 22,000 men with which to oppose Wellington. On 10 August Joseph and his royal household left Madrid for Valencia, accompanied by 15,000 civilians in a convoy of 2,000 wagons. Only a small garrison was left behind.

The poor communications between Andalusia and Madrid meant Soult did not learn of the French defeat at Salamanca until 12 August. He was forced to withdraw. He ended his siege of Cadiz on 25 August and evacuated Seville two days later, apart from a small rearguard that was quickly defeated by an Anglo-Spanish force. Soult joined with other French forces from Extremadura at Cordoba and withdrew to Granada. On 16 September he retreated to Valencia.

Wellington’s army entered Madrid on 12 August 1812 to the cheers of the population. The French had lost half the territory that they had gained in Spain since 1808 in eight months.

The Spanish could theoretically put 100,000 troops in the field, and more could be raised from the liberated territories. The British hoped for a general Spanish mobilisation against the French, but this did not happen. Charles Esdaile says that the British attributed this to ‘Spanish laziness and incompetence’[1] but argues that this view ignored the true situation in Spain and the ineffectiveness of the government.

The 1811 harvest was disastrous, and the countryside had been pillaged by a series of armies. The crowds that cheered Wellington’s armies wanted bread rather than a chance to fight the French.

Police controls imposed by the French were little relaxed. Feudalism was theoretically abolished, but landowners simply replaced feudal levies with rents. Some guerillas preferred banditry to pursuing the French or joining the regular army. There was consequently anarchy in much of the country.

The country was also in a dire financial state. The French invasion and troubles in the Spanish American colonies reduced revenue from 407.7 million reales in 1810 to 210.6 million in 1811 and 138 million in 1812. Esdaile argues that Spain was bankrupt unless it could stabilise the situation in its American colonies. Only British subsidies allowed it to continue the war.[2]

Despite the liberation of the capital of Spain and half the country, the Peninsular War was a long way from being over.


[1] C. J. Esdaile, The Peninsular War: A New History (London: Allen Lane, 2002), p. 403.

[2] Ibid., pp. 406-7.

1 Comment

Filed under Political History, War History

The Battle of Salamanca, 1812

Wellington‘s Anglo-Portuguese army captured the French held fortress of Badajoz in April 1812 and then moved north to deal with the threat offered by Marshal Auguste Marmont‘s French army to Ciudad Rodrigo, which Wellington had taken in January. Ciudad Rodrigo and Badajoz  covered the northern and southern routes respectively from Portugal to Spain. An army invading Spain from Portugal had to hold both in order to protect its lines of communication back to Portugal.

River Tagus from the repaired stone bridge towards the position of the French wooden pontoon bridge.

On 12 May 1812 three brigades under General Sir Rowland Hill attacked and destroyed the wooden pontoon bridge that the French had built across the River Tagus at Almaraz. It replaced a stone bridge that had been destroyed during the Talavera campaign in 1809. The loss of the Almaraz bridge greatly lengthened the lines of communication between Marmont’s army in northern Spain and Marshal Nicolas Soult‘s force in the south.

The French had significantly more troops than Wellington in Spain.  According to Jac Weller, he had just over 60,000 men whilst there were over 230,000 French soldiers in Spain. However, the French forces were divided into five armies; Marmont  had 52,000 troops and Soult 54,000.[1]

Wellington had sole command and his superior supply and intelligence systems, British control of the seas and the Spanish guerrillas meant that he could manoeuvre against  either Marmont or Soult. The latter could more easily evade and join up with other French forces, such as the 60,000 men under Marshal Louis Suchet that had just taken Valencia.

Charles Esdaile notes that the defeat of Soult would result in the liberation of Andalusia, but that this would have no impact on the north. Defeat of Marmont in the north would force the French to withdraw from Andalusia.[2]

Wellington therefore determined to attack Marmont. He did not have control over Spanish troops at this stage,, but his prestige gave him enough influence to persuade the Spanish to undertake operations aimed at tying down the rest of the French forces in Spain.

An Anglo-Portuguese division under Hill was sent south to help General Ballesteros’s army in the south. The threat of invasion of from Naples by from Lord William Bentinck’s British, Neapolitan and Spanish force kept French troops in Catalonia.

Wellington advanced  on Salamanca on 13 June with 48,000 men and 54 guns. Marmont withdrew behind the River Duero, leaving behind a small force, based in three fortified convents. Wellington entered the city on 17 June but took 10 days to subdue the garrison.

Wellington then advanced on the Duero, hoping that Marmont would attack him, and waiting for the Spanish 6th Army to arrive in the French rear.  The 6th did not appear, as its siege of Astorga took longer than expected.

Marmont had only 44,000 men, but Wellington’s inaction convinced him that he could afford the take the initiative despite being slightly outnumbered.  He crossed the Duero on 15 July and forced Wellington back towards Salamanca by trying to outflank him and thus threaten his lines of communication.

Map of the Battle of Salamanca, 22 July 1812. Source: http://en.wikipedia.org/wiki/File:Battle_of_Salamanca_map.jpg

On 22 July the Anglo-Portuguese army was positioned along a line of low hills, the southern end of which was a hill called the Lesser Arapile. Marmont seized the Greater Arapile, a larger hill a few hundred yards to its south, and attempted to move round Wellington’s left flank. Wellington saw what was happening and re-positioned his army to avoid this.

Marmont now made a mistake. He was convinced that Wellington was too cautious and mistook these movements for a preparation to retreat. Marmont therefore ordered his army to move westwards. Wellington, who had been considering an attack, observed the French becoming strung out threw away a chicken leg that he had been eating and ordered an attack, announcing ‘By God that will do.’[3]

Thomières’s division, leading the French advance, was attacked by Pakenham’s Third Division, which appeared over the crest of a ridge. The French fell back with heavy losses, and Pakenham then advanced on the next French division, that of Maucune. It had formed itself into squares because of the threat from a British cavalry brigade under General John Le Marchant, but had then been attacked by the infantry of  Leith’s Fifth Division, Well disciplined infantry in square were secure against cavalry but had no chance in a firefight with infantry in line.

The Lesser Arapile from the Greater Arapile.

Le Marchant’s cavalry charged into Maucune’s troops as they retreated, and then attacked the third French division, commanded by Taupin. It was also routed. Three out of eight French divisions had now been destroyed.

Thomières and Le Marchant were amongst the dead, whilst Marmont and his second-in-command, General Bonnet, had both been wounded. There is some doubt over the timing of Marmont’s wound; he claimed that it was before Wellington counter-attacked, preventing him responding, whilst his enemies said that it was later.

An attack by Cole’s Fourth Division and Pack’s Portuguese Brigade on the Greater Arapile was repulsed. General Bertrand Clausel, now commanding the French army, thought that this came him an opportunity to counter-attack. Wellington saw the danger and had plenty of reserves, which he moved into position to cover the danger.

Esdaile says that the battle is ‘Known, and for good reason, as “Wellington’s Masterpiece”.’[4] He surprised Thomières and then destroyed Maucune and Brennier’s divisions with an attack in echelon. Wellington was able to mas superior numbers at the decisive point.

Weller argues that Clausel’s counter-attack in ‘conception was brilliant; it was flawlessly executed. Against any other contemporary commanders, excepting only Napoleon and Wellington, Clausel would probably have succeeded in making it a drawn battle.’[5]

The French casualties were 12,000, compared with 5,000 for the Anglo-Portuguese. the French also lost 12 guns and two eagles. Their losses might have been higher had the pursuit been more vigorous, but the pursuers lost cohesion in the night and were exhausted after days of marching and a battle on a very hot day. Some, including Weller, blame the Spanish General de España  for not garrisoning the bridge at Alba de Tormes, but Esdaile says that this had little effect.[6]

Casualties amongst senior officers were high in this battle. The deaths of Thomières and Le Marchant and the wounds suffered by Marmont and Bonnet have already been mentioned. On the French side, General Ferrey was also killed and Clausel was wounded, meaning that the three most senior French officers were wounded. The British General Lord William Beresford was badly wounded and Wellington was badly bruised by a bullet that struck his saddle holster.

The loss of Le Marchant was a particular blow to the British. He had improved the training and tactics of the British cavalry, which was prone to getting out of control when charging. The only British cavalry general of comparable skill was Henry Paget, then Lord Uxbridge and later Lord Anglesey; he had eloped with Wellington’s brother’s wife and the two consequently did not serve together until Waterloo in 1815.

The map in this post is from Wikipedia; link given in the caption. The two photos were taken by myself when I visited the battlefields of Wellington’s campaigns of 1809-12 in a tour led by Ian Fletcher. I have no connection with Ian Fletcher Battlefield Tours except as a satisfied and repeat customer.


[1] J. Weller, Wellington in the Peninsula 1808-1814, New ed. (London: Greenhill, 1992), p. 207.

[2] C. J. Esdaile, The Peninsular War: A New History (London: Allen Lane, 2002), p. 390.

[3] Quoted in Ibid., p. 395.

[4] Ibid., p. 397.

[5] Weller, Peninsula, p. 223.

[6] Esdaile, Peninsular War, p. 397; Weller, Peninsula, p. 225.

4 Comments

Filed under War History