Category Archives: War History

SMS Seeadler: A First World War Sailing Warship

https://www.thetimes.co.uk/article/wreck-sheds-light-on-the-downfall-of-one-of-the-last-sail-raiders-0mppjwbw0?shareToken=87b75d3ec84295b899a2ccce31ce0225

The wreck of the German First World War commerce raider Seeadler was recently discovered strewn across the Mopelia atoll, almost 300 miles west of Tahiti in French Polynesia. The link below from The Times above includes pictures of the wreck

SMS Seeadler was one of the last sail powered warships. She was built in Glasgow as the merchantmen Pass of Belhama and was US owned and registered by August 1915, when she was captured by the U-boat U36. She was flying British colours at the time of her capture as a British cruiser had stopped her on suspicion of carrying contrabrand and put aboard a prize crew to take her to a British port.

U36 was later sunk by the British Q-ship Prince Charles, making her the first U-boat to be sunk by a Q-ship, an apparently innocuous merchant ship that carried a concealed armament.

The Germans also gave merchant ships hidden weapons, in their case to act as commerce raiders. Pass of Belhama was chosen to be one such ship. She was renamed SMS Seeadler and given a concealed armament of two 105mm guns, two machines guns and two torpedo tubes.

She was also fitted with accommodation for prisoners, including a library of English and French books, an auxiliary engine that meant that she was not dependent solely on the wind for propulsion, oil tanks holding 40 tons of oil and large fresh water tanks.[1]

Kapitänleutnant Felix Graf von Luckner was appointed her captain. He had refused to follow his father into the cavalry and served on a number of sailing merchant ships before joining the German navy. One of them was Norwegian and he spoke fluent Norwegian.[2]

Seeadler was disguised as the Norwegian ship Irma. Her deck machinery, thermometers, barometers and compasses bore the names of Norwegian companies. Her crew included  another 23 Norwegian speakers. They were given cover stories that included love letters in Norwegian and family photos stamped with the names of Norwegian photographers. They were required them to become experts on their alleged home towns by reading about them in Bäedeker’s tourist guide.[3]

Seeadler sailed on 21 December 1916 and on Christmas Day she was stopped between by a British armed merchant cruiser between the Faeroes and Iceland. All of the crew except the Norwegian speakers stayed below, heavily armed. The boarding officers were satisfied that the Seeadler was the Norwegian Irma but their boat had problems getting clear and they almost saw the screw of the auxiliary engine, which was not mentioned in her papers. Von Luckner, however, avoided this be distracting them with a rope.[4]

Seeadler’s sails gave her a wide radius of action. She headed into the Atlantic and captured two steamers off the Azores before heading to the South Atlantic, where her mission was to attack the sailing trade.[5]

On 28 July 1917, Seeadler anchored outside the narrow entrance to a lagoon at the uninhabited island of Mopeha. The crew were showing signs of scurvy and plenty of coconuts and turtles were available there. The crew camped ashore. On 2 August a sea storm started suddenly, wrecking Seeadler.[6]

According to The Times, von Luckner blamed this on a tsunami but Seeadler’s logbook and the position of her anchor and other parts of the ship show that she had been poorly anchored when the crew went ashore.

Two boats, provisions, firearms and enough canvas and spars to construct shelters for the crew were saved. Von Luckner then set off with three officers and two seaman with the intention of capturing a schooner and returning for the rest of his crew.

Von Luckner managed to persuade the British Chief Resident on Atiu in the Cook Islands that he and his men were Dutch Americans and obtained fresh fruit and provisions. They then sailed westwards. At their next stop, Aituaki, the inhabitants saw through them, but were unarmed so the Germans continued to Wakaya, where they were arrested by the police.[7]

Von Luckner was first imprisoned at Suva, then transferred to New Zealand, where he was held with interned Germans from Samoa on the island of Motuihi. He led an escape, initially using the commandant’s launch before capturing a schooner and reaching the Kermadec Islands, where they were recaptured by the cable steamer Iris. He was then held more securely but continued to plot escape attempts.[8]

The remainder of the crew, led by Leutnant Kling,  managed to capture a small French schooner, which they sailed to Easter Island. They were captured by a Chilean cruiser and interned as belligerents who had taken refuge in neutral territory.[9]

Seeadler  captured or sank three British and one French steamers with an aggregate tonnage of 12,000 tons gross and 12 sailing ships, four of them British, with a tonnage totalling just under 18,000 tons. This includes the schooner captured by Kling and his men. The British official history of the trade war at sea says that this ‘was a creditable record for a ship of her class but had little significance in relation to the volume of Allied trade.’[10]

According to The Times, Seeadler was responsible for the death of only one enemy sailor, a 16 year old member of the crew of the French barque Horngarth, who was accidentally struck by a warning shot.= fired by Seeadler,

There was also only one death amongst Seeadler’s crew: a dachshund called Schnäutchen who apparently had a heart attack after meeting a hermit crab. Schnäutchen probably combined the roles of ship’s mascot and rodent controller.

Bibliography

Bridgland, Tony. Sea Killers in Disguise. Barnsley: Leo Cooper, 1999.

Fayle, G. Ernest. Seaborne Trade. London: HMSO, 1920.

Newbolt, Henry. Naval Operations. Vol. iv. v vols. London: HMSO, 1928.


[1] Henry Newbolt. Naval Operations. Vol. iv. v vols. London: HMSO, 1928, p.195.

 [2] Tony Bridgland. Sea Killers in Disguise. Barnsley: Leo Cooper, 1999, pp. 246-47.

[3] Newbolt, p. 196.

[4] Newbolt. p 204.

[5] G. Ernest Fayle. Seaborne Trade. London: HMSO, 1920, p. 29.

[6] Newbolt, p. 204.

[7]  Newbolt, p. 204.

[8] Newbolt, p. 204-5.

[9] Newbolt, p. 205.

[10] Fayle, p. 144.

Advertisement

1 Comment

Filed under War History

WWII GI’s Letter Home Delivered in 2021

On December 6 1945, Sergeant John Gonsalves, a US soldier stationed at Bad Orb in occupied Germany, posted a letter to his mother. In it, he asked her to stop sending him packages, as he expected to be home in January or February. He complained about the ‘lousy weather’ and inquired about his pals and Jim.

A typical letter home by a soldier then, but what makes it remarkable is that it was found undelivered in a US Postal Service distribution facility in Pittsburgh in December 2021. John’s mother is dead and he died in 2015 but USPS employees managed to trace his widow, Angelina, who is still alive, and delivered the letter to her home in Woburn, MA on 9 December 2021. They married in 1953 and had five sons.

“I love it. I love it. When I think it’s all his words, I can’t believe it. It’s wonderful. And I feel like I have him here with me, you know?” Angelina told CBS Boston, adding that she had ‘a funny feeling, he was around us at Christmas time. One of his favorite times of the year.’

She also told Boston 25 News that ‘It’s like he came back to me, you know? Really. That was amazing. He was a good man. He really was. Everybody loved him.’

See also The Times.

https://www.thetimes.co.uk/article/soldiers-letter-from-germany-finally-arrives-76-years-late-0sqfpq2mz?shareToken=e1a95a78e1761b38bf7bc10b4c209b7d

Leave a comment

Filed under Uncategorized, War History

DNA analysis helps America identify its unknown soldiers | The Times

https://www.thetimes.co.uk/article/dna-analysis-helps-america-identify-its-unknown-soldiers-q5pcs8vhn?shareToken=ff2a6e1d3c513897dc7ea94b8d07ca5b

Leave a comment

Filed under War History

Falklands Flagship to be Scrapped

The Indian aircraft carier INS Viraat, previously HMS Hermes, made her last journey to the breakers yard at Alang, India in September 2020 and is now being scrapped: see this video report from the British ITV network.

She was laid down during World War II as HMS Elephant and was a Centaur class light fleet carrier. Only four of the intended eight ships of this class had been laid down by the end of the war and the other four, one of which was to be named Hermes, were cancelled.

The previous HMS Hermes, sunk by the Japanese in 1942, was the first ship in the world to be designed as an aircraft carrier, although the Japanese Hosho was launched and completed first.

The Royal Navy had more carriers than it needed, or could afford, at the end of World War II, so Hermes and her three remaining sisters were not completed for some time. She was launched in 1953 in order to clear the slipway, but was not completed until 1959. This was to a modified design that included an angled flight deck and steam catapults, enabling her to operate the latest jet aircraft.

By the late 60s, she carried an air group of 12 Sea Vixen jets (interceptor), seven Buccaneer jets (strike), five turboprop Gannets (four Airborne Early Warning [AEW] and one Carrier on board Delivery) and six Wessex helicopters (five anti-submarine [ASW] and one air-sea rescue and utility). The Sea Vixens and Buccaneers were subsonic and the RN hoped to equip Hermes with its first supersonic aircraft, the F4 Phantom. However, trials proved that she was too small to effectively operates F4s.

in 1966, it was decided that the RN should no longer operate fixed wing aircraft. A proposal to sell Hermes to Australia fell through and she was converted from 1971-73 into a Commando Carrier. Her catapults were removed and she was modified to carry landing craft and 800 troops. Her airwing was now about 20 Sea King helicopters. In 1976, the threat from Soviet submarines led to her becoming an anti-submarine helicopter carrier.

In 1980-81, she was refitted with a ski jump in order to operate Sea Harrier V-STOL fighters after it was decided plan that the RN should operate fixed wing aircraft. The ski jump enables a V-STOL aircraft to take off with a greater payload than if it made a vertical take off.

Her normal air group was then five Sea Harriers and 12 Sea King ASW helicopters. However, during the Falklands War, she carried 16 Sea Harrier interceptors, 10 RAF ground attack Harriers, five ASW Sea Kings and five commando assault Sea Kings.

It is difficult to see how the British could have retaken the Falklands without the fighter cover provided by the Harriers on board Hermes and HMS Invincible. The RN has now returned to the operation of large carriers, with HMS Queen Elizabeth and Prince of Wales now in service.

HMS Hermes remained in service with the RN until 1986, when she was sold to India. She was commissioned into the Indian navy as INS Viraat in 1987 and served until 2016, 57 years after she was completed and 63 since she was laid down. Plans to convert into a museum and hotel proved to be uneconomic.

3 Comments

Filed under War History

The Days of August, 1945

This detailed analysis of why President Truman decided to drop the atom bomb on Hiroshima 75 years ago was sent to me by Allen Gray, author of the excellent blog Wayne’s Journal, about his uncle’s experiences as a USAAF B-25 gunner/armorer in the South Pacific in World War II. The author prefers to remain anonymous but the copyright is his, not mine.

I agree with the analysis of Truman’s decision to drop the A-bomb and think that he was correct to use it. However, I admit that I am biased for the reasons given in the next two paragraphs.

My father was part of a beach clearance unit in the first wave of Operation Zipper, the British amphibious landing in Malaya that was planned for 9 September and is mentioned below.  It went ahead without opposition after the Japanese surrender as it was the quickest way to get British Commonwealth troops into Malaya.

Like many veterans, he said little about his service but he did say that he saw only one Japanese sentry, who was ‘as frightened as’ he was. He also said that the colonel told the unit afterwards that that the War Office estimate of their casualty rate if the operation had gone ahead was 90%. We once on holiday met a former Royal Marine whose unit had been in the second wave and had an estimated casualty rate of 50%.

See the Codenames website and Wikipedia for more on Operation Zipper.

Martin Gibson

Everything from here onwards was written by Allen’s correspondent.

The Days of August, 1945

The following, The Days of August, 1945”, was written by a Seattle attorney.  He is a dedicated, if amateur, student of the history of the Atomic Bombings and the life of Harry Truman, and who a few years ago appeared as Truman in a play about the subject, “The Realm of Whispering Ghosts: If Truman Met Einstein.”

The Days of August, 1945

Seventy-five years ago later this morning, August 6 Japan time, the center of the city of Hiroshima was obliterated by the first nuclear bomb.  Two days later the Soviet Union entered the war against Japan.  The day after that, much of Nagasaki suffered the same fate as Hiroshima.  Six days after that, the Japanese people heard the unfamiliar “Voice of the Crane” announce Japan’s surrender.  World War Two had come to a sudden end.  The formal surrender to the allied powers would occur early the following month, on the deck of the battleship Missouri anchored in Tokyo Bay.

As a matter of cause-and-effect, it seems clear that, at the very least, this combination of events in early August precipitated a crisis within the Japanese government that produced a capitulation that was not imminent at the beginning of that month.

A Soviet attack in isolation would have been viewed as a diplomatic setback – some within the Japanese government had been hoping the Soviets would serve as an intermediary to negotiate a peace allowing Japan to retain a portion of its Empire and military might.  But the Soviets months before had already served notice that the Soviets were formally withdrawing from the Japanese-Soviet Friendship Treaty of 1941, and the Japanese military recognized that this action had begun the countdown for a Soviet entry into the war.  The attacks on Japanese holdings in Manchuria and Korea did not come as a surprise to them.  Standing alone, the Soviet entry into the war on August 8 would not have triggered Japan’s surrender seven days later.  It took the shock of America’s employment of the “most cruel bomb” – as the Emperor would describe it in his August 15 broadcast – to move Hirohito to end a Cabinet deadlock and direct his ministers to make peace.

And that came just in time.  For unknown to either the Japanese or us, Stalin was just weeks away from taking a fateful step that would have radically altered the course of history.  Soviet forces were gathering for an invasion of the Japanese Home Island of Hokkaido.  The landings were set to take place on August 24, 1945.  Within a few days two Soviet divisions would have seized the northern half of Hokkaido – months before American forces were scheduled to storm ashore on the southernmost Home island of Kyushu.

As history actually unfolded, the Japanese surrender on August 15 (August 14 in America) pulled Stalin up short.  The Soviets were in the process of taking the southern half of Sakhalin Island (lost to Japan under the terms of the Treaty of Portsmouth that ended the disastrous Russo-Japanese War of 1904-1905), and also grabbing the Kurile Island chain.  But Stalin wanted more – he wanted to share in control of the Japanese Home islands themselves, a position from which he hoped to bring about a Soviet Japan, and at the least block any American attempt to transform Japan into an anti-Communist bulwark.  Indeed, Stalin was so loathe to let go of these goals that he pressed Truman to accept a post-surrender Soviet occupation of northern Hokkaido (the same territory scheduled for invasion), and only reluctantly accepted Truman’s refusal to permit such a dilution of American plans to be the sole occupying power of the four Home Islands.

Without the Atomic Bombings in early August, the war would still have been raging when August 24 arrived.  There can be no doubt that the Soviet invasion would have been launched.  If we assume just a one month a delay in the development and successful test of the Plutonium Bomb, or an outright failure of the “Trinity” test on July 26, the news of the Soviet invasion of Japan – for that is exactly how it would have been viewed, just as much an invasion of Japan proper as our planned landings on Kyushu on November 1 would have been seen as an invasion – would have triggered a crisis in Washington, DC.  Without the atomic bombings, Truman would have returned from Potsdam to be confronted by a veritable mutiny by the Navy against the American invasion plans.  Intelligence in late July showed that the Japanese had somehow moved 750,000 troops to Kyushu, not the 250,000 predicted earlier that Summer.  The new numbers meant the Japanese could be expected to meet our invading forces with at least equal numbers on the beaches – a formula for disaster, based on the experience accumulated from the many amphibious landings conducted in Europe and the Pacific.  The Navy would have been demanding a cancellation of the planned Kyushu landings, and adoption of their preferred strategy of blockade.  The news that the Soviets had beaten us to the Japanese Home Islands by several months would have knocked the Navy’s and the Army’s arguments all into the proverbial cocked hat, forcing the American leadership to consider whether to scrape together a force that could be rushed ashore on northern Honshu, and block a Soviet move south towards Tokyo.  The Cold War was already unfolding in Europe, and the pressure on Truman to prevent the Red Army from marching into Tokyo and imposing a Japanese puppet Communist government would have been excruciating.

And what of the Japanese?  The Home islands of Japan had never been invaded.  Never.  The Mongols had tried twice, and each time the kamikaze, the “Divine Winds” of the typhoon season had wrecked the Khan’s mighty invasion fleets.  The Japanese military, which had been preparing to beat back an invasion coming from the south – hence the shift of those 750,000 troops to Kyushu – would now have confronted the Russians coming through a northern backdoor unavoidably left unguarded.  The military would have unleashed its plans to rally the entire nation against an invasion, while scrambling to move forces from the south to the north.  The Japanese hated the Russians, and the Japanese elite loathed and feared Communism.  The political dynamic of an evenly divided War Cabinet, with three military members adamantly opposed to surrender on any terms before Japan had the chance to bloody its enemies in a “decisive battle” for the Home Islands, squaring off against three civilian members who urged seeking peace with the Americans (if not on the “unacceptable” terms of the Potsdam Declaration), would have been swept away.  There was no more time for the luxury of such debate.  The Decisive Battle was at hand, the evil Russian Bear was ashore, and all Japan must be mustered to resist.

How would this world have unfolded?  What we can say with confidence is that the moment for peace, which was latent at the beginning of August 1945, would have been swept away after an August 24 that saw Soviet forces storming ashore on the beaches of Hokkaido.  The war would have continued.  Extended now on the ground to the Japanese Home Islands, it would have continued to rage throughout East Asia and the Pacific.  The British on September 9 would have launched “Operation Zipper,” a massive amphibious assault against the Japanese position in Malaya, an operation that would have dwarfed the D-Day landings.  In response, the Japanese Commander of the Southwest Asian theater would have issued his promised order for the massacre of hundreds of thousands of allied military and civilian prisoners.

The war would have continued until, somehow, the Japanese leadership could be brought to its sense, and made to realize that continued fighting would only end in the obliteration of Japan itself.  In our history, as events actually unfolded, that realization meant the Emperor taking the step that only he could take, by commanding a decision for peace.  But he took that step in the comparative calm of a Japan not yet invaded, within the protective confines of the Imperial Palace.  And even then, when word leaked out within military circles of his decision, and the impending surrender, it triggered a mutiny on the night of August 14/15 by captains and majors that saw murderous bands of soldiers invade the palace grounds, seeking to take the Emperor into “protective custody” and prevent the surrender broadcast scheduled for the next day.  And while these fanatic junior officer “patriots” sought to prevent the planned surrender, the War Minster killed himself rather than be a party to the “shame” of capitulation.  If Japan’s decision to surrender then was nearly undone, imagine the challenge for the emperor to try and bring about a surrender in the face of a united military plunging into the final “decisive” battle they had been itching to fight.

When Harry Truman made the decision to order the atomic bombing of Japan, he did so for one reason.  Not to make an impression on Joe Stalin.  He did so because he knew that the war with Japan had to be brought to an end, and soon.  He recognized that continued war would mean the deaths of millions, including hundreds of thousands of Americans.   He knew that continued war in the Pacific and East Asia would make it impossible to achieve a just peace for the wounded peoples of Europe, at the opposite end of the Eurasian landmass.  Truman could not know that, had he hesitated to use the atomic bomb against Japan right when it became available, events were about to unfold that would have undone the moment for peace.  But 75 years later we do.  Or at least we ought to.

1 Comment

Filed under War History

How a 13 Year Old Girl Helped to Win the Battle of Britain

In 1934, there was a debate within the RAF about whether its next generation of fighters, the Hawker Hurricane and the Supermarine Spitfire, should have four or eight 0.303 inch Colt Browning machine guns. These guns had the same calibre of ammunition as the British Army’s Lee Enfield rifles.

This is well known but the role of Hazel Hill, a 13 year old schoolgirl, in the decision to adopt eight guns has only recently come to light thank to a BBC News Channel documentary called The Schoolgirl Who Helped to Win a War. It is based on research carried out by her grand-daughter Felicity Baker, a journalist. It is available to UK viewers on the iPlayer at the link below.

https://www.bbc.co.uk/iplayer/episode/m000kzx7/the-schoolgirl-who-helped-to-win-a-war

There were two alternative guns that might have armed the new fighters. The 20mm Hispano cannon, used by the French, was ‘new and temperamental’[1]

Stephen Bungay, author of The Most Dangerous Enemy: A History of the Battle of Britain (London: Aurum Press, 2009), stated on the BBC documentary that the 20mm cannon and the 0.5 inch machine gun were rejected on the grounds of weight.

In 1934, RAF fighter squadrons were equipped with Bristol Bulldogs and Hawker Furies and were soon to receive Gloster Gauntlets, fabric covered biplanes with open cockpits, fixed undercarriages and an armament of two 0.303 inch machine guns. The next British fighter, the Gloster Gladiator, had an enclosed cockpit and four 0.303 inch machine guns, but was still a fixed undercarriage biplane. Most air forces in the world were then equipped with similar fighters. The best fighter in the world was probably the Polish PZL P.11, an all metal gull winged monoplane, but it still had an open cockpit, a fixed undercarriage and only two machine guns, although later models carried four.

The world’s leading air forces were about to introduce monoplanes with retractable undercarriages, enclosed cockpits, greater speed, higher altitude ceilings  and heavier armament. The question for the British was how many guns their new fighters carry.

 Squadron Leader Ralph Sorley, head of the Air Ministry’s Operational Requirements Section, thought that eight guns were required to to inflict enough damage to shoot down an enemy aircraft in the two seconds that a fighter pilot was expected to be able to keep it in his sights. Air Marshall Edgar Ludlow-Hewitt, the Deputy Chief of the Air Staff, agreed.[2]

Others, however, were not convinced, including Air Marshall Robert Brooke-Popham, Commander-in-Chief of the Air Defence of Great Britain and thus the commander of the fighter squadrons that would receive the new aircraft. He thought that eight guns were too many  and that four were enough, arguing that eight would create ‘a lot of leading edge resistance.’[3]

Captain Frederick Hill, the Air Ministry’s Senior Technical Officer of Ballistics, was given the job of calculating the number of guns needed by a modern fighter. He came from a working class background but received a BSc in Chemistry from London University in 1909 and subsequently worked as a teacher. He served in the Royal Naval Air Service and the Royal Air Force during the First World War, working on the technical aspects of aerial guns and gunsights. He continued with this work after the war as a civilian employee of the Air Ministry, although he almost lost his job during defence cuts in 1922.

Hill was given the task of working out how many guns the new fighters needed. As he was working to a tight timetable, he took the relevant documents and a calculating machine home and worked on his kitchen table, helped by his 13 year old daughter Hazel, a maths prodigy. Their calculations  showed that that with machines guns that fired 1,000 rounds per minute, a fighter would need eight guns to cause enough damage to destroy  an enemy aircraft in the two seconds that it was likely to have the enemy in its sights.

The next day Hill presented his conclusions to an Air Ministry committee, which accepted that his recommendation that the new fighters needed to have eight machine guns. According to the Times article linked below, he told only his immediate superior that Hazel had helped him with the calculations. The BBC documentary said that his superior mentioned this in his memoirs. Neither source names him but he was presumably C. H. Keith, whose book I Hold My Aim is referred to in the Wikipedia entry on Hill.

https://www.thetimes.co.uk/article/how-schoolgirl-helped-to-win-battle-of-britain-6cpb7kh75?shareToken=6e00b0e2d1b24d8ae4da3ac438ff656c

The BBC documentary interviewed Squadron Leader Allan Scott, a 98 year old who flew both Hurricanes and Spitfires in the Second World War. In his opinion, they could not have shot down enough enemy aircraft to win the Battle of Britain had they been armed with only four machine guns.

Even eight 0.303 machine guns was soon regarded as being too weak an armament. During the Battle of Britain, Spitfires and Hurricanes fought against German Messerschmitt Me109E fighters that carried two 20mm cannon and two 7.92mm machine guns. In 1941, the Spitfire VB, armed with two 20mm cannon and four 0.303 inch machine guns, and the Hurricane IIC with four 20mm can non entered service.

Captain Hill died in 1959. Hazel followed a career in medicine rather than Maths, serving in the Royal Army Medical Corps during the Second World War. She died 10 years ago. Her four sons appeared in the BBC documentary and her family still owns the table on which the calculations were made.

[1] E. B. Morgan, E. Shacklady, Spitfire: The History, Rev. ed. ed. (Stamford: Key Books, 1987), p. 18.

[2] A. Price, The Spitfire Story (London: Arms and Armour, 1982), p. 21.

[3] Quoted in Morgan, Shacklady, Spitfire: The History, p. 15.

4 Comments

Filed under Reviews, War History

Top Secret: London Science Museum

I recently attended Top Secret, an exhibition at the Science Museum in London about codebreaking, ciphers and secret communications. It has now finished but will open again at the Manchester Museum of Science and Industry in October 2020.

The exhibition was timed to coincide with the 100th anniversary of the foundation of GCHQ [Government Communications Headquarters], the UK’s Intelligence, Security and Cyber agency. The exhibits came mostly from the historic collections of the Science Museum and GCHQ, with most of the latter never having previously been shown to the public.

Definitions 

Code:  A process that replaces a word or phrase with an arbitrary symbol of group of characters (numbers or letters).

Cipher: A repeatable, standardised process that replaces one character with another to encrypt a message.

Cipher machine: A machine that automatically encrypts a message one character at a time using a cipher.

Key: Use of ciphers is governed by secret settings called a ‘key’ shared between authorised users to make sure only they can decipher the message.

The exhibition generally talked about code-breakers and decoding. I have followed this terminology.

Pre 20th Century

The exhibition began by describing the history of codes and ciphers. In 405 BCE, the Spartan general Lysander is said to have received a secret message that was revealed by winding a piece of parchment round a rod of a particular thickness.

By 50 BCE, simple ciphers that replaced each letter of a word with another were being  used. These were named Caesar Ciphers after the Roman general Julius Caesar, but their use predated him.

Around 850 BCE, the Arab scholar and mathematician al-Kindi became the first person to describe a system of deciphering encrypted messages based on how often a language uses each letter, now known as frequency analysis.

The British government was intercepting and reading encrypted messages long before the foundation of GCHQ. Information found in decoded messages implicated Mary Queen of Scots, exiled in England, in a plot to assassinate Queen Elizabeth of England and put Mary on the English throne. Mary was executed as a result. 

After the War of the Three Kingdoms, also known as the English Civil War, Oliver Cromwell’s government protected itself against plots to restore the monarchy by intercepting and decoding letters from Royalist supporters.

In 1844, the British intercepted and decoded letters from Guiseppe Mazzini, the leading campaigner for Italian unification, who was then living in London. The decoded messages were shown to the government of Austria, which then controlled northern Italy, with the rest of the country being divided into small states.

The bulk of the exhibition was concerned with the 20th and 21st centuries.

First World War

During the First World War, underground telephone networks were laid throughout the trench systems. It was initially possible for the enemy to overhear conversations. However, the Fullerphone, invented by Captain, later Major General Algernon Fuller of the Royal Engineers allowed secure communications and avoided interference between different lines.

German Zeppelins were detected by their radio signals, thanks to a network of Marconi direction finders.

In 1914, Britain had a global network of communications cables. So did Germany, but at the outbreak of war, the Royal Navy cut the German cables. This meant that Germany had to communicate with its overseas embassies by radio, which the British were able to intercept and decode.

The Germans were allowed to use a Swedish cable to the USA and also, for the express purpose of discussing a US attempt to mediate peace, a US one. Both these, however, passed through the UK, enabling the British to intercept them. In particular, the British decoded the Zimmermann Telegram. It proposed that if the German campaign of unrestricted submarine warfare caused the USA to declare war on  Germany, Mexico should join the war against the USA and would regain the territory that it had lost to the USA in the Mexican-American War of 1846-48 after a victorious war.

Code-breaking during the First World War had been carried out by people from many walks of life, who mostly returned to their pre-war jobs at the end of the war. However, the importance of code-breaking and security in the war led Britain to in 1919 establish the Government Code and Cipher School, renamed GCHQ in 1946.

Attempts were made in the 19th and early 20th century to produce mechanical cipher machines, but these were too easy to break. By the 1920s, more secure electro-mechanical machines were available.

Second World War

In World War II, the Germans had two code machines: the Enigma and the more secure Lorenz. The Enigma was a military version of a machine originally built for commercial use.

Before the war, Marian Rejweski, a Polish code-breaker, worked out the Enigma’s internal wiring, making it possible to decipher its messages, although it was still necessary to work out the settings, which were changed frequently. The Poles shared the results of their work with the British and French, enabling the British code-breakers at Bletchley Park to start reading Enigma messages far more quickly than if they had had to start from scratch.

The messages were intercepted at one of about 40 Y stations around Britain, transcribed, mostly by women and then sent to Bletchley Park to be decoded.

The settings of the Enigma machines changed daily, meaning that it was necessary to work out the rotor settings before decoding messages. Rejweski built an electro-mechanical machine called a Bomba to help with this process. The British version, developed by Alan Turing with Gordon Welchman contributing an important refinement, was called a Bombe.

The British used a modified Enigma machine called a Typex for their coded messages. It remained secure throughout the war. Once the Enigma settings had been worked out by hand and the Bombes, the message was put through a Typex modified to be used as an Enigma receiver.

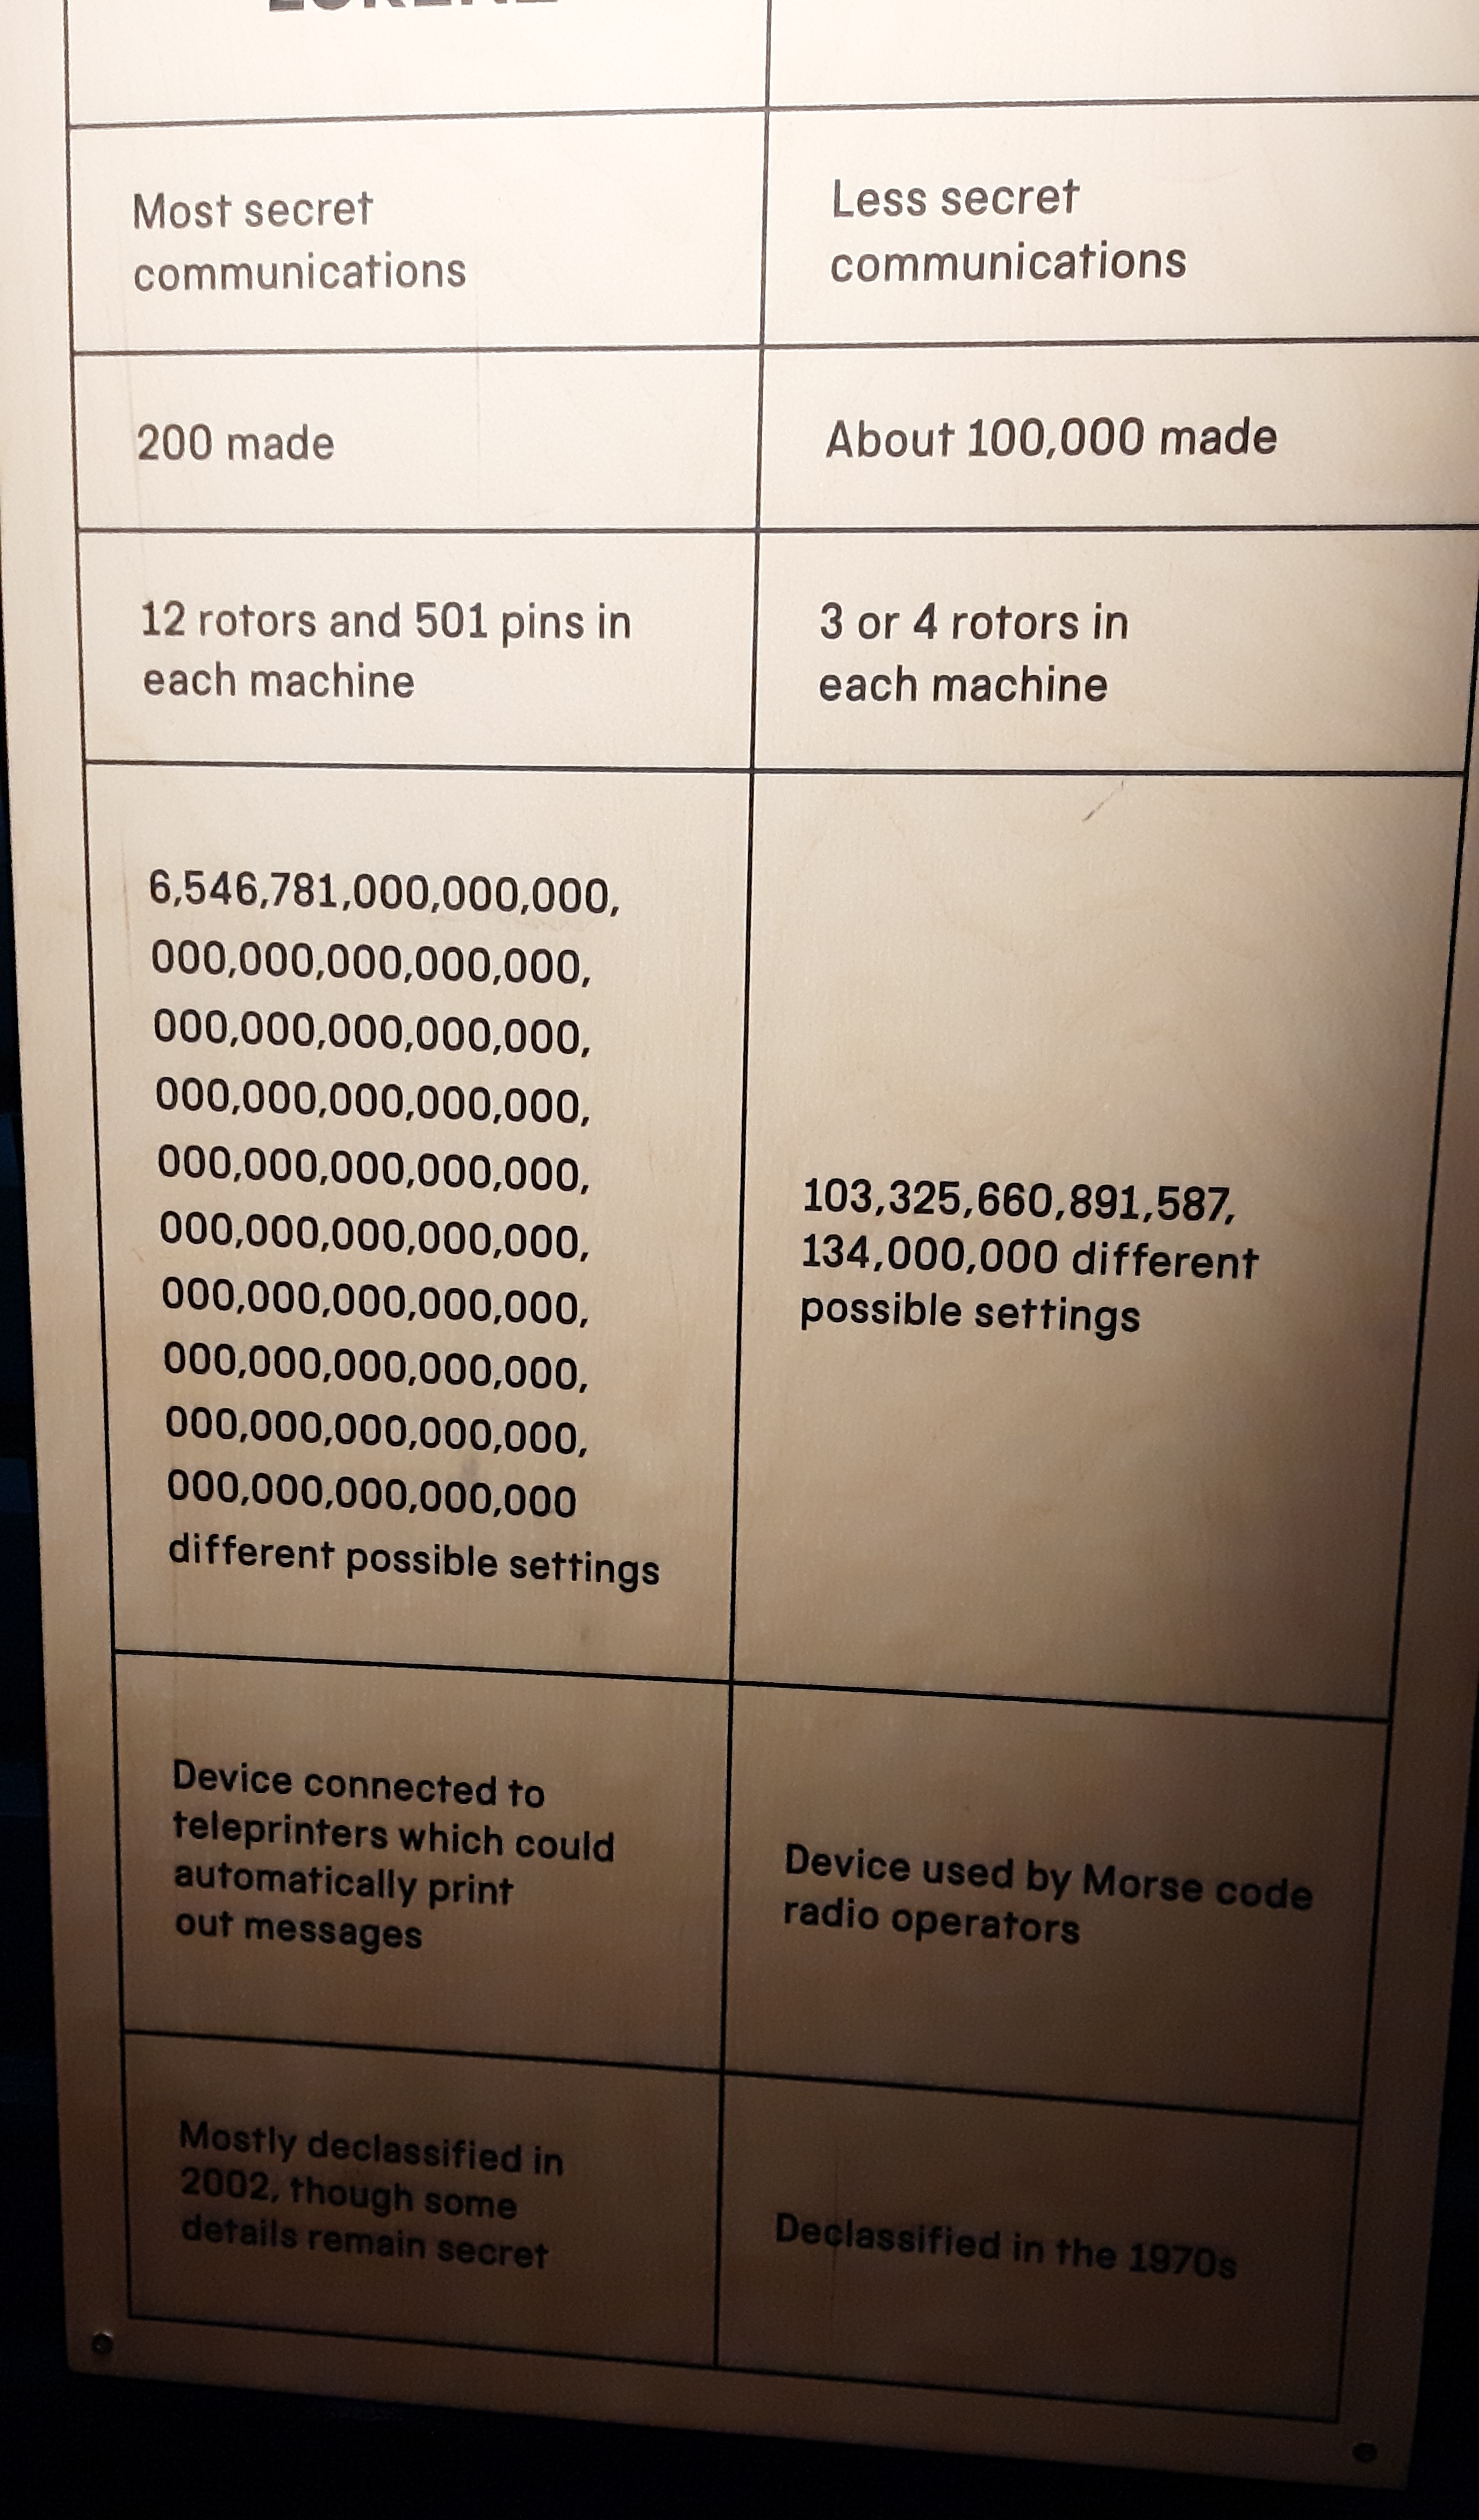
The Germans had over 100,000 Enigma machines but only about 200 more sophisticated 200 Lorenz machines. The latter were used for the most secret communications between senior commanders. It had 12 rotors and 501 pins, compared with three rotors in an early Enigma machine, increasing to four for naval machines from late 1941. This hugely increased the number of possible settings, making it very difficult to break Lorenz messages. However, a breakthrough was made in August 1941 when a Lorenz operator sent a message twice with only minor changes and using the same settings.

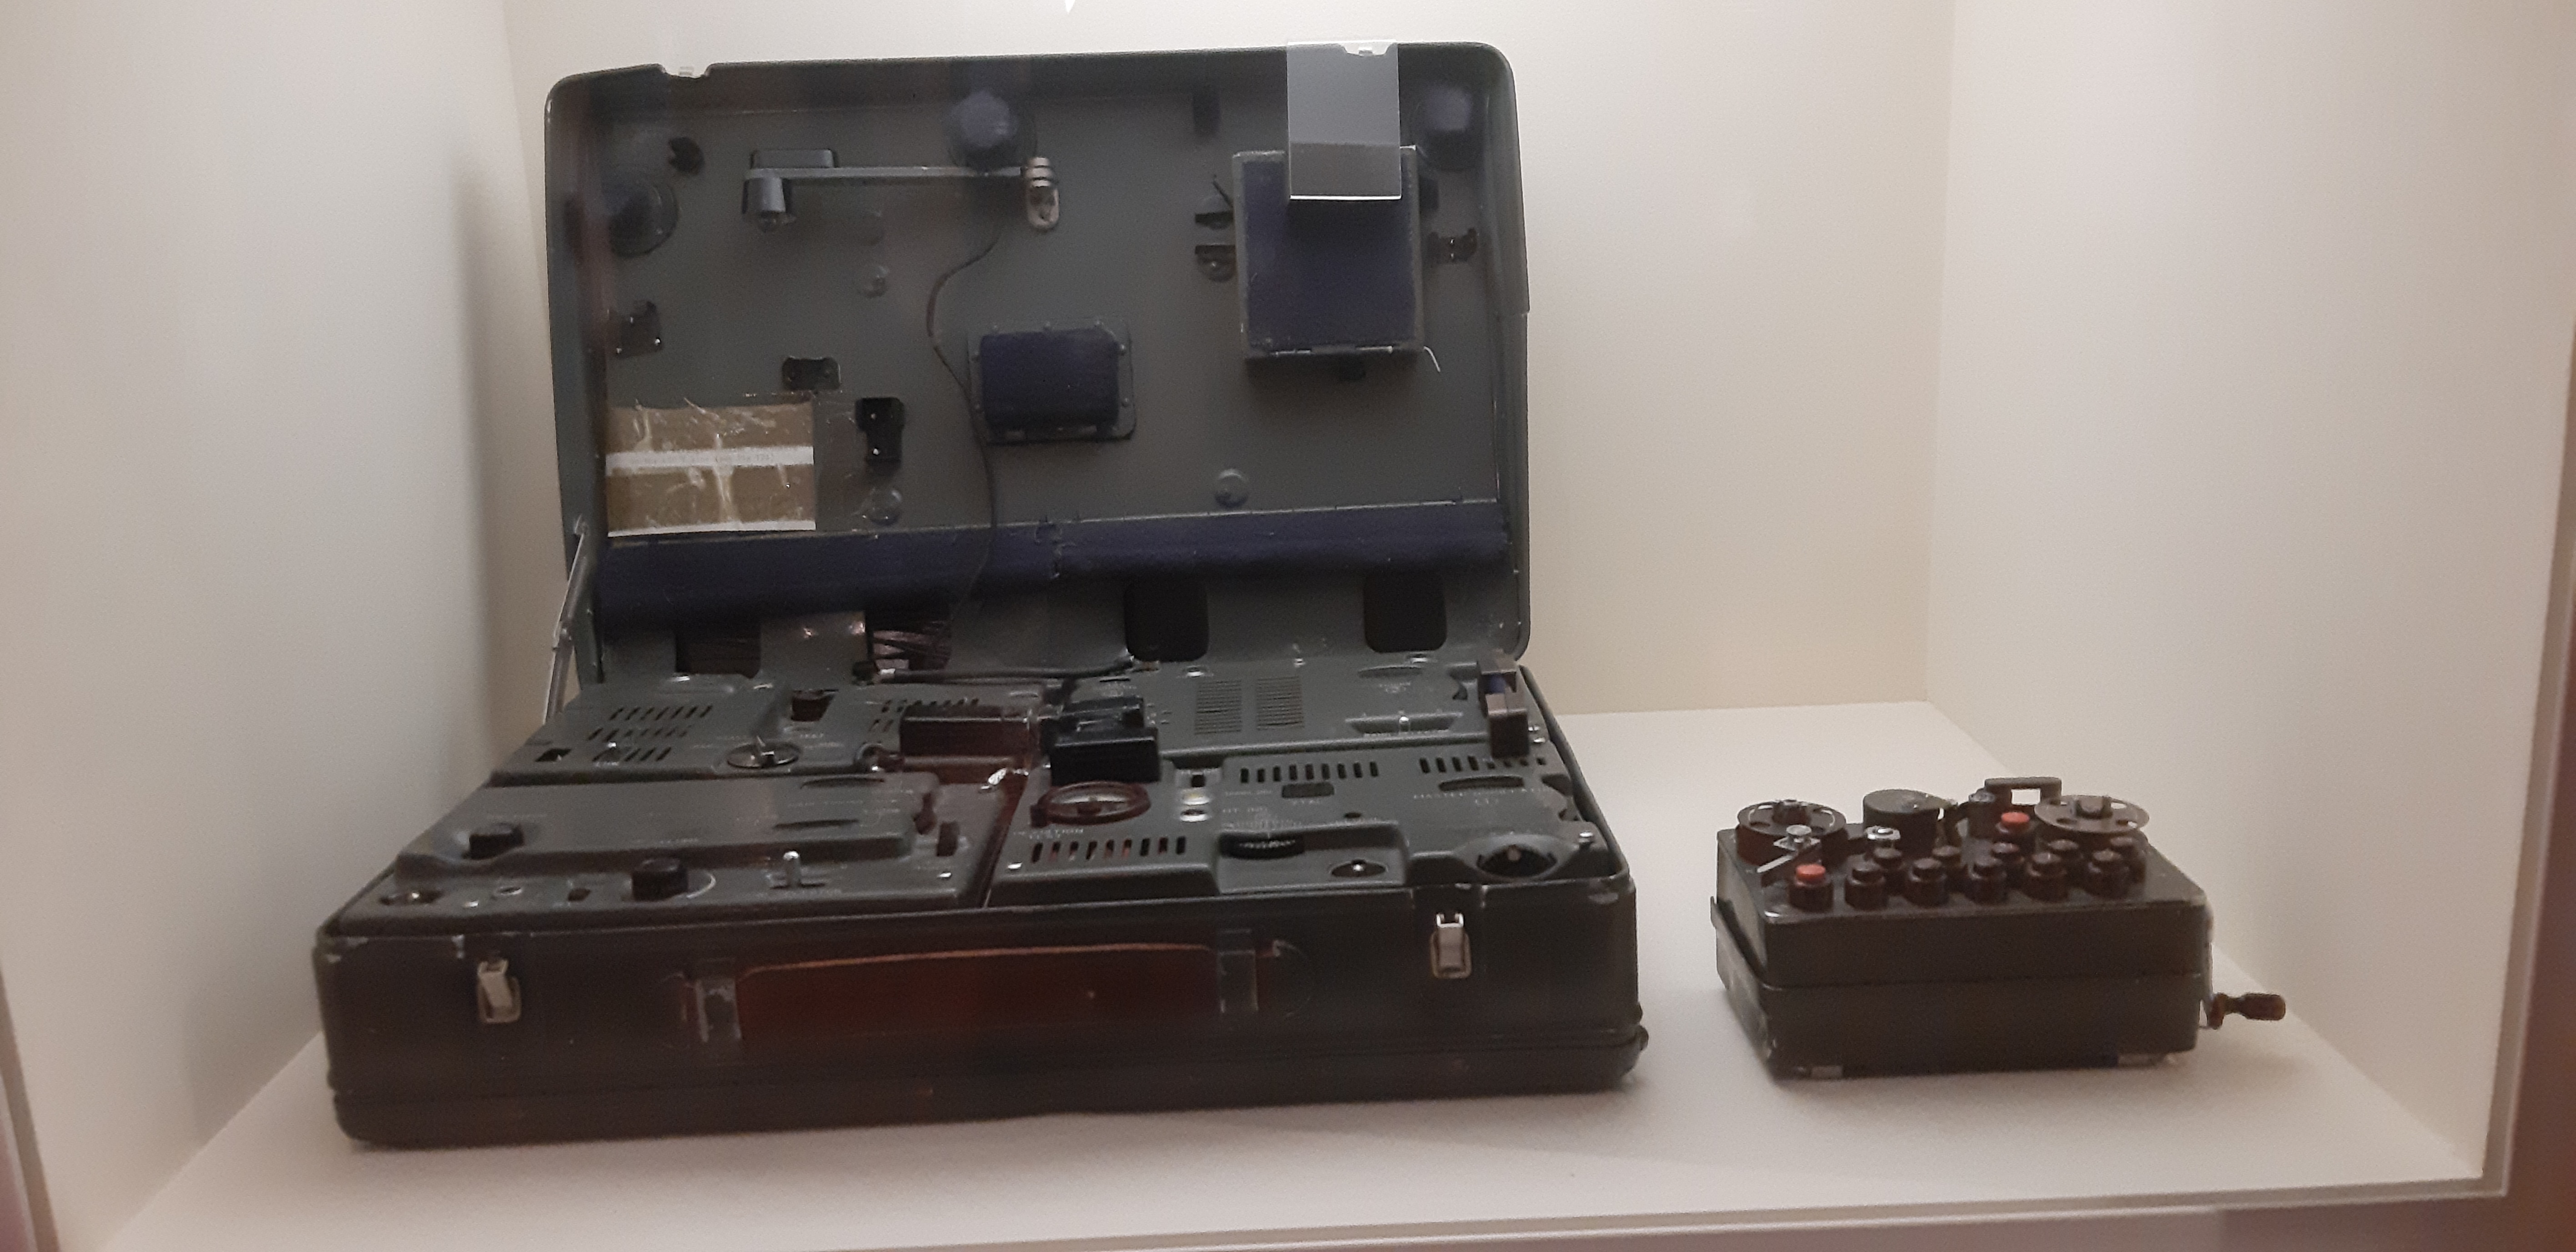
Lorenz                                                                 Enigma

Lorenz v Enigma

Lorenz (left hand column) v Enigma (right)

In 1943, Tommy Flowers, a Post Office Engineer [the British telephone network belonged to the Post Office until privatisation in the 1980s], came up with the idea that an entirely electronic machine could automate the process of working out the Lorenz settings. Many code-breakers were sceptical about using an entirely electronic machine because it would require thousands of unreliable glass valves.

Flowers, however, had the machine, called Colossus, operating by January 1944 and 10 such machines were in use by September 1945. The government regarded these early computers as being too valuable to reveal. Eight were dismantled for parts and GCHQ continued to use the other two for unknown purposes until the mid 1950s. Only a few parts remain today.

Amongst the Lorenz messages decoded after the introduction of Colossus was one that revealed that the German High Command had fallen for the Allied deception plan that the June 1944 landing in France was to take place in the Pas-de-Calais rather than in Normandy.

As well as breaking enemy communications, GCCS was responsible for keeping British government communications secure. The exhibition included a 1941 secure telephone, known as a Secraphone, used by Winston Churchill. This was an early model that could deter only a casual listener, more secure versions were introduced later in the war.


Cold War

GCHQ, as GCCS became in 1946, continued in the same roles in peacetime. A secure telephone used by Prime Minister Harold MacMillan to communicate with US President John F. Kennedy during the 1962 Cuban Missile Crisis scrambled calls so that anybody listening in could not understand what was being said. Secure briefcase telephones that could be used by leaders when away from their offices were later developed. The example on display was used by Margaret Thatcher during the 1982 Falklands War to inform the Ministry of Defence of a change in Britain’s rules of engagement, resulting in the sinking of the Argentinian cruiser ARA General Belgrano.

In 1961, five members of what became known as the Portland Spy Ring were arrested. Three of them, a couple calling themselves Helen and Peter Kroger and a man going under the name of Gordon Lonsdale were KGB agents operating under deep cover. The Krogers were actually called Morris and Lona Cohen whilst Lonsdale was really Colonel Konon Molody of the KGB. The other two, Henry Houghton and Ethel Gee, were British citizens employed at the Royal Navy’s Underwater Detection Establishment.

Houghton and Gee copied secret documents, which they then passed to Lonsdale-Molody. He gave them to the Krogers, who transmitted them to the USSR using a powerful transmitter. They thought that the powerful radio signals from a military base near their bungalow in Ruislip in west London would probably mask their transmissions but GCHQ was able to monitor them and prove that they were in communication with the USSR.

The Krogers' transmitter

The Krogers’ Radio Transmitter,

All five were sentenced to long terms in prison. Lonsdale-Molody and the Kroger-Cohens were swapped for British agents arrested in the USSR. Houghton and Gee were released after serving nine out of 15 years and then married

By the 1970s some countries, notably the USA and the USSR had spy satellites orbiting the Earth. The UK had a network of military communications satellites called Skynet: the first was launched in 1969, 15 years before the first Terminator film featuring Skynet as the villain. However, for spy satellites the UK relied on the USA.

During the 1982 Falklands War, US spy satellites had other priorities in South America. The UK therefore decided to launch its own spy satellite, called Zircon under the guise of it being Skynet IV. The journalist Duncan Campbell found out and made a TV documentary revealing the existence of Zircon. Police raids and a court injunction delayed transmission and had been cancelled on cost grounds by the time that the programme was shown. The case did bring more public attention onto GCHQ.

Today

As well as gathering signals intelligence, GCHQ today is concerned with combating cyber attacks on the UK. In May 2017, a ransomware virus called WannaCry infected the computers of thousands of people and organisations, including those of the British National Health Service. The UK and other countries believe that it originated in North Korea. The exhibition concluded with a number of recordings in which anonymous GCHQ employees talked about their work/.


1 Comment

Filed under Political History, Reviews, War History

The Royal Navy Attacks on Kronstadt, Russia, 1919 and 3 VCs

In 1918, the leading British secret agent in Petrograd, as St Petersburg was then known, was Paul Dukes, code number ST/25. In order to provide a courier service for Dukes two Coastal Motor Boats were based, with the consent of the Finnish authorities, at the Terijoki yacht club on the Finnish of part of the Gulf of Finland, 25 miles from Petrograd and the adjacent Bolshevik naval base at Kronstadt. Augustus Agar, a 29 year old Royal Navy Lieutenant was given command of the CMBs. He was code numbered ST /34.[1]

The first CMBs, called 40 footers although they were actually 45 feet long, had a speed of 24.8 knots, an armament of a stern launched 18 inch torpedo and two or four .303 inch Lewis machine guns and a crew of two or three. Later 40 footers had more powerful engines, giving them a maximum speed of 35.1 – 37.8 knots. The subsequent 55 footers were armed with one or two 18 inch torpedoes, four Lewis guns and four depth charges. They had a crew of three to five and could make 35.25 – 41.2 knots. The later 70 footers were minelayers with six  Lewis guns, seven mines or 3 torpedoes, four depth charges, a crew of three to five and a maximum speed of 26 -36 knots depending on their engines.[2]

Agar had qualified as a pilot before the war, but did not serve with the Royal Naval Air Service. He served pre-dreadnought battleship HMS Hibernia, including at Gallipoli, and then in the elderly cruiser HMS Iphigenia, which acted as a depot ship for minesweepers covering the supply routes to Archangel and Murmansk in North Russia. In May 1918, he was assigned to a flotilla of CMB operating from the Essex coast. [3]

Agar successfully landed a courier near Petrograd in June. Dukes then ordered that there should be no more missions until mid-July because of the short nights. Agar then signalled Captain Sir Mansfield Smith-Cumming RN, the head of the British Secret Intelligence Service, requesting permission to take action in support of an anti-Bolshevik Russian garrison that was being bombarded by Bolshevik naval forces. Cumming replied that the CMBs were to be used only for intelligence purposes unless otherwise ordered by the Senior Naval Officer Baltic.[4]

The SNO was Admiral Walter Cowan, an aggressive officer, and Agar was confident that Cowan would retrospectively support any action that he took. On 16 June, his first attempt to attack the Kronstadt Island naval base next to Petrograd had to be abandoned  after one of the CMBs broke down. The next night Agar, commanding the 40 footer CMB4, succeeded in sinking the 6,650 ton cruiser Oleg. On 19 August 1919 the award of the Victoria Cross to Agar was announced. See Naval-History.net for the citation.

Agar made two unsuccessful attempts to pick up Dukes. The first time, a Bolshevik patrol spotted Dukes’s courier. The second attempt failed because their rowing boat sank.[5]

On the night of 17-18 August, Agar in the 40 footer CMB7 led a flotilla of 55 footer CMBs into Kronstadt. He piloted the other boats into the harbour under heavy fire and then covered their withdrawal, again under heavy.

The 55 footers were of two types. The A boats carried one 18 inch torpedo and were capable of 35.25 knots. The BD type had two 18 inch torpedoes and a maximum speed of 35.1 knots.[6]

The flotilla was commanded by 34 year old Commander Claude Dobson, DSO in CMB 31BD. He had previously served in submarines and CMBs. He directed the attack and then torpedoed the 17,400 ton pre-dreadnought battleship Andrei Pervozvanny, before retiring under heavy fire.

Lieutenant Archibald Dayrell-Reed, captain of CMB 88BD was shot in the head and the boat thrown off course. Second in command 26 year old Lieutenant Gordon Steele took the wheel. moved Dayrell-Reed away from the steering and firing position and torpedoed the Andrei Pervozvanny. He then manoeuvred to get a clear shot at the 23,360 ton dreadnought Petropavlovsk, which was partly overlapped by the Andrei Pervozvanny and further obscured by smoke coming from her. However, he managed to fire a torpedo her and to turn away in a tight space, firing his machine guns as his boat exited the harbour under heavy fire. The elderly Russian cruiser Pamiat Azova, which was being used as a torpedo boat depot ship, was sunk by the CMBs.

The Andrei Pervozvanny was not repaired and was scrapped in 1923. The British claimed to have sunk the Petropavlosk in shallow water but the Soviets insisted that she was not damaged. She was renamed Marat and recommissioned in 1922. She was badly damaged by German dive bombers in 1941 at Kronstadt but enough of her hull remained above water for her to be used as a gun battery.[7]

CMB25BD, captained by 25 year old Russell McBean, who had been an early volunteer for CMBs and was awarded the Distinguished Service Cross after the second Ostend Raid, also torpedoed the Andrei Pervozvanny, before withdrawing under heavy fire.

Acting Sub Lieutenant Edward Bodley, RNR’s CMB72A attacked a Bolshevik destroyer, but the CMB’s steering broke down. It encountered Acting Sub Lieutenant Francis Howard’s CMB86BD, whose engines had broken down and it took in tow.

The other three CMBs were lost: 25BD, 31BD and 72A. Four officers, including Dayrell-Reed, and four petty officers and ratings were killed. They are listed on Naval-History.net.

Dobson and Steele were both awarded the VC and Agar, McBean and Bodley the Distinguished Service Order. Their citations, published on 11 November 1919 are available on Naval-History.net: VC here and DSO here. Six other officers, including Howard, were awarded the DSC.  The award of Distinguished Service Medals to a number of petty officers and ratings for operations in Russia at the same time, but no details of how, where and when they were earned was given.

Agar was a Captain in 1939, commanding the cruiser HMS Emerald. She and her sister ship HMS Enterprise transported five tons of gold to Nova Scotia in order to pay for war materials before the later introduction of Lend Lease. He then commanded a destroyer flotilla and was chief staff officer, coastal forces, before in August 1941 taking command of the heavy cruiser HMS Dorsetshire.

On 5 April 1942 Dorsetshire and her sister ship HMS Cornwall were sunk by Japanese dive bombers in the Indian Ocean. Agar survived but was wounded in the leg, swallowed oil and suffered from the bends, which damaged his lungs. He recovered from the leg wound but was unfit for further sea service. He was President and Captain of the Royal Naval College, Greenwich with the rank of Commodore from 1943-46. He then retired and became a farmer, dying in 1969.

His medals are in the Imperial War Museum in London and CMB4 is in the IWM’s Duxford branch.

Dobson reached the rank of Rear Admiral retiring in 1935 and dying in 1940. His VC is held by the National Maritime Museum, Greenwich.

Steele was Captain Superintendent of HMS Worcester, a training college for Royal and Merchant Navy Officers from 1929 to 1957, apart from World War II, when he returned to the RN. He was featured in the TV programme This is Your Life in 1958, when he once again met Bodley, who had retired as Commodore of the P&O Line the year before. Steele’s VC belongs to Trinity House. He died in 1981.

MacBean retired from the RN as a Captain after the Second World War and died in 1963.


[1] K. Jeffery, MI6: The History of the Secret Intelligence Service, 1909-1949, pp. 175-76.

[2] R. Gray, Conway’s All the World’s Fighting Ships, 1906-1921, p. 100.

[3] H. C. G. Matthew et al, “Oxford Dictionary of National Biography”, Oxford University Press <<http://www.oxforddnb.com/subscribed>&gt;. Accessed 17 June 2019.

[4] Jeffery, MI6, p. 176.

[5] Ibid.

[6] Gray, Conway’s 1906-1921, p. 100.

[7] Ibid., p. 303.

Leave a comment

Filed under War History

Harold Auten VC

Harold Auten was born in 1891. He joined the P&O Line as an apprentice in 1908. He became a member of the Royal Naval Reserve two years later and was promoted to Sub Lieutenant just before the outbreak of the First World War. He was one of the early recruits to the Royal Navy’s force of Q-ships, apparently innocuous merchantmen that carried heavy but concealed armaments in order to lure German U-boats to their doom. He served first on the former collier Zylphia as First Lieutenant.

Whilst serving on the Zylphia, he paid a Portsmouth second hand clothes shop £60 for 80 suits, a scruffy work one and a smarter shore going one for each crewman. He also came up with the idea of making it appear that his ship was on fire by putting a tub full of dried seaweed on her deck and setting it alight.[1]

In June 1917, the Zylphia was torpedoed by a U-boat that did not fall for her trap but remained submerged. She was taken under tow but sank just off the Irish coast at 2320 on 15 June 1917.[2]

By then, however, Auten had become First Lieutenant of HMS Heather, an Aubreitia class sloop. This class were warships designed to resemble merchantmen rather than being armed merchantmen.  Auten took command of her after her captain, Lieutenant-Commander William Hallwright, was killed in an action with a U-boat on 21 April 1917. In this case, the U-boat shelled the sloop, which then launched her “panic party. ” This was a group of sailors who pretended to be abandoning ship in a hurry in the hope of tricking the Germans into thinking that their opponent was a helpless merchantman not worth wasting a torpedo on. The captain of this U-boat was, however, not fooled. He dived his boat and made off.[3]

The Aubreitias did not make good decoys. They did not look like merchantmen if viewed from the bow or quarter and their 92 man crews were too big to carry out a convincing abandon ship routine.[4]

Auten, who had been awarded the Distinguished Service Cross on 6 April 1918, realised this and successfully persuaded Admiral Sir Lewis Bayly, commanding the naval forces defending the Western Approaches to put him in command of the Stock Force, an almost new  collier. She was armed with two 4 inch guns, two 12 [76mm] pounders, a 3 [47mm] pounder  and two fourteen inch torpedo tubes.[5]

On 30 July 1918, HMS Stock Force received a radio message stating that a U-boat was operating between the Channel Islands and South Devon.  She first encountered two French seaplanes, which tried to persuade her to steer away from danger, not realising that she was a Q-ship deliberately steering into danger.[6]

The seaplanes eventually left and Stock Force continued on her way until she was struck by a torpedo, which disabled her. The panic party was launched and the U-boat surfaced about half a mile away, a highly risky action by that stage in the war. It is especially strange considering that she was SM UB-80, whose captain, Kapitänleutnant Max Viebeg, had been awarded the Pour-le-Merite, Germany’s highest decoration, and was responsible for the destruction of 51 ships with a total tonnage of 80,000 tons over the course of the war.[7]

The panic party drew the UB-80 to a position 300 yards from Stock Force and in the arc of fire of both her 4 inch guns. They opened fire, wrecking UB-80’s conning tower and scoring numerous hits on her hull. She slipped below, stern first, but survived and returned to port thanks to the strength of her double hull. She was repaired quickly enough to sink a merchantman on 6 September and another 3 days later.[8]

Stock Force was also sinking. Her engines were still working, so Auten headed towards Plymouth. On the way, Stock Force encountered two trawlers who were heading towards the sound of the guns. Auten transferred the wounded to them and tried to get his ship back to port, but she foundered eight miles off the English coast.[9]

Auten was awarded the Victoria Cross. The citation, not published until after the war because of the secrecy of Q-ship operations, but now available on Wikipedia, said that:

H.M.S. “Stock Force,” under the command of Lieutenant Harold Auten, D.S.C., R.N.R., was torpedoed by an enemy submarine at 5 p.m. on the 30th July, 1918. The torpedo struck the ship abreast No. 1 hatch, entirely wrecking the fore part of the ship, including the bridge, and wounding three ratings. A tremendous shower of planks, unexploded shells, hatches and other debris followed the explosion, wounding the first lieutenant (Lieutenant E.J. Grey, R.N.R.) and the navigating officer (Lieutenant L.E. Workman, R.N.R.) and adding to the injuries of the foremost gun’s crew and a number of other ratings. The ship settled down forward, flooding the foremost magazine and between decks to the depth of about three feet. “Panic party,” in charge of Lieutenant Workman, R.N.R., immediately abandoned ship, and the wounded were removed to the lower deck, where the surgeon (Surgeon Probationer G.E. Strahan, R.N.V.R.), working up to his waist in water, attended to their injuries. The captain, two guns’ crews and the engine-room staff remained at their posts.

The submarine then came to the surface ahead of the ship half a mile distant, and remained there a quarter of an hour, apparently watching the ship for any doubtful movement.

The “panic party” in the boat accordingly commenced to row back towards the ship in an endeavour to decoy the submarine within range of the hidden guns. The submarine followed, coming slowly down the port side of the “Stock Force,” about three hundred yards away. Lieutenant Auten, however, withheld his fire until she was abeam, when both of his guns could bear. Fire was opened at 5.40 p.m.; the first shot carried away one of the periscopes, the second round hit the conning tower, blowing it away and throwing the occupant high into the air. The next round struck the submarine on the water-line, tearing her open and blowing out a number of the crew.

The enemy then subsided several feet into the water and her bows rose. She thus presented a large and immobile target into which the “Stock Force” poured shell after shell until the submarine sank by the stern, leaving a quantity of debris on the water. During the whole of the action one man (Officer’s Steward, 2nd Class, R.J. Starling) remained pinned down under the foremost gun after the explosion of the torpedo, and remained there cheerfully and without complaint, although the ship was apparently sinking, until the end of the action.

The “Stock Force” was a vessel of 360 tons, and despite the severity of the shock sustained by the officers and men when she was torpedoed, and the fact that her bows were almost obliterated, she was kept afloat by the exertions of her ship’s company until 9.25 p.m. She then sank with colours flying, and the officers and men were taken off by two torpedo boats and a trawler.

The action was cited as one of the finest examples of coolness, discipline and good organisation in the history of “Q” ships.

Starling was awarded the Conspicuous Gallantry Medal and Grey, Strahan and Workman the DSC. Tony Bridgland sates that ‘[m]any awards were made for the bravery in the first and last action of Stock Force,’ but I have not been able to find out how many or to whom.[10] Naval-History.net lists all British sailors awarded medals but the secrecy behind Q-ship operations means that the citations for Q-ship sailors omit the name of their ships. Its lists of men killed does not include anybody from HMS Stock Force.

Auten moved to New York after the war, working for the Rank Organisation in the film industry. He later owned a hotel and cinema in Bushkill, Pennsylvania. He remained in the RNR and was employed in organising convoys during World War II, initially with the rank of Commander and later Acting Captain. He was awarded the US Legion of Merit and the Dutch Order of Nassau as a result. He died in 1964. His medals are on display in the National Museum of the Royal Navy in Portsmouth.


[1] T. Bridgland, Sea Killers in Disguise: The Story of the Q Ships and Decoy Ships in the First World War (London: Leo Cooper, 1999), pp. 16, 18.

[2] Ibid., pp. 96-99.

[3] Ibid., p. 135; R. H. Gibson, M. Prendergast, The German Submarine War, 1914-1918 (London: Constable, 1931), p. 171; R. Gray, Conway’s All the World’s Fighting Ships, 1906-1921 (London: Conway Maritime Press, 1985), p. 95.

[4] Gray, Conway’s 1906-1921, p. 95.

[5] Bridgland, Sea Killers, pp. 135-36; Gibson, Prendergast, German, p. 316.

[6] Bridgland, Sea Killers, pp. 137-38.

[7] Ibid., pp. 138-39.

[8] Ibid., p. 139; Gibson, Prendergast, German, p. 316.

[9] Bridgland, Sea Killers, pp. 139-40.

[10] Ibid., p. 140.

Leave a comment

Filed under War History

Thomas Crisp VC: Father and Son against a U-boat

Thomas Crisp, born in 1876, was a Lowestoft fishing captain before the First World War. His age and the importance of his profession to the war effort meant that he continued to  be a fisherman in the early stages of the war.  U-boats, however, were sinking fishing vessels as well as larger merchant ships and Crisp was recruited serve in a force of secretly armed fishing vessels that would protect the fishing fleet.

By the summer of 1916, he had joined the Royal Naval Reserve and was captain of the  HM Armed Smack I’ll Try, formerly the G & E. Like other fisherman captaining fishing vessels requisitioned by the Royal Navy, he held the rank of Skipper. His son, also called Thomas, was a member of his crew.

I’ll Try frequently operated with another secretly armed smack, the Ethel & Millie, which sometimes went by the name Boy Alfred.  On 1 February 1917, they claimed to have sunk two U-boats. The Admiralty paid the crews a bounty for this action and awarded Crisp and the other skipper the Distinguished Service Cross. However, no U-boats were lost that day. [1]

Crisp was offered a position on a larger Q-ship, but declined as he wanted to remain close to his terminally ill wife.

On 15 August 1917, the two smacks were operating  together off the coast of East Anglia, acting as bait for U-boats.  I’ll Try had by then been renamed Nelson. Just after 2:45 pm, Skipper Crisp spotted something on the horizon, realised that it was a submarine and ordered the Nelson, which was armed with a 13 pounder  gun, to clear for action just before a shell landed 100 yards off her port bow.[2]

About the fourth shell fired by the U-boat hit the Nelson on the port bow just before the waterline. Three more then hit her, the last of which passed right through the Nelson without exploding, hitting Skipper Crisp on the way. Tom junior took over the tiller, but the smack was sinking. Skipper Crisp ordered that the following message be sent by carrier pigeon:

Nelson being attacked by submarine. Skipper killed.  Send assistance at once.’[3]

Skipper Crisp ordered that the Nelson be abandoned and her confidential books be thrown overboard but declined to be lowered into the lifeboat. He asked to be thrown overboard but was too badly wounded to be moved. He was therefore left on the deck of his sinking vessel whilst the rest of the crew rowed away in the lifeboat.[4]

The survivors rowed for the rest of the day and all the next. They saw several ships but were unable to attract their attention. On the morning of Friday 17 August, they moored to the Jim Howe Buoy and were rescued later that day by the minesweeper HMS Dryad, 41 hours after they abandoned the Nelson.

After sinking the Nelson, the U-boat turned on the Ethel & Millie, which had only a 6 pounder gun.  Her crew abandoned ship after running out of ammo and were last seen by the Nelson’s crew lined up on the U-boat’s deck.[5]

Nothing more was heard of Ethel & Millie’s crew. Tony Bridgland suggests that the U-boat may have been UC-41, which was blown up by her own mines in the Tay Estuary five days later, in which case the survivors could have been taken on board and shared the fate of the captors.[6]

U-boat.net, however, says that it was UC-63, which survived that patrol to be sunk by the British submarine E-52 on 1 November 1917. In that case, they were probably left to drown. The Germans regarded merchant seamen who fought back as being francs-tireurs or partisans and thus liable to execution: see the fate of Captain Charles Fryatt, a British merchant captain who was executed on 27 July 1916 for attempting to ram a U-boat.

Another possibility is that they were interrogated, put back into their lifeboat  and lost at sea.

None of Ethel and Millie’s crew were civilians. Two were RN sailors: Able Seamen Edwin Barrett and Alfred Preece. The others were members of the RNR: Skipper Charles Manning, 2nd Hand Spencer Gibson and Deck Hands John Lewis, Arthur Soames and Hugh Thompson: source naval-history.net

Skipper Crisp was awarded a posthumous Victoria Cross. Tom Crisp junior collected it and his own Distinguished Service Medal from King George V on 19 December 1917, when Leading Seaman Percival  Ross, the Nelson’s gunner, received a bar to his DSM.[7]

The full citation for Crisp’s VC, along with all those awarded for actions on Q-ships, was not published until after the war for security reasons. It is below: source naval-history.net.

Action of H.M. Armed Smack “Nelson,” on the 15th August, 1917.

On the 15th August, 1917, the Smack “Nelson” was engaged in fishing when she was attacked by gunfire from an enemy submarine. The gear was let go and the submarine’s fire was returned. The submarine’s fourth shot went through the port bow just below the water line, and the seventh shell struck the skipper, Thomas Crisp, partially disembowelling him, and passed through the deck and out through the side of the ship. In spite of the terrible nature of his wound Skipper Crisp retained consciousness, and his first thought was to send off a message that he was being attacked and giving his position. He continued to command his ship until the ammunition was almost exhausted and the smack was sinking. He refused to be moved into the small boat when the rest of the crew were obliged to abandon the vessel as she sank, his last request being that he might be thrown overboard.

(The posthumous award of the Victoria Cross to Skipper Thomas Crisp, D.S.C., R.N.R., 10055 D.A., was announced in London Gazette No. 30363, dated the 2nd November, 1917.)


[1] T. Bridgland, Sea Killers in Disguise: The Story of the Q Ships and Decoy Ships in the First World War (London: Leo Cooper, 1999), p. 118.

[2] A. S. Hurd, The Merchant Navy, 3 vols (London: HMSO, 1921). vol. iii, p. 59.

[3] Ibid., p. 60.

[4] Ibid.

[5] Ibid., pp. 60-61.

[6] Bridgland, Sea Killers, p. 120.

[7] Ibid., p. 42.

1 Comment

Filed under War History