Monthly Archives: October 2014

The Sinking of HMS Audacious 27 October 1914

In mid October 1914 the Germans decided to take advantage of a period of dark nights to mine the Grand Fleet’s bases. The minelayer SMS Nautilius, accompanied by the light cruiser SMS Kolberg, left port on 16 October, followed the next day by SMS Berlin, a 17,000 ton Norddeutscher Lloyd line converted into a minelayer. She was commanded by Kapitän Hans Pfundheller.

Nautilus and Kolberg headed for the Firth of Forth, but picked up wireless traffic and observed smoke when about 100 miles from May Island. Assuming wrongly that they had been discovered, they turned for home.

Berlin’s orders were to head for the Firth of Clyde. If possible, she was mine the approaches to Glasgow between Garroch Head and Fairland Head in the Firth. If this was not feasible, she should mine the entrance to the Firth between Pladda and Fairland Head.

The Germans expected that Berlin would have to pass through the British blockade patrols, but in fact they ‘could not have chosen a more favourable moment for the attempt to send a minelayer through the blockade line.’[1]

The threat from U-boats had led to the withdrawal of the Grand Fleet from the North Sea and its cruiser squadrons were to the north west of the Shetlands when she headed northward between the Shetlands and Norway. She then passed between Iceland and the Faeroes, where there were gaps in the blockade line because of a shortage of ships.

Once in the Irish Sea, Berlin picked up wireless traffic that indicated that she was near two British forces. Pfundheller had been told before his ship sailed that the entrance to the Irish Sea was not closely patrolled, but this was clearly wrong. He therefore decided that he could not enter the Firth of Clyde. Instead, he decided to lay his 200 mines north of Tory Island.

Berlin began to lay her mines at 11:35 pm on 22 October, finishing at 00:10 am the next day. She was only 30 miles away from the Grand Fleet at Lough Swilly, but its anti-submarine destroyers patrolled only inside the Lough. She then headed into the North Atlantic before passing between Greenland and Iceland on 30 October.

Pfundheller had been ordered to raid the Iceland fishing fleets, but the weather was too bad for them to be at sea, so he headed north to carry out his third task, the raiding of trade between Archangel and Britain. However, bad weather made commerce raiding impossible because boats could not be lowered in order to inspect merchant ships.

By 15 November, Berlin was short of coal, her boilers were defective and a bright moon made it likely that the British would find her. Pfundheller’s orders permitted him to allow his ship to be interned in a neutral port if there was no other practicable option open to him. At 9 am on 15 November, Berlin entered Trondheim in Norway. She was interned 24 hours later.

Despite this inauspicious end, Berlin’s cruise proved to be very successful. At 2:15 pm on 26 October, the merchantman Manchester Commerce struck one of her mines and sunk. The 30 survivors of her 44 man crew were picked up by the trawler City of London at 2:30 am on 27 October.

The trawler then made for Carnlough on the north east coast of Ireland to report the sinking. Her time of arrival is unknown, but was probably just after 10 am, since she was capable of 8 knots and had a 60 mile journey. The news was transmitted by the local police at 10:46 am to a coastguard war signal station and reached the Admiralty at 11:35 am. However, Admiral Sir John Jellicoe, the commander of the Grand Fleet, did not receive it until 2 pm.[2]

At 5 pm on 26 October the eight Orion and King George V class dreadnoughts of the 5th Battle Squadron, commanded by Vice Admiral Sir George Warrender, left Lough Swilly to carry out practice firing. At 8:50 am HMS Audacious struck a mine, about a mile from where the Manchester Commerce had been sunk. It was at first assumed that she had been torpedoed by a U-boat, so the other battleships followed the orders issued after U9 had sunk three British cruisers in the Broad Fourteens and moved away. At 11:09 am, the dreadnought HMS Monarch reported that she had sighted a U-boat, although none were in the area. The light cruiser HMS Liverpool stayed with Audacious.

Audacious had struck one of Berlin’s mines, which had flooded her port engine room, causing the port engine to stop, though she was able to make about 9 knots for Lough Swilly using the starboard one. However, the very rough sea meant she was at risk of capsizing. Berlin’s mines had been set deep, meaning that they would not be hit by small ships, but would strike a battleship where its underwater protection was weakest.

Jellicoe sent all available destroyers and tugs, the collier Thornhill, the supply ship Assistance and the fleet messenger Cambria to give assistance. Vice Admiral Sir Lewis Bayly was on Cambria to direct operations. Jellicoe could not risk a larger ship whilst it was believed that Audacious had been torpedoed. However, the White Star liner Olympic, captained by Commodore Herbert Haddock RNR arrived in response to the distress signal.

All but 250 of Audacious’ crew were taken off, although the bad sea, exacerbated by the rolling of Audacious, made boat work very difficult.

At 2 pm, the destroyer HMS Fury, captained by Lieutenant-Commander Charles Sumner, managed to take a low line from Olympic to Audacious. However, it was impossible to steer the dreadnought and the line parted. Fury tried to pass tow lines from Liverpool and Thornhill, but was unsuccessful.

By 5 pm it was getting dark, and Audacious was rolling heavily. Her crew was reduced to a small party of volunteers, but at 6 pm it was decided to abandon her for the night because the risk of her capsizing was so high. By then, Jellicoe had learnt of the fate of the Manchester Commerce, so realised that Audacious had been mined, not torpedoed. He sent the pre-dreadnought battleship HMS Exmouth to take her in tow. However, Audacious had been abandoned by the time that Exmouth arrived.

At 9 pm, Audacious capsized and blew up. The only casualty was Petty Officer William Burgess of HMS Liverpool, who was killed by a large amour plate that was thrown 800 yards to his ship.

The British decided not to announce the loss of Audacious, something described by the Official History as being ‘so contrary to all British tradition and sentiment, that the Admiralty would not decide without reference to the Cabinet.’[3]

Jellicoe requested that the loss be kept quiet because of the poor military situation. Operations on the Belgian coast were at a crisis point, and it was possible that the German fleet might attack British warships supporting land forces. The Cabinet was more concerned with the impact on the Ottoman Empire, which the Allies still hoped to keep neutral.

It was accepted that the news could be kept quiet for only a week to 10 days. American passengers on board the Olympic had seen Audacious in severe difficulties and heard her explode. Some had taken photos of her listing and low in the water. Her departure was delayed for three days, but US newspapers reported the loss of Audacious. In the event, the Germans did not learn the news until 19 November.

Britain did not acknowledge the loss of Audacious until after the war, even though all neutral countries realised that she had been sunk. She was even kept in official lists of ships’ movements and activities. This led many neutrals to distrust British government statements, which would ‘have disastrous repercussions after the Battle of Jutland in 1916.’[4]

Audacious was the first dreadnought to be sunk and the only British dreadnought battleship to be sunk by enemy action in WWI, although one was later lost to an accidental explosion and three British battlecruisers were sunk at Jutland in 1916.


[1] Naval Staff Monograph (Historical)  vol. xi, Home Waters part ii, September and October 1914. p. 126.

[2] Ibid. pp. 129-31 and notes 1-7 on p. 130.

[3] J. S. Corbett, H. Newbolt, Naval Operations, 5 vols. (London: HMSO, 1938). vol. i, p. 241.

[4] J. Goldrick, The King’s Ships Were at Sea: The War in the North Sea, August 1914-February 1915 (Annapolis, MD: Naval Institute Press, 1984), p. 142.

2 Comments

Filed under War History

The Burning of the White House and the Star Spangled Banner

On 2 June 1814, 2,500 men from Wellington’s army under the command of Major General Robert Ross, like many of his men a Peninsular War veteran, left Bordeaux, arriving at Bermuda on 25 July. Another battalion of 900 men was then added to Ross’s force.

Ross’s force and its naval escort then proceeded to Tangier Island in Chesapeake Bay where it joined a British fleet commanded by Vice Admiral Sir Alexander Cochrane, who had been appointed to command of the Royal Navy’s North American Station in March. The combined fleet included more than 20 warships, four of them ships of the line, and a large number of transports. Ross’s force was increased to over 4,000 men by the addition of 700 marines.[1]

Cochrane sent frigates up the Potomac and towards Baltimore in order to confuse the Americans before entering the Patuxent. On 19 August Ross’s force made an unopposed landing at Benedict, 50 miles from Washington.. However, the difficulty of including horses in an amphibious operation meant his force lacked cavalry and had only one 6 pounder and two 3 pounder guns, which had to be man-handled.

Jeremy Black notes that:

‘the British could not only take Washington without fatal effects to the American war effort…but…the Americans had the opportunity to withdraw from Washington without losing their capacity to maintain their forces.’[2]

At Bladensburg on 24 August, Ross attacked a larger American force commanded by Brigadier-General William Winder, a lawyer before the war. He had been captured at the Battle of Stoney’s Creek in July 1813, and had only recently been released as part of a prisoner exchange.

Alfred Mahan quotes the subsequent US Court of Enquiry as saying that Winder had 5-6,000 men, all but 400 of them militia. The Navy had provided 120 marines under Captain Miller and the 500 sailors of Commodore Joshua Barney’s gunboat flotilla, but Barney had to leave some of his men behind to burn their vessels.[3]

Theodore Roosevelt says that the militia fled so quickly that only 1,500 British troops got into action, to be faced by 78 marines under Miller and 370 sailors under Barney with two 18 pounder guns and three 12 pounders.[4]

Mahan gives British casualties as being 64 killed and 184 wounded. He says that only 10 or 12 Americans were killed and 40 wounded ‘by the estimate of their superintending surgeon.’[5] Wikipedia quotes sources giving a range of 10-26 Americans killed, 40-51 wounded and 100-20 captured.  The small number of losses suffered by the losing side indicates how few Americans stood and fought. This should be blamed on politicians who did not make proper provision for the defence of their capital, rather than on poorly equipped, inexperienced and badly led citizen soldiers.

The British entered Washington the same night without further fighting. Rear Admiral George Cockburn ordered the destruction of the public buildings and military facilities, including the White House. Black comments that this was done:

‘in retaliation for American destructiveness at York in 1813, an attempt at equivalence not generally mentioned in American public history where the emphasis, instead, is in damage by the British.’[6]

It is often claimed that the White House is so called because it was painted white to hide the scorch marks from the burning. In fact it is built of white-grey sandstone;  the name was used unofficially from about 1810, when it was officially named the Executive Mansion, but it did not become the official name until 1902: see the Encyclopaedia Britannica‘s website.

Ross ordered that private property should not be destroyed. This was obeyed, with the exception of a small number of buildings whose occupants resisted the invaders. British looters were flogged.

The Americans themselves burnt the Navy Yard, its stores and supplies and two warships that were almost complete: the 44 gun frigate USS Columbia and the 18 gun USS Argus. The damage from this destruction alone was estimated to have cost $500,000.[7]

The invaders re-embarked on 30 August and landed at North Point, 10 miles from Baltimore. A force of Maryland militia confronted Ross and his advance guard. The British attacked and the Americans, assuming that they were heavily outnumbered, retreated, but Ross was killed.

The British, now under Colonel Arthur Brooke, another veteran, continued to advance, but met more Americans. The British defeated them, but Brooke halted his force a mile and a half from Baltimore as the British believed that the army could not advance further until the navy had overcome Fort McHenry. Baltimore’s defences had been greatly improved by Major General Samuel Smith, a rich merchant who commanded the Baltimore militia and was a Republican Senator.

The naval bombardment was carried out by the rocket ship HMS Erebus and the bomb ketches Devastation, Aetna, Meteor, Terror and Volcano, each carrying a 13 inch mortar with a range of two and a half miles. The bombardment lasted from dawn on 13 September to 7:30 am on 14 September. From 1,500 to 2,000 rockets and bombs were fired, but relatively little damage was done. Only four Americans were killed and 24 wounded.

The British ships stayed out of range of Fort McHenry’s guns, with the exception of a short period on the afternoon of 13 September, when they closed the range, before withdrawing again after being damaged by American fire. Ships of that period were vulnerable to forts, so the British were forced to stay at a range where they could do little damage. A night time amphibious assault also failed.

Brooke’s men re-embarked at North Point on 15 September and were taken to Jamaica. From there, they could threaten the Gulf Coast of the USA. The British defeat at Baltimore did not end their blockade of the USA.

The American victory was celebrated by Francis Scott Key in a poem called the Defence of Fort McHenry. It was then set to the tune of a British song called The Anacreontic Song, written by John Stafford Smith for the Anacreontic Society, a London social club for amateur musicians. It was renamed The Star Spangled Banner and became the US national anthem in 1931.

HMS Terror was used as a polar exploration ship from 1836; bomb vessels had to be strongly built, so were particularly suited to operating in ice. She was fitted with a steam engine before being sent on the expedition led by Sir John Franklin that set off in 1845 to try and find the Northwest Passage.

The HMS Erebus that accompanied her was not the ship of the same name that had taken part in the bombardment of Fort McHenry. The entire expedition was lost, but in September 2014 the underwater wreck of Erebus was found.


[1] Troop and ship numbers are from A. T. Mahan, Sea Power in Its Relations to the War of 1812, 2 vols. (London: Samson Low, Marston, 1905). vol, ii, p. 184

[2] J. Black, The War of 1812 in the Age of Napoleon (Norman, OK: University of Oklahoma Press, 2009), p. 167.

[3] Mahan, Sea Power 1812. vol. ii, pp. 185-87

[4] T. Roosevelt, The Naval War of 1812, 2 vols. (New York, NY: Charles Scribner’s Sons, 1900-2). vol. ii, p. 44.

[5] Mahan, Sea Power 1812. vol. ii, p. 189.

[6] Black, War of 1812, p. 174.

[7] A. D. Lambert, The Challenge: Britain against America in the Naval War of 1812 (London: Faber, 2012). Kindle edition, location 6238.

2 Comments

Filed under War History

The Battle of Texel Island 17 October 1914

On 17 October, the 1st Division of the Royal Navy’s 3rd Flotilla was sent to relieve a routine patrol in the Broad Fourteens. It consisted of the new light cruiser HMS Undaunted (Captain Cecil Fox), the flotilla leader, and the Laforey class destroyers HMS Lance, Lennox, Legion and Loyal.

At about 1:40 pm, when about 50 miles south west of Texel Island,  Undaunted spotted the smoke of four ships about eight miles away and approaching. Ten minutes later, they were identified as German torpedo boats in line abreast. The British closed and the Germans turned away both at full speed.

However, the British destroyers were new vessels capable of 29 knots and Undaunted 28.5 knots. The German ships, S115, S117, S118 and S119 of the 7th Half Flotilla, were of the 1898 type and completed in 1903. They had been designed for 26 or 27 knots, but a Naval Staff Monograph, written post war for internal RN use, quotes the German Official Naval History as saying that they were capable of only 19 knots.[1]

The Germans were heavily outgunned, so stood little chance unless they got inside torpedo range: two 50 mm (1.97 inch) guns and three 45 cm (17.7 inch) torpedo tubes versus three 4 inch guns and four 21 inch torpedo tubes in the British destroyers and Undaunted’s two 6 inch and six 4 inch guns and four 21 inch torpedo tubes.

Undaunted opened fire at 8,000 yards range at 2:05 pm, but soon ceased fire as the Germans were zigzagging, making it hard to hit at that range. The Germans had been on a mine laying mission, and started to throw their mines overboard. The Naval Staff Monograph suggests that the British mistook the splashes for the launch of torpedoes.[2]

A general action began once the range was done to 2,500 yards. Legion and Loyal concentrated on the western most German, S117, which sank at 3:17 pm according to Fox’s report (3:14 according to his ship’s signal log).[3] Lance and Lennox concentrated on the eastern most German ship, S115, which was out of action by 4 pm, but did not sink for another half hour.

S118 struggled to keep up with the other German ships because of a leaking condenser. She therefore turned towards Undaunted. Korvettenkapitän Georg Thiele, the Half Flotilla commander, realising that his force had no chance of escaping, took S119 after her in the hope of torpedoing Undaunted.

Several German torpedoes were launched, but Fox kept his ship out of their range. All four German ships were sunk, although their skilful manoeuvring meant that the British used a lot of ammunition.

Fox’s report indicates that the second German ship sank at 3:30 pm and the third at 3:55 pm. Only 35 Germans survived, of whom 33 were picked up by the British and two by a neutral fishing boat the next day. 223 Germans were killed including one who died of wounds after being rescued by the British. British casualties were five wounded and their ships suffered little damage.

This was a one sided action, but it boosted British morale after the sinking of HMS Hawke by U9 two days before. More importantly, on 30 November a British fishing vessel trawled up a chest that had been thrown overboard by Thiele’s S119. It contained code books, including one used by admirals and the commanders of squadrons and flotillas.

[1] Naval Staff Monograph (Historical)  vol. xi, Home Waters part ii, September and October 1914. p. 118. This document and others in the same series can be freely downloaded from this link to the Royal Australian Navy’s website.

[2] Ibid., p. 119.

[3] This account is largely based on Ibid. pp. 118-19, which in turn is based on Fox’s report and the logs of his ships.

1 Comment

Filed under War History

U9 Sinks HMS Hawke 15 October 1914

On 13 October the German Navy, after receiving intelligence that the British Grand Fleet was at least partly operating from Scapa Flow, sent two U-boats to patrol off the Orkneys. The U9, commanded by Kapitänleutnant Otto Weddigen, which had already sunk three British cruisers in a single engagement, was to patrol to the east of the Orkneys. The U18 was ordered to patrol to the west, but had to return to base almost immediately because of a hot bearing. She was replaced with the U17. The U-boats were to stay 60-100 miles off the Orkneys.

U9 was an early German submarine, carrying only four 17.7 inch torpedo tubes and just six torpedoes. She was capable of only 8 knots submerged. On the surface her Körting paraffin engines gave off a lot of smoke and sparks and a speed of only 14 knots. She could make 8 knots submerged. U17 and U18 were newer, larger and faster: 15 knots on the surface and 9 submerged. However, they had the same armament as U9 and also had paraffin engines.

Other U-boats had been operating in the North Sea; U16 fired two torpedoes at the cruiser HMS Antrim on 9 October, but they missed thanks to orders given quickly by Commander John Webster, Antrim’s navigating officer. He was promoted to Captain for his action.

The Grand Fleet had been patrolling the North Sea in early October because of the risk that German battlecruisers would try and break out in order to attack a convoy that had left Canada on 2 October carrying over 30,000 men and their equipment to Europe. Click here for more details.

It was escorted by four old cruisers, two pre-dreadnought battleships and one of the Royal Navy’s newest battlecruisers, HMS Princess Royal. Other cruisers covered ports on the east coast of the USA in case German liners that had been trapped there by the outbreak of war had been secretly armed and tried to break out to attack the convoy.

So secret was the assignment of Princess Royal to the escort that neither the Canadian government nor the escort commander, Rear Admiral Wester Wemyss, knew about it until she met the convoy in the Atlantic. This level of secrecy was justified by the need to minimise ‘the risk entailed in weakening the 1st Battle Cruiser Squadron.’[1] The convoy reached the UK without being attacked, although the presence of U-boats in the channel forced it to dock at Devonport rather than Southampton, as originally planned.

On 15 October five Edgar class cruisers were on patrol off Peterhead on the north east coast of Scotland, sailing in line abreast 10 miles apart. Rear Admiral Dudley de Chair’s flagship HMS Crescent had returned to Cromarty to take on coal, ‘but he had left definite instructions for the method of cruising so as to minimise the risk of submarine attack.’[2]

The squadron did not repeat the errors of U9‘s earlier victims, which had kept to a steady course, formation and speed. Instead, the Edgars ‘kept well apart; they continually altered course; they varied their speed.’[3]

However at 9:30 am HMS Hawke and Endymion ‘incredibly’ stopped so that Hawke could send a boat to her sister ship in order to collect mail.[4] Endymion returned to her station once the boat had left. Hawke was stationary for 15 minutes until she had recovered her boat before moving off at 12-13 knots. By then the rest of the squadron was out of sight.

Weddigen had been tracking the squadron since daybreak, but had been unable to get into a position to fire. He dived after almost being run down by a cruiser and came up to periscope depth expecting to have a shot at the cruiser with one of his stern tubes. However, she was in front of U9, so he fired a bow tube. Hawke was hit amidships at 10:30 am and sank within 10 minutes. Only two boats could be launched in the time available.

The rest of the squadron did not know what had happened until 1:20 pm, when U17 fired a torpedo at HMS Theseus. The squadron was obeying de Chair’s instructions regarding anti-submarine measures, and the torpedo missed. The squadron was ordered to head north west at full speed, but Hawke did not reply.

One of Hawke’s boats, with 49 survivors, was found by the Norwegian merchantman Modesta, but there was no sign of the other one, which was probably crushed by Hawke as she capsized. Another 22 men on a raft were rescued by the fast flotilla leader HMS Swift. U17 fired a torpedo at her as she headed to Scapa, but it missed thanks to Swift’s high speed. One of the men rescued died the next day, making a total of 70 saved and 524 lost. They are listed on the website Naval-History.net.

At 1:15 pm on 16 October, the Acorn class destroyers HMS Lyra, Nymphe, Nemesis and Alarm, were making 13 knots on patrol off the eastern entrance to Scapa Flow. Nymphe had just increased speed to 15 knots and followed a change of course signalled by Lyra when her officer of the watch spotted a periscope.

It belonged to U9, which was manoeuvring with the intention of getting between Lyra and Nymphe so that it could torpedo them simultaneously using a stern and a bow tube respectively. It fired a bow torpedo that missed Nymphe by two feet, Nemesis by 200 yards and Alarm by 10 yards after she went hard a port to stop the torpedo hitting her stern. Nymphe tried to ram U9, but Weddigen managed to dive his boat in time. The destroyers stayed in the area until dark, but had no means of attacking a submerged submarine.

There had been a number of false sightings of alleged German U-boats in British harbours. One on 1 September led to the First Battle of Scapa Flow, with British ships firing on phantom periscopes. The first ‘periscope’ sighted was probably a seal. [5]

The Grand Fleet went to sea after this, with all but the 3rd Battle Squadron then being based at Loch Ewe from 5 to 24 September. This base was thought to be far enough from German bases to be safe from U-boats, but it was also too far from the English Channel for the Grand Fleet to have arrived in time had German High Seas Fleet entered the English Channel to attack the British Army’s supply ships.

In October a mistaken sighting of a periscope as the battle cruisers entered the Cromarty Firth led to the Battle of Jemimaville in which a 4 inch shell damaged the roof and chimney of a house in the village of Jemimaville. A baby was slightly injured, but the parents were ‘soothed’ with the news that two U-boats had been sunk.[6]

At 4 pm on the afternoon of 16 October, it was reported wrongly that there was a U-boat in Scapa Flow. Loch Ewe had been abandoned as a base after a U-boat had been reported in the harbour on 6 October. There was another reporting of a submarine in Scapa Flow on 17 October. The next day the Grand Fleet’s commander Admiral Sir John Jellicoe started to move it to Lough Swilly on the north coast of Ireland and Loch na Keal, south of Loch Ewe. These harbours had narrow and easily defensible entrances and Lough Swilly was shallow, making it hard for a submerged submarine to safely enter.

The Grand Fleet returned to Scapa Flow on 9 November. A fortnight later the trawler Dorothy Gray rammed U-18 inside the anchorage. The submarine was so badly damaged that her captain, Kapitänleutnant Heinrich von Henning, had to scuttle her. One man was lost, and the rest of her crew captured. Had she escaped, the Germans would have learnt about the weakness of Scapa Flow’s defences, but her loss made them assume that it was well defended.

There were few more submarine alerts until later in the war. However, it was the middle of 1915 before Scapa Flow had been made secure by the use of sunken merchant ships and booms to block some channels, defensive minefields, seaplanes, gun batteries and searchlights. Hydrophones were later added to the defences.


[1] Naval Staff Monograph (Historical) 1924 xi, Home Waters part ii, September and October 1914. p. 103.

[2] J. S. Corbett, H. Newbolt, Naval Operations, 5 vols. (London: HMSO, 1938). i, p. 207

[3] R. H. Gibson, M. Prendergast, The German Submarine War, 1914-1918. (London: Constable, 1931), p. 12.

[4] J. Goldrick, The King’s Ships Were at Sea: The War in the North Sea, August 1914-February 1915 (Annapolis, MD: Naval Institute Press, 1984), p. 138.

[5] A. J. Marder, From the Dreadnought to Scapa Flow; the Royal Navy in the Fisher Era, 1904-1919, 5 vols. (London: Oxford University Press, 1961-70). ii, p. 66.

[6] R. K. Massie, Castles of Steel: Britain, Germany, and the Winning of the Great War at Sea (London: Jonathan Cape, 2004), p. 155.

7 Comments

Filed under War History

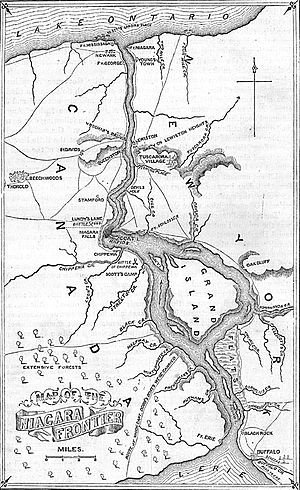
Lundy’s Lane and the Niagara Front in 1814

Major General Jacob Brown, commanding the US Left Division, failed to follow up the US victory at Chippawa on 5 July

1812. He allowed the defeated British, commanded by Major General Phineas Riall, to retreat to Fort George near the mouth of the River Niagara on Lake Ontario.

Brown advanced to Queenston, a few miles south of Fort George, but his force, whose largest guns were 18 pounders, was too weak to assault it. He hoped that 24 pounders might be brought from Sacket’s Harbor, but British control of the lake made this impossible. On 24 July the Americans withdrew behind the River Chippawa in order to re-supply before moving on the Burlington Heights.

Lieutenant General Gordon Drummond, the Lieutenant Governor of Upper Canada, ordered a British force under Lieutenant Colonel John Tucker to advance from Fort Niagara along the east bank of the Niagara with the intention of threatening Brown’s lines of communication. Riall was to demonstrate on the west bank

Drummond left York for Fort George on the evening of 24 July, arriving at before daybreak the next day. He had intended to remain there for a day, but on arriving learnt that the Americans had withdrawn and that Riall had advanced after them. He therefore decided to follow with reinforcements.

Brown became aware of Tucker’s advance and decided that his best course of action was to move towards Queenston in order to force Tucker to return to Fort George. His leading unit was the 1st Brigade under Brigadier-General Winfield Scott.

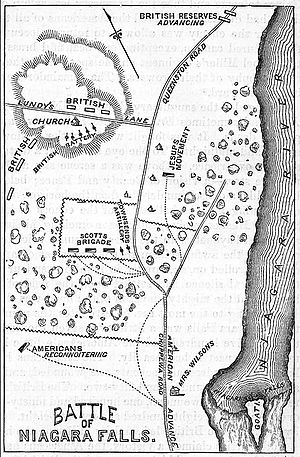
The two armies met at Lundy’s Lane on the evening of 25 July. Both sides aimed to defeat the enemy, rather than to capture territory, but tactically it was a battle for the hill on which the British artillery was positioned. The action is sometimes called the Battle of Niagara Falls.

The position of the guns was crucial and the British ones inflicted heavier casualties because of their higher position. The Americans eventually took the hill and beat off a series of British counter-attacks, but were forced to withdraw overnight because of shortages of ammunition and water.

Donald Graves gives the following figures for troop strengths:

US: 2,508 infantry, 200 artillerymen and 70 cavalry totalling 2,778 men. The Left Division had 14 guns: five 18 pounders, three 12 pounders, four 6 pounders and two 5.5″ howitzers. However, probably only nine were present: three 12 pounders, four 6 pounders and two 5.5″ howitzers. On 23 July the Left Division had 5,009 men, but many were in garrisons and some were guarding the camp.[1]

Anglo-Canadian: 2,226 British regulars, 852 Canadian regulars and 550 Militia totalling 3,638 men Probable artillery strength was a rocket section and eight guns: two 24 pounders, five 6 pounders and one 5.5″ howitzer.[2] Many accounts of the battle mention the rockets, but Graves says that ‘there is little evidence that these dramatic projectiles caused much damage.’[3]

Drummond had 2,200 men on the field at the start of the battle, and thought wrongly that he faced 4-5,000 Americans.[4]

Official US casualties totalled 860: 173 dead, 571 wounded and 117 missing. Graves notes that many British and Canadian historians think that the true US casualties were higher.[5] However, he argues ‘that Brown’s return was probably as accurate as it could be.’[6]

Official British casualties totalled 878: 84 dead, 559 wounded, 193 missing and 42 captured. This return includes 142 casualties for the Militia, 75 of which were missing. A later return for the Militia one gives 97 casualties, including 36 missing, so some missing may have returned to the ranks. The US claimed 169 prisoners. Graves thinks actual British casualties were probably about 800.[7]

The wounded included Brown, Scott, Drummond and Riall. Riall was captured, lost his left arm and recuperated alongside Scott, who did not serve again in the war.

Jeremy Black notes that ‘both sides claimed victory and produced conflicting contemporary accounts.’[8] Casualties were similar on both sides, but the British were entitled to claim victory on the basis of possession of the ground after the battle.

Brigadier-General Eleazer Ripley, the surviving senior US officer, did not attack again the next morning, but retreated to Fort Erie. The US no longer threatened Canada and had lost the initiative.

The British besieged Fort Erie, but an attack by Drummond on the night of 15 August was defeated: casualties were about 900 attackers and 90 defenders. Brown launched a sortie on the night of 17 September. His men were outnumbered 3,000 to 4,000, but inflicted casualties of about 600 men for the loss of 500 of their own and captured or destroyed much of the British artillery.[9] This American victory forced the British to end the siege.

4,000 US troops under Major General George Izard were moved from Plattsburg to the Niagara front, arriving on 12 October. Izard had 7,000 men, but was reluctant to attack Drummond’s defensive position. The US won a small engagement at Cook’s Mill on 18-19 October, but Drummond did not react; Izard then withdrew to the US shore of the Niagara.

On 5 November Fort Erie was abandoned and destroyed. This largely ended operations on the Niagara Front and the US threat to Canada. However, the performance of Brown’s Left Division was important for American morale and the future of the US Army. It would, according to Alfred Mahan, ‘have been a calamity…had the record for that generation closed with the showing of 1812 and 1813.’[10]

Graves describes the Left Division as being the ‘best led, best trained and most experienced military force [the USA] was to field during the war…With some truth it can be said that the birth of the modern US army occurred not at Valley Forge in 1777-1778 but along the Niagara in 1814.’[11]

[1] D. E. Graves, Where Right and Glory Lead!: The Battle of Lundy’s Lane, 1814, Rev. ed. (Toronto: Robin Brass, 1997), pp. 257-58.

[2] Ibid., pp. 261-63.

[3] Ibid., p. 131.

[4] Ibid., p. 121.

[5] Ibid., p. 196.

[6] Ibid., p. 271.

[7] Ibid., p. 195.

[8] J. Black, The War of 1812 in the Age of Napoleon (Norman, OK: University of Oklahoma Press, 2009), p. 156.

[9] Troop strengths and casualties in this paragraph are from T. Roosevelt, The Naval War of 1812, 2 vols. (New York, NY: Charles Scribner’s Sons, 1900-2). vol. i, p. xxi

[10] A. T. Mahan, Sea Power in Its Relations to the War of 1812, 2 vols. (London: Samson Low, Marston, 1905), p. 169. vol. ii,

[11] Graves, Where, p. ix.


4 Comments

Filed under War History