Monthly Archives: June 2015

Lieutenant-Commander Martin Nasmith VC and HM Submarine E11

Lieutenant-Commander Martin Nasmith was captain of the submarine HMS E11 at the outbreak of WWI. In October 1914 E11 was one of three British submarines that tried to enter the Baltic Sea. The other two succeeded, but E11 was delayed by technical problems. On 19 October she mistook a neutral Danish submarine for a German U-boat, but her torpedo attack fortunately missed. She was spotted by a seaplane whilst recharging her batteries on the surface the next day; destroyers searched for her all day. After trying but failing to get past the Germans patrols again the next day Nasmith headed back to base on 22 October.[1]

On 17 December E11 was at southern end of a patrol line of British submarines in Helgoland Bight. Just after 7:00 am a number of German destroyers appeared, searching at high speed. An hour later large ships, which must have been returning from the German raid on the English north east coast, came into sight. Nasmith approached to 400 yards of one of them and fired a torpedo, but it ran too deep. He tried to get a shot on the third in the German line, but its zigzag course left it 500 yards away and heading straight for E11, forcing Nasmith to dive rapidly. This disturbed the boat’s trim, and she broke the surface when returning to periscope depth. She was able to escape. but the Germans made off at high speed.[2] On Christmas Day 1914 E11 rescued four of the airman who took part in the Cuxhaven Raid.

By May 1915 E11 was in the Dardanelles. On 17 May E14 returned from a successful patrol in the Sea of Marmara that earned her captain, Lieutenant-Commander Edward Boyle, the Victoria Cross and every member of her crew a medal. E11 was to head through the Straits to replace her the next day. The night before Boyle briefed Nasmith on the mines, nets and guns defending the straits.[3]

19 May: E11 set off at 1:10 am on 19 May, passing through the Allied destroyer line at 3:20 am and then diving. At 6:10 am she saw the Ottoman battle ships Targut Reis and Heredin Barbarossa, accompanied by several destroyers. The battleships withdrew and the destroyers fired on E11 whenever her periscope was raised. It was very easy to spot because of the speed that she was making and the light conditions. By 9:45 pm she was through the Straits. At 10:00 pm she surfaced in order to charge her batteries.[4]

20 May: She stayed on the surface, charging her batteries until 4:00 am, apart from 0:30 – 0:40 am, when a destroyer appeared, forcing her to dive. No merchant ships were seen during the day. Generally E11 stayed on the surface at night in order to charge her batteries. During the day she was on the surface if it was safe to do so.

21 May: At 11:30 am E11 stopped a small sailing vessel. Four chickens were taken; the scared but polite skipper declined payment. E11 used the vessel as a screen for the rest of the day: it was then very foggy.

22 May: Only warships were encountered and evaded. Attempts to radio the destroyer HMS Jed failed.

23 May: Course was altered towards Istanbul at 3:00 am. A transport was encountered at 4:50 am, whilst E11 was inspecting a sailing vessel. E11 dived to attack, but the transport spotted her and made off. At 5:50 am the 775 ton Ottoman gunboat Peleng-I Derya was seen anchored off Istanbul.[5] E11 dived, approached her and fired a torpedo into her. The gunboat sank, but first got off rifle fire and shots from her 6 pounder gun; one of the latter put E11’s forward periscope out of action.

24 May: Radio contact was made with Jed. Thereafter E11 and Jed were in regular contact.

At 10:30 am a smaller steamer was spotted heading west. E11 surfaced and ordered her to stop. The steamer tried to flee, but stopped after coming under rifle fire from E11. Her crew panicked and started to abandon ship. The panic was calmed by Silas Q. Swing, the war correspondent of the New York Sun. He said that the steamer was a passenger ship that was heading for Chanak and was not, as far he knew, carrying stores, before just making the last boat.

The steamer was in fact carrying a 6 inch gun, other gun mountings and a large amount of ammunition. After taking some souvenirs E11’s crew set a demolition charge, sinking the ship, which was the 480 ton naval auxiliary Naga.[6]

More smoke had by then been spotted. It was another steamer, similar to the Naga. E11 dived to attack, but was spotted. The target headed for Rodasto, with E11 pursuing on the surface. Large quantities of stores could be seen on the steamer’s deck. She berthed at Rodasto’s pier. E11 dived and approached, but ran aground 2,000 yards away as the water quickly became shallower. She fired a torpedo, which sank the steamer; she was the 512 ton SS Hunkar Iskelesi.[7] E11 then withdrew under rifle fire, which seemed to be aimed at her remaining periscope. It was hit but not damaged.

Another vessel was then observed. It was a small paddle steamer, which initially tried to flee. It stopped after coming under rifle fire, but then tried to ram E11 after realising that the submarine did not have any guns other than rifles. The paddle steamer, which was carrying horses, finally ran ashore. E11 approached, but came under fire from 50-100 cavalrymen. She fired a torpedo, but it missed; only the stern could be targeted and the shallow water made it impossible to close the range.

At 10:30 pm E11 headed towards Istanbul.

25 May: On the same day as U21 sank the battleship HMS Triumph E11 arrived at the Golden Horn. At 12:30 pm she fired torpedoes at two transports moored at the Arsenal Wharf. One hit and damaged the 3,559 ton SS Istanbul, which beached herself in shallow water, while the other, aimed at SS Kismet, circled back, forcing E11 to take evasive action, before escaping back to the Sea of Marmara.[8] The action was observed by the USS Scorpion, guard ship to the US Embassy. Her log noted that four torpedo boats fired on E11.[9]

26 May: The spare torpedoes were made ready. The rest of the day was spent bathing, repairing and mending clothes and resting.

27 May: An Ottoman battleship and two destroyers were seen at 1:30 am, but one of the destroyers forced E11 to dive as she was about to fire. A small steamer was observed at 5:00 pm, but not attacked after she fired on E11.

28 May: Smoke was spotted at 6:00 am. Half an hour later a convoy of one large and four small transports, escorted by a destroyer became visible. At 7:30 am a torpedo was fired at the largest transport, hitting and sinking the 474 ton SS Bandirma. Nasmith, conscious of the risk to E11’s periscope from Ottoman fire, dived his boat. He brought her back to periscope depth once safely clear, observing the destroyer searching for the submarine and the other transports continuing on their course.

At noon a steamship was seen approaching. A torpedo was fired, but no explosion was heard, although the target was seen to stop briefly. The torpedo was later found floating and hoisted back on board after Lieutenant Robert Browne had removed the firing pistol. Damage to the torpedo’s head showed that it had struck the ship, the 216 ton SS Dogan, without exploding.[10]

A small sailing vessel was stopped at 4:30 pm. She was not carrying any cargo and was allowed to continue after being relieved of various delicacies.

29 May: An attack on a store vessel at 7:00 am failed, with E11 breaking surface. Only two or three destroyers were seen during the rest of the day.

30 May: Day spent mainly in clearing the foul air in E11, cleaning her as far as possible and washing and bathing by the crew.

31 May: At 8:00 am a large ship of the German Rickmers Line was seen embarking troops at Panderma. At 9:20 am a torpedo was fired that hit her. She listed heavily to port, but her crew managed to beach her. The ship, the 3,431 ton SS Madeline Rickmers, was wrecked.[11]

1 June: A quiet day.

2 June: A destroyer was spotted at 8:10 am but E11 evaded her by diving. At 9:00 am E11 surfaced and headed to intercept a ship whose smoke had been observed just before diving. At 9:20 am E11 dived. She fired a torpedo 20 minutes later and the target, which was the 390 ton store SS Tecielli, sank in 3 minutes.[12]

At 12:30 pm the smoke of a small ship escorted by two destroyers was spotted. E11 dived at 1:15 pm. She fired a torpedo at the merchant ship at 2:15pm , but it passed under the target, which was the 400 ton SS Basangic.[13] The torpedo was found and floated back in to E11 via the stern torpedo tube after the firing pistol had been removed.

3 June: Smoke was seen at 3:00 pm. E11 dived and approached the vessel, which resembled a steam yacht. She was not closing the range quickly enough, so surfaced. When the range was down to 2,000 yards the enemy vessel turned and headed straight towards E11, which dived. The enemy had disappeared when E11 surfaced. A destroyer forced her to dive at 4:00 pm and remain submerged until midnight.

4 June: The only ship observed was a destroyer in the afternoon and evening, which was thought to be the one that had been hunting for E11 the day before.

5 June: The day was spent ventilating the boat, charging the batteries and bathing. Problems were found in one of the main motors and the intermediate shaft was cracked, so Jed was asked to give E11 permission to return to base.

6 June: A quiet Sunday of bathing, prayers, exercise and battery charging. A destroyer an some sailing vessels were seen in the afternoon. At 9:30 pm E11 headed slowly on the surface towards the north entrance to the Dardanelles.

7 June: E11 dived at 3:40 am and entered the Straits. At 6:30 am she passed Gallipoli at 90 feet. She examined all the anchorages, but found no battleships. A few small vessels and sailing ships were seen. The nest target was a troopship anchored off Moussa Bank. At noon a torpedo was fired at her. It struck, and the ship, which was the 3,590 ton SS Ceyhan, sank.[14]

E11 passed Nagara Point at 1:30 pm and Chanak 30 minutes later. A large mine became attached to the port foremost hydroplane at Chanak. At 4:00 pm E11 cleared the mine by surfacing stern first and heading astern at full speed. She was then met by the destroyer HMS Grampus, which escorted her to Port Mudros.

On 25 June the London Gazette printed the citation for the award of the Victoria Cross to Nasmith. Lieutenant Guy D’Oyly Hughes, his second in command, and Browne both received the Distinguished Service Cross and every petty officer and rating was awarded the Distinguished Service Medal. Nasmith’s citation, reproduced on Naval-History.net, said that:

 29206 – 25 JUNE 1915

Admiralty, 24th June, 1915.

The KING (is) pleased to approve of the grant of the Victoria Cross to Lieutenant-Commander Martin Eric Nasmith, Royal Navy, for the conspicuous bravery specified below:

For most conspicuous bravery in command of one of His Majesty’s Submarines while operating in the Sea of Marmora. In the face of great danger he succeeded in destroying one large Turkish gunboat, two transports, one ammunition ship and three storeships, in addition to driving one storeship ashore. When he had safely passed the most difficult part of his homeward journey he returned again to torpedo a Turkish transport.

The number of ships that E11 was credited with sinking ties in with the ships named by Nicholas Lambert in his footnotes to the Navy Records Society’s reprint of the report of E11’s patrol on which the above is based. Their total tonnage was 13,211 tons.

This was only the first of three patrols that Nasmith and the crew of E11 made in the Dardanelles. The other two will be the subject of later posts.


[1] J. S. Corbett, H. Newbolt, Naval Operations, 5 vols. (London: HMSO, 1938). vol. i, pp. 237-38.

[2] Ibid. vol. ii, pp. 45-46.

[3] Ibid. vol. iii, 32.

[4] This account of E11’s patrol is based on [142] ‘The First Sea of Marmora Patrol’ by HM Submarine E11, 19 May to 7 Hune 1915 by Lieutenant-Cammander Martin Nasmith, Lieutenant Guy d’Oyly Hughes and Lieutenant Robert Browne, document no. 142 in N. A. Lambert, ed. The Submarine Service, 1900-1918 (Aldershot: Ashgate for the Navy Records Society, 2001), pp. 301-13. Additional comments made by the editor are footnoted.

[5] Ibid. Footnote 1, p. 303.

[6] Ibid. Footnote 1, p. 305.

[7] Ibid. Footnote 2, p. 305.

[8] Ibid. Footnotes 1-3, p. 306.

[9] Ibid., p. 307.

[10] Ibid., pp. footnote 1, p. 309.

[11] Ibid. Footnote 1, p. 310.

[12] Ibid. Footnote 1, p. 311.

[13] Ibid. Footnote 2, p. 311.

[14] Ibid. Footnote 1, p. 313.

15 Comments

Filed under War History

Trawler and Submarine Trap Sinks U-boats.

It was hard to detect or attack submerged submarines in June 1915. The only way of finding them was visual, mainly by spotting a raised periscope and/or the wake that it produced. It was also possible to see a submerged submarine that was close to the surface in the clear waters of the Mediterranean or the Dardanelles, but not in the Atlantic or North Sea.

Hydrophones, which detected submarines by sound, were introduced later in the war. Some were based onshore. Those on ships had the problem that the ship had to stop in order to prevent the sound of her engines interfering with that from the submarine: not ideal when a submarine was around.

There was also a lack of anti-submarine weapons. One not very efficient one was for ships to towing explosive sweeps. Ships fired on periscopes with their guns or tried to ram the submarine. Most submarines sunk early in the war, struck mines, suffered accident or were caught on the surface. The limited number of torpedoes carried meant that submarines preferred to surface and use guns to sink smaller ships.

One method of attacking submarines was to trick them into surfacing in order to attack with gunfire an apparently innocuous merchant ship. It would then open fire with its concealed weapons. These ships were called Q Ships and will be the subject of several later posts in this series.

A variation on this tactic was suggested by Acting Paymaster F. T. Spickernell, Secretary to Vice Admiral Sir David Beatty. It was that a trawler should tow a submerged submarine in areas were German U-boats were expected to be operating. The trawler and the British submarine would be in contact with each other via a telephone cable. A U-boat would surface to attack a trawler by gunfire rather than wasting a torpedo on a small craft. The trawler would then inform the British submarine by telephone. It would slip the tow and manoeuvre to torpedo the U-boat whilst herself remaining submerged.[1]

After a period of trials in the Forth in May, C class submarines from the Forth Local Defence were transferred to Aberdeen and Peterhead to work with the trawler Taranaki. The first patrol took began on 24 May, but no U-boats were encountered until 8 June, when Taranaki, towing C27, spotted U19 a mile and a half away, 30 miles east by north off Peterhead. She informed C27, which confirmed the situation by periscope before slipping her tow. She approached the German boat, raising her periscope again when she should have been in firing range only to see that U19 was heading towards her at 15 knots. C27 had to dive, and U19 was out of sight when she returned to periscope depth..[2]

Nothing had happened to make the Germans suspicious, but Taranaki’s appearance was changed as a precaution. She sailed from Aberdeen early on 23 June, commanded by Lieutenant-Commander Harrington D. Edwards, accompanied by Lieutenant Frederick H. Taylor’s C24. At 9:30 am the next day they were at sea to the south east of Aberdeen when U40 surfaced 2,500 yards away and fired a shot across Taranaki’s bows. A problem with the telephone meant that it was three more minutes before C24 was informed. She was unable to release the cable, so Taranaki had to release it from her end. C24 was not free until 9:45 am, during when Edwards had to keep his trawler under way. [3]

A trawler not stopping when approached by a U-boat might have made the Germans suspicious, but U40‘s captain, Kapitänleutnant Gerhardt Fürbringer, saw nothing to fear, although one of his junior officers was suspicious. [4] U40 was on her first war patrol. The British hoped that a U-boat would assume that the tow line was drawing the trawler’s net.[5]

U40 stopped 1,000 yards from Taranaki, whose crew pretended to panic and abandon ship. C24 was finding it difficult to maintain her trim because she was still attached to 100 fathoms of towing rope and telephone cable. Once this problem had been overcome, she raised her periscope, found U40 1,000 yards away, closed to 500 yards, positioned herself for a beam shot and fired a torpedo at U40 at 9:55 am. It struck the U-boat, which sank immediately. Fürbringer, another officer and a petty officer were picked up by the British. The other 29 crewmen went down with U40.[6]

The success of this method, which was kept secret, meant that the scheme was considerably expanded: C26 and C27 were to work with trawlers from Scapa Flow; C14 and C16 from the Tyne; C21 and C29 from the Humber and C3 and C34 from Harwich.[7]

On 18 July Lieutenant-Commander Claude C. Dobson’s C27 and the trawler Princess Marie José, temporarily renamed Princess Louise, set out on patrol from Scapa. The trawler was captained by Lieutenant L. Morton, but Lieutenant C. Cantlie and Lieutenant A. M. Tarver were also on board in order to train the crew. Cantile, who was the only regular officer of the three, the others being peacetime merchant marine officers who were members of  the Royal Navy Reserve, took command during the subsequent operation.[8]

At 7:55 am on 20 July Cantlie telephoned Dobson to tell him that a U-boat had been spotted 2,000 yards away. The phone then broke down; Dobson waited five minutes before slipping the cable; contact had not been restored, and he could hear gunfire.

The U-boat, which was U23, had fired one warning shot before firing at the trawler. She stopped, raised the Red Ensign and dipped it as a sign of surrender, whilst her crew prepared to abandon ship in an apparent panic. This was in accordance with the plan, which was to trick the Germans and hopefully persuade them to come closer. It worked so well that U40 stopped near the trawler.[9]

The trawler’s crew did not know where C27 was, but she was only 500 yards away on U40’s starboard beam when Dobson raised her periscope. He fired a torpedo, but U40 then started her engines, and it passed under her stern. He fired another that hit and sank U40. The British rescued 10 survivors, including her captain, Oberleutnant Hans Schulthess, and two other officers. The British Naval Staff Monograph, written after the war for internal Royal Navy use only, stated that the prisoners ‘gave a good deal of information, not only of a technical character…but also on the general work of German submarines’, which it suggests may have been a result of their good treatment.[10]

The reason why the captains and a high proportion of officers of both U-boats sunk in this manner survived was that they would have been on the bridge whilst their boats were on the surface.

In both instances the more senior of the commanders of the two British vessels involved, Edwards and Dobson, was awarded the Distinguished Service Order, and the other one, Taylor and Cantlie, the Distinguished Service Cross. The coxswains of Taranaki and C24 were also awarded the Distinguished Service Medal after the earlier action. Dobson was later awarded the Victoria Cross.[11]

U23 was the last U-boat to be caught in this way. Her survivors managed to inform some German civilian internees who were being repatriated from the United Kingdom to Germany about her fate. Consequently no more U-boats fell into the trawler/submarine trap.[12]

[1] Naval Staff Monograph (Historical) 1925 vol. xiii, Home Waters part iv, February 1915 to July 1915. p. 249.

[2] Ibid.

[3] Ibid., p. 250.

[4] Ibid.

[5] Ibid; R. H. Gibson, M. Prendergast, The German Submarine War, 1914-1918. (London: Constable, 1931), p. 46.

[6] Naval Staff vol. Xiii. p. 250.

[7] Ibid., pp. 250-51.

[8] Naval Staff Monograph (Historical) 1926 vol. xiv, Home Waters part v, July 1915 to October 1915. p. 34.

[9] Ibid., p. 35.

[10] Ibid.

[11] J. S. Corbett, H. Newbolt, Naval Operations, 5 vols. (London: HMSO, 1938). vol. iii, p. 48, note 1; A. S. Hurd, The Merchant Navy, 3 vols. (London: HMSO, 1921). vol. ii, pp. 55-56.

[12] V. E. Tarrant, The U-Boat Offensive, 1914-1945 (London: Arms and Armour, 1989), pp. 22-23.

3 Comments

Filed under War History

The Battle of Waterloo 18 June 1815

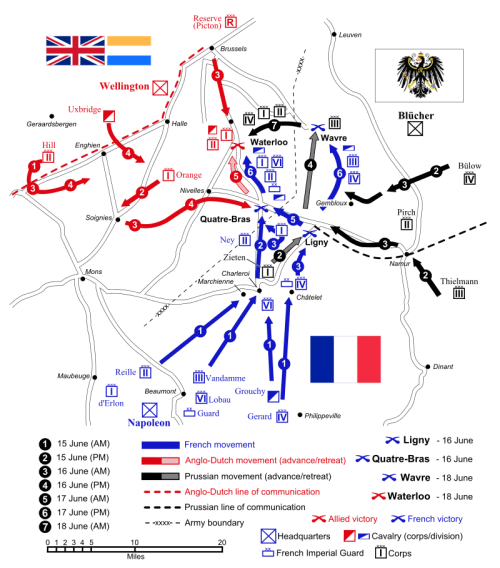
Napoleon defeated Prince Gerbhard von Blücher’s Prussian army at Ligny on 16 June 1815, forcing it to retreat to Wavre. The battle of Quatre Bras between the French and the Duke of Wellington’s Allied army on the same day was a draw. Napoleon intended to outflank them the next day, but his slowness in acting allowed Wellington to pull back ‘to a ridge line south of Mont St Jean, a position that had been carefully noted by Wellington and his staff some time ago as being an excellent defensive position.’[1]

Source: "Waterloo Campaign map-alt3" by Ipankonin - Self-made. Vectorized from raster image Flags from. Licensed under CC BY-SA 3.0 via Wikimedia Commons - https://commons.wikimedia.org/wiki/File:Waterloo_Campaign_map-alt3.svg#/media/File:Waterloo_Campaign_map-alt3.svg

Source: “Waterloo Campaign map-alt3” by Ipankonin – Self-made. Vectorized from raster image Flags from. Licensed under CC BY-SA 3.0 via Wikimedia Commons – https://commons.wikimedia.org/wiki/File:Waterloo_Campaign_map-alt3.svg#/media/File:Waterloo_Campaign_map-alt3.svg

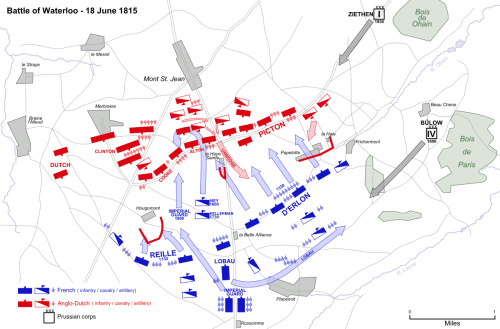
On 18 June the two armies at Waterloo faced each other on two low ridges that were separated by a gentle valley, which was bisected by the Charleroi to Brussels road. The frontage was about 5,000 yards and the battlefield measured no more than three square miles. The small hamlet of La Belle Alliance was on the road in the centre of the French line. In front of the Allied line were the Château of Hougoumont on their right, the farm of La Haye Sainte on the road in the centre and the town of Papelotte on the left.[2]

Wellington had 53,850 infantry, 13,350 cavalry, 5,000 artillerymen with 157 guns and 1,000 others (staff, engineers, medical, supply etc) for a total of 73,200 troops. Only 36 per cent of them were British, with 13 per cent Dutch and 9 per cent Belgian: Belgium was then part of the Kingdom of the Netherlands. The other 45 per cent were Germans: 10 per cent were part of the King’s German Legion, Germans serving as part of the British Army; 17 per cent were from Hannover, whose King was also King George III of the United Kingdom; 10 per cent were from Brunswick; and 8 per cent from Nassau. A further 17,000 Allied troops had been positioned at Hal to cover an alternative road to Brussels; they did not take part in the battle.[3]

Napoleon’s army was only slightly bigger, except for a superiority in artillery: 53,400 infantry, 15,600 cavalry, 6,500 artillerymen with 246 guns and 2,000 others for a total of 77,500 men. He had sent 30,000 troops under the newly promoted Marshal Emmanuel de Grouchy to cover the Prussians at Wavre.[4]

Blücher had 100,000 men and 283 guns available for combat, but only 49,000 men, made up of 38,000 infantry, 7,000 cavalry, 2,500 artillerymen and 1,500 others, and 134 guns fought at Waterloo.[5]

At a post breakfast meeting Napoleon’s chief of staff, Marshal Jean-de-Dieu Soult, said to the Emperor that he should recall at least some of Grouchy’s troops. Napoleon replied that:

‘You think because Wellington defeated you he must be a great general. I tell you he is a bad general, that the English [sic] are poor troops and that this affair will be no more serious than eating one’s breakfast.’[6]

General Honoré Charles Reille, the commander of II Corps and like Soult a Peninsular War veteran who had fought Wellington and the British many times, argued that the British firepower meant that the French should manoeuvre rather than launch a frontal assault, but the Emperor dismissed this. He decided to postpone the attack from the original 9 am start in order to allow the wet ground to dry, which would aid manoeuvre and allow artillery rounds to ricochet off the ground. The army was also behind its timetable. The Emperor would not have delayed in the past, having once said that ‘space we can recover, but time, never.[7]

The delay meant that the Prussians were getting closer to Waterloo. General August von Gneisenau, Blücher’s chief of staff, wanted to keep the majority of the Prussian army at Wavre until at least noon, but Blücher insisted that two corps should head to Waterloo immediately. General Friedrich von Bülow’s IV Corps, which had not been at Ligny, had set off at daybreak.[8]

Source: "Battle of Waterloo" by Ipankonin - Vectorized from raster image. Licensed under Public Domain via Wikimedia Commons - https://commons.wikimedia.org/wiki/File:Battle_of_Waterloo.svg#/media/File:Battle_of_Waterloo.svg

Source: “Battle of Waterloo” by Ipankonin – Vectorized from raster image. Licensed under Public Domain via Wikimedia Commons – https://commons.wikimedia.org/wiki/File:Battle_of_Waterloo.svg#/media/File:Battle_of_Waterloo.svg

The artillery bombardment began about 11:30 am. Grouchy heard it, but declined the advice of General Étienne Gérard to march to the sound of the guns. Had he done so he would have intercepted Bülow before the Prussians reached Waterloo.[9]

As the artillery opened fire the French 6th Infantry Division, commanded by Napoleon’s brother Jérôme, attacked Hougoumont. This was supposed to be a diversion, but Jérôme was determined to take the objective, regardless of losses. He called up another division, meaning that much of Reille’s II Corps spent most of the battle fighting a single brigade.[10]

By 3 pm the French had sent 12,500 men of the 6th and 9th Divisions against 2,500 men of the 2nd Battalion, Coldstream Guards, 2nd Battalion, 3rd (Scots) Guards and 1st Battalion, 2nd Nassau Regiment. Light companies of Hannoverians and the 2nd and 3rd Battalions 1st Foot Guards also took part in the desperate and successful defence. The key event came at 12:30 pm, when Lieutenant Colonel James McDonnell ordered the closing of the North Gate, which had been left open to facilitate the movement of Allied troops. About 30 French troops, led by the axe wielding Sous-Lieutenant Legros, nicknamed L’enfonceur, got inside before McDonnell’s guardsmen shut and barricaded the door. Legros and his men were killed, except for a drummer boy.[11]

At 1 pm the Comte D’Erlon’s I Corps was ready to attack when Bülow’s 30,000 men were spotted approaching the French right flank. Napoleon ordered cavalry and the 10,000 infantrymen of Comte Lobau’s VI Corps to take up a defensive position facing them.[12]

D’Erlon’s attack began at 1:30 pm. For some reason he adopted an outdated and inflexible formation that meant that heavier casualties were suffered in the advance and that it was harder to deploy once in musket range. The attack also lacked adequate cavalry support. Papelotte was taken and the French almost reached the crest of the ridge. Sir Thomas Picton’s division then advanced to the crest and opened fire from 40 yards before charging and forcing the French back. Picton was amongst the dead.[13]

Two British heavy cavalry brigades, the Household and Union Brigades, then charged D’Erlon’s corps, sweeping them away, inflicting 4,000 casualties and capturing two eagles. The Allied cavalry commander, the Earl of Uxbridge, led them personally. However, the British cavalry carried on instead of stopping to reform and were themselves charged by French cavalry. The British suffered 1,000 casualties and the 1,500 survivors were spent for the rest of the battle. Around 3 pm the fighting died down everywhere except Hougoumont, enabling the Allies to reinforce La Haye Sainte and recapture Papelotte.[14]

At 3:30 pm Napoleon ordered Marshal Michel Ney to capture La Haye Sainte regardless of casualties. The first attack, by the only two brigades of D’Erlon’s corps that had rallied, failed. However, Ney mistook a column of Allied ambulances, empty ammunition wagons, wounded and a small number of cavalry heading towards Brussels for signs of a retreat. He launched a series of cavalry attacks, which the Allied infantry were able to beat off by forming square.[15]

By 5 pm Ney had committed almost 9,000 cavalry, 6,000 of them armoured cuirassiers or carabiniers. Between 5 pm and 6 pm another 4,500 cavalry attacked after a heavy preliminary bombardment. A total of 76 guns in 12 batteries either gave preliminary fire support or, in the case of horse artillery, accompanied the cavalry. The guns inflicted heavy casualties on the squares but none broke. The Allies had 14,000 infantry in 25 squares and 65 guns.[16]

None of the attacks were supported by infantry until 8,000 men from Reille’s II Corps attacked at 5:30 pm. By then the tired cavalry had withdrawn to regroup and Allied musket fire beat off the attack with 20 per cent casualties.[17]

Napoleon, after observing Wellington’s position, ordered Ney to attack La Haye Sainte again. This time he made a combined arms attack using cavalry, infantry and artillery, which took the farm. The French were now able to position artillery to fire on the Allied centre. This was Wellington’s ‘great crisis of the day…his centre was wavering.’[18]

Ney now requested that the Emperor send him reserves, but Napoleon replied ‘Some troops! Where do you expect me to get them from? Do you want me to make some?’[19]

David Chandler argues that if Napoleon had ‘sent forward the Imperial Guard (or even half of it), the battle would almost certainly had been won.’[20] However, he adds that the Emperor had good reasons to reject Ney’s request: he did not know what state Wellington’s army was in; Ney’s performance so far in the battle had done nothing to make Napoleon trust him; and the Emperor was also worried about his right flank.[21]

Bülow was threatening Napoleon’s right by 4 pm. He nearly turned back after hearing gunfire from Wavre, a town with two stone bridges across the River Dyle, where Grouchy had attacked the Prussians. However, Blücher insisted that Bülow continue. Grouchy won a tactical victory at Wavre, but it made no difference to the outcome of the campaign. He briefly renewed his attack on 19 June, taking Wavre by 10 am. However, he heard the news from Waterloo half an hour later and withdrew.[22]

By 5 pm after an hour’s fighting Bülow had forced Lobau back to the village of Plancenoit, which the Prussians soon captured. Their artillery could now threaten Napoleon’s line of retreat, so he sent a division of the Young Guard in an attempt to retake it.[23]

The Young Guard recaptured Plancenoit, but was then thrown back. Napoleon prioritised the threat to his communications, putting 11 battalions in square on his right flank and sending two Old Guard battalions to retake Plancenoit. They succeeded, forcing 14 Prussian battalions to retreat, but then pushed on too far and had to fall back. However, Plancenoit was now occupied by the Young Guard and the right flank was stable by 6:45 pm, allowing several battalions to return to the reserve.[24]

They failed, but two battalions of the Old Guard then recaptured it, throwing back 14 Prussian battalions from the immediate area. Both sides then stopped to regroup, allowing Napoleon to bring some of the battalions that had been sent to his right back to his central reserve by 7 pm.[25]

The right flank was temporarily stabilised, but more Prussians were on their way. Napoleon therefore decided that now was the time to commit the Imperial Guard units from his central reserve against Wellington’s centre. He personally led them to within 600 yards of the enemy, before handing command over to Ney.[26]

The advance began at 7:30 pm with five battalions of the Middle Guard and a battery of horse artillery in the first line and three battalions of the Old Guard in the second line. Another Middle Guard battalion was positioned as a reserve about half way between Hougoumont and La Haye Sainte. The attack was intended to be a general one led by the Imperial Guard rather than one by the Guard alone. Some cuirassiers and Guard cavalry moved forward, but the main support from other units was from artillery.[27]

The French Guard were attacking in echelon, meaning that their battalions did not arrive together. The first two, the 1/3rd and 4th Grenadiers, encountered the British 2/30th, 33rd, 2/69th and 2/73rd Foot of Major General Sir Colin Halkett’s Brigade as they approached the top of the slope. All these British units had suffered heavy casualties at Quatre Bras. Ney was now on foot after having had his fifth horse shot from under him. The two French Guard battalions were forced to retreat by the British musket fire at 40 metres range. The British were then ordered to about face and get behind the hedge at the top of the crest. However, they came under fire from Duchand’s horse artillery, which had approached to within 100 metres of the crest, as they did so, becoming ‘a mere mob.’[28]

When the 1/3rd and 2/3rd Chasseurs à Pied, which had taken significant casualties from artillery fire, reached the crest they appeared to face no opposition. However, the 1,400 guardsmen of Major General Peregrine Maitland’s Brigade stood up 25 metres away when Wellington shouted ‘Now Maitland! Now’s your time!’, firing a volley that hit over 20 per cent of the surviving Chasseurs, with the others retreating.[29]

The British Guards charged the retreating French with fixed bayonets. The 4th Chasseurs then appeared. Maitland ordered his two battalions to stop and reform; the 2/1 Guards on the right did so, but the 3/1 misunderstood and formed square. The 4th Chasseurs continued, but then were confronted by the largest battalion in Wellington’s army, over 1,000 men of Colonel Sir John Colborne’s 52nd Foot. The two battalions briefly exchanged fire before the French retreated.[30]

Wellington now ordered a general advance. The discipline, courage and experience of the Old Guard allowed many, including Napoleon and his entourage, to escape.[31]

Waterloo was a joint victory for Blücher and Wellington. Napoleon planned to defeat Wellington’s multi-national army before Blücher’s Prussians arrived. He could have beaten either of the two Coalition armies but not both together. Wellington could not have won if Blücher had not arrived, but he would not have fought had he not been sure that Blücher was coming. Blücher could not have won had Wellington not stood and fought on ground of his own choosing.

The French lost because they made many mistakes, most of which were the responsibility of Napoleon for appointing the wrong men to key jobs. Ney was unsuited to independent battlefield command, Soult had no experience of staff work and Grouchy none of infantry command. Napoleon did not supervise operations as closely as he had done previously. He would not in the past have wasted so much time in the morning, allowed so many troops to be sucked into the battle for Hougoumont or permitted Ney to make several uncoordinated attacks on Wellington’s squares.

Better options for key positions would have been Marshal Louis-Gabriel Suchet, who was commanding the Army of the Alps, as Chief of Staff, Soult in Ney’s job and Grouchy commanding the cavalry. Marshal Louis-Nicholas Davout, Napoleon’s best Marshal, who was left in Paris as its Governor and Minister of War should have had Grouchy’s command.

The table below gives the total casualties (dead, wounded and missing) over the campaign, including those in a Franco-Prussian engagement at Gilly on 15 June. Some men lightly wounded in the earlier battles fought at Waterloo and not every available man fought at Waterloo.

Date and Battle Allied Prussian French Total
15 June – Gilly 2,000 600 2,600
16 June – Quatre Bras 4,600 4,100 8,700
16 June – Ligny 18,800 13,700 32,500
17 June – Allied retreat 250 120 370
18-19 June – Wavre 2,450 2,400 4,850
18 June – Waterloo / retreat 17,000 7,000 46,500 70,500
Army at Waterloo 73,200 49,000 77,500 199,700
Total casualties 21,850 30,250 67,420 119,520
Starting strength 112,000 130,000 123,000 365,000

Source: M. Adkin, The Waterloo Companion, (London: Aurum, 2001), pp. 73-74.

All ranks suffered heavily on the three square mile battlefield of Waterloo. Six French generals were killed and 37 wounded out of 114 present. The Allies, who had relatively fewer generals, had five killed and 14 wounded out of 41 and the Prussians two killed and one wounded out of 26.

The battle did not immediately end the war, as the French were holding on elsewhere, but the large numbers of Austrian and Russian troops approaching France meant that Napoleon had little chance of victory. He abdicated on 22 June, hoping to escape to the United States of America from the port of Rochefort, where a ship had been provided for him. On 3 July he arrived there to find that it was blockaded by the British. He surrendered to them on 15 July, hoping to be allowed to live in Britain, but was exiled to St Helena in the south Atlantic.

Most of Napoleon’s senior commanders eventually regained their titles under the restored monarchy. The restored King Louis XVIII issued the Cambray Proclamation, which stated that those who had been ‘misled’ into following Napoleon would not be prosecuted but that he would not ‘pardon the instigators and authors of this horrible plot.’ Ney and the Comte de la Bédoyère, one of Napoleon’s aides, were tried and shot. This website notes that others named on King Louis XVIII’s ordinance, including D’Erlon and Grouchy escaped abroad, but Ney refused opportunities to do so.

For a discussion of why Waterloo was important see this post by Dr Huw J. Davies in Defence in Depth, the blog of the Defence Studies Department of King’s College London. For a number of articles on the British Army in this period see the latest issue of the British Journal of Military History, a free academic journal: registration is required but not payment.

The Napoleonic Wars of 1803-1815, which had closely followed on from the Revolutionary War were now over. It was also the last of a series of major European Wars that had begun with the Nine Years War of 1688-97. The opposing Coalitions had varied, but France and Britain were always on different sides. It was some time before the two became allies and British and Vichy French forces did fight during World War II, but Waterloo was the last major battle between the two countries.


[1] G. Wootten, Waterloo 1815: Birth of Modern Europe (London: Osprey, 1992), p. 47.

[2] D. Chandler, The Campaigns of Napoleon (London: Weidenfeld & Nicolson, 1966), p. 1064.

[3] M. Adkin, The Waterloo Companion (London: Aurum, 2001), p. 37.

[4] Ibid., p. 51.

[5] Ibid., p. 65.

[6] Wootten, Waterloo, p. 52.

[7] Ibid.

[8] Chandler, Campaigns, p. 1068.

[9] Ibid., pp. 1071-72.

[10] Ibid., pp. 1072-73.

[11] Adkin, Waterloo, pp. 329-42.

[12] Chandler, Campaigns, pp. 1073-76.

[13] Ibid., pp. 1076-78.

[14] Ibid., pp. 1078-79.

[15] Ibid., pp. 1080-84.

[16] Wootten, Waterloo, pp. 356-61.

[17] Ibid., p. 68.

[18] Chandler, Campaigns, p. 1085.

[19] Ibid.

[20] Ibid.

[21] Ibid., p. 1086.

[22] Wootten, Waterloo, pp. 49-50.

[23] Chandler, Campaigns, p. 1084.

[24] Ibid., p. 1086.

[25] Ibid.

[26] Ibid., p. 1087.

[27] Adkin, Waterloo, p. 391.

[28] Ibid., pp. 393-97.

[29] Ibid., p. 397.

[30] Ibid., pp. 397-98.

[31] Ibid., pp. 399-400.

4 Comments

Filed under War History

The Battles of Ligny and Quatre Bras 16 June 1815

The first stage of Napoleon’s 1815 campaign was to concentrate the 123,000 men of his Armée du Nord just south of the junction of the Duke of Wellington’s 112,000 Anglo-Dutch Army and Prince Gerbhard von Blücher’s 130,000 Prussians.[1]

Napoleon’s plan was to position his army between his two enemies, preventing them uniting. He would then defeat one of them, making it retreat along its line of supply and leaving it unable to support its ally, which Napoleon could then turn on.[2]

Source: "Waterloo Campaign map-alt3" by Ipankonin - Self-made. Vectorized from raster image Flags from. Licensed under CC BY-SA 3.0 via Wikimedia Commons - https://commons.wikimedia.org/wiki/File:Waterloo_Campaign_map-alt3.svg#/media/File:Waterloo_Campaign_map-alt3.svg

Source: “Waterloo Campaign map-alt3” by Ipankonin – Self-made. Vectorized from raster image Flags from. Licensed under CC BY-SA 3.0 via Wikimedia Commons – https://commons.wikimedia.org/wiki/File:Waterloo_Campaign_map-alt3.svg#/media/File:Waterloo_Campaign_map-alt3.svg

The Emperor had an experienced army with high morale. but he made a number of ‘unsuitable appointments’ to high command.[3] His long serving chief of staff, Marshal Louis-Alexandre Berthier, had fallen from a window to his death on 1 June: whether this was an accident, murder or suicide has never been resolved. However, Napoleon had already given this job to Marshal Jean-de-Dieu Soult, an experienced battlefield commander who had never held such a position. The best choice would have been Marshal Louis-Gabriel Suchet, who was instead commanding the Army of the Alps.

Command of the left wing was given to Marshal Michel Ney, a very brave and inspiring leader, but unsuited to independent command. Emmanuel de Grouchy, a fine cavalry commander with little experience of infantry, was promoted to Marshal after the battle of Ligny on 16 June and put in command of the right wing. Marshal Louis-Nicholas Davout, Napoleon’s best Marshal, was left in Paris as its Governor and Minister of War. Davout on the right and Soult on the left were Napoleon’s best options for wing commanders.

The Emperor also declined to employ Joachim Murat, King of Naples, the best cavalry commander of the Napoleonic Wars. He had good reasons to do so: Murat had defected to the enemy in 1814 and then attacked the Austrians in Italy too soon in 1815. His consequent rout at Tolentino on 2-3 May allowed the Austrians to redeploy troops from Italy to France. Grouchy would have been a good alternative, but Napoleon did not appoint an overall cavalry commander.[4]

Wellington’s army was a multi-national one, including Dutch and Belgians from the Netherlands army and a large number of Germans, including men from Brunswick, Hannover and Nassau, plus the King’s German Legion, who were Germans in British service. The quality of Wellington’s troops was mixed. Some were veterans, whilst others were inexperienced conscripts. Many of the veteran British troops and commanders had been sent to North America to fight in the War of 1812. Major-General John Lambert, who had taken over command at New Orleans after his superiors were killed or wounded, returned home in time to also fight at Waterloo, but many others were still in or on the way home from North America. The veteran Dutch-Belgians had obtained their experience fighting for Napoleon.[5]

One of Wellington’s corps commanders was the very experienced British General Sir Rowland Hill but the other was the very inexperienced 22 year old Prince of Orange. His second in command and cavalry commander was the Earl of Uxbridge. He was a much better cavalry general than Wellington had had for most of the Peninsular War, but their personal relations were poor, since Uxbridge had eloped with Wellington’s sister-in-law. The army did have good division commanders, both British and Germans who had gained their experience fighting against Napoleon and Dutch and Belgians who had fought for him.[6]

Over half of Blücher’s army consisted of Landwehr, who were inexperienced and poorly equipped but often highly patriotic. There were also a number of men from parts of Germany that only became Prussian in 1814, many of whom had fought for Napoleon until then. They included 14,000 Saxons and Silesians who mutinied and had to be disarmed before the campaign even began.

The French began to move at 2:30 am on 15 June, taking Blücher and ‘especially’ Wellington by surprise.[7] The Duke and many of his senior officers were attending the Duchess of Richmond’s ball in Brussels on the evening of 15 June.

About 2 pm on 15 June General Jean Victor de Constant Rebecque, the Prince of Orange’s chief of staff, authorised General Count Perponcher-Sedlnitzberg, commander of the 2nd Dutch-Belgian Division, to move Prince Bernhard of Saxe-Weimar’s brigade of Nassauers to the crossroads at Quatre-Bras, a vital junction on the road from Charleroi.

Ney had sent 2,000 cavalrymen under General Charles Lefebvre-Desnouëttes to reconnoitre ahead of the main body of the left wing of the Armée du Nord. They encountered Bernhard’s advance guard, which retired on the rest of his brigade.

At 8 pm Rebecque authorised the other brigade of Perponcher’s division, Dutch-Belgians commanded by the Count of Bylandt, to move from Nivelle to Quatre Bras. Soon afterwards Rebecque received an order sent by Wellington in the afternoon that stated that all of Perponcher’s division should move to Nivelle. Rebecque showed it to Perponcher, saying nothing, and the latter decided to ignore it. [8]

David Chandler quotes the British general and military historian J. T. Fuller as saying that ‘this act of intelligent insubordination saved Blücher’, adding that it also ‘saved Wellington’s reputation.’[9] Geoffrey Wootten argues that Perponcher and Bernhard showed ‘the benefits of their French training at Quatre Bras where bold initiative and intelligence – the hallmark of the French approach – were to be critical to Wellington’s survival and eventual success.’[10]

However, Perponcher’s 8,000 infantry, 16 guns and 50 cavalry were faced by Ney’s 25,000 infantry, 3,000 cavalry and 60 guns, with 20,000 more French close behind and another French corps and the Imperial Guard expected.[11]

Reports of the French advance reached Wellington during the ball. He realised that a move by Napoleon towards Mons was a feint to draw his army west in order to protect its line of supply. He told the Duke of Richmond that Napoleon had ‘humbugged me…He has gained 24 hours’ march on me…I have ordered the army to concentrate at Quatre Bras; but we shall not stop him there, and if so, I must fight him here’, pointing to Waterloo on the map.[12]

Napoleon expected Wellington to fall back and had therefore planned to attack him before he could concentrate his army. He told Ney of this verbally, but the exhausted Emperor did not dictate his written orders until 6 am, four hours later than his usual practice. There was a further two hour delay before they left his HQ, and Ney did not receive his written orders until 10:30 am.[13] They told him to ‘hold yourself in readiness for an immediate advance towards Brussels once the Reserve reaches you’ so he issued no orders until 11 am and did not attack until 2 pm, by when Wellington reinforcements were arriving.[14] Wellington reached Quatre Bras at 9:30 am, saw that the French were cooking food and headed to Ligny to meet Blücher.

The attack by General Honoré Charles Reille’s II Corps began at 2 pm. It was initially successful and had broken through the thin defensive line by 3 pm. However, Sir Thomas Picton’s 5th Division then arrived and stabilised the situation. Wootten notes that if ‘Reille had started just a short while earlier…the battle would now have been over almost before it had started.’[15] The arrival of Picton’s 8,000 men meant that 25,000 French troops were now facing 17,000 defenders.[16]

About 4 pm Ney received a message sent at 2 pm ordering him to attack and drive back whatever force he was facing, before turning to envelop Blücher. However, he did not realise that his sector was now the secondary one: Blücher’s forward disposition had made Napoleon to make the Prussians at Ligny rather than the Anglo-Dutch at Quatre Bras the main target.[17]

Ney sent an aide to hurry the advance of the 20,000 men of the Comte D’Erlon’s I Corps to Quatre Bras. However, the Comte de la Bedoyère, carrying orders to Ney to send I Corps against the Prussian flank encountered I Corps before he met Ney. De la Bedoyère sent it towards Ligny, but an error meant that it headed for the French rather the Prussian flank. Ney was furious when he discovered this; soon afterwards the appearance of another of Wellington’s divisions led him to send a message ordering I Corps back to Quatre Bras. It had nearly reached Ligny when the message arrived; it ended up fighting in neither battle.[18]

At 4:15 pm British squares beat off an attack by French lancers at the expense of heavy casualties. More reinforcements were arriving, giving Wellington 26,000 men and 42 guns. At 5 pm Ney ordered General François Étienne de Kellermann to attack with his heavy cavalry, although only one of his four brigades had arrived. The charge almost succeeded, catching two British infantry battalions in line, but it lacked infantry and light cavalry support and was thrown back by fire from a King’s German Legion gun battery and two British infantry battalions.[19]

By 6:30 pm Wellington had 36,000 men and 70 guns, outnumbering Ney. He counter-attacked and by 9 pm had regained almost all the ground lost earlier in the day. Total casualties (dead, wounded, captured and missing) were 4,100 French and 4,850 Coalition, 250 of the latter in the retreat the next day.[20]

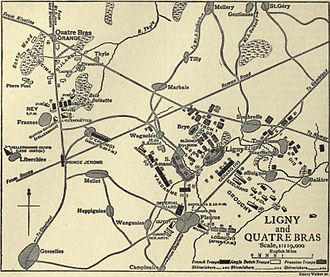
The main French attack, however, had been made against the Prussians at Ligny. The Prussian defence was based along the Ligny, a marshy stream that was hard to cross other than at its four bridges. A defensive line based on ten villages and hamlets covered them. The ground rose to the rear. However, the defensive line was vulnerable to flanking fire and troops on the forward slope could be bombarded by artillery. Napoleon intended to demonstrate with cavalry on the Prussian left whilst attacking their right and centre. When Ney appeared on their right the Guard would destroy the Prussian centre.[21]

The Prussians had 84,000 men, including 8,000 cavalry, and 224 guns to defend seven miles. Despite the favourable terrain, this was too few to defend that distance: 20,000 men per mile were then believed to be needed in defence. The Prussians hoped that a further 31,000 of their troops plus Wellington’s force would support them, but the former were too far away and the latter too heavily engaged. The French had 68,000 infantry, 12,500 cavalry and 210 guns, but could choose where to concentrate their attack and expected support from Ney.[22]

The attack began at 2:30 pm. Napoleon assumed that Ney had taken Quatre Bras and was heading for Ligny, since no gunfire had been heard from that direction.[23]

Grouchy’s cavalry on the French right pinned the Prussian left. A fierce battles for the Ligny stream and the villages beside it took place in the centre and on the Prussian right, French left. The Prussian reserve infantry was drawn up close enough to the line to be bombarded by French artillery, but too far away to use their muskets to support their front line.[24]

At 3:15 pm Napoleon sent an order telling Ney to envelop the Prussian right and rear. Almost immediately, he received news of Quatre Bras, so ordered that only D’Erlon’s I Corps should move to Ligny. Shortly afterwards, he realised that he had left the 10,000 men of the Comte de Lobau’s VI Corps near Charleroi without any orders, so ordered them to Ligny.[25]

By 5 pm Blücher had been forced to commit virtually all his reserves, but Napoleon still had 10,000 fresh troops. He intended to launch his Imperial Guard at 6 pm to strike the decisive blow, but about 20,000 men then appeared on the French left flank, causing the French troops there to waver. At first they were assumed to be hostile, but by 6:30 pm it was apparent that they were the French I Corps in the wrong place. D’Erlon had failed to follow the normal practice of sending officers ahead of his force. Napoleon ordered him to the correct place on the Prussian right flank, but by the time that the messenger arrived I Corps was on its way back to Quatre Bras.[26]

Blücher now led personally a counter attack by six battalions, which briefly retook the village of St Amand, but the French rallied and recaptured it. The Guard finally attacked at 7:30 pm in heavy rain. The infantry was supported by 60 guns on their right and heavy cavalry. Blücher then led another counter attack, this time by 32 squadrons of cavalry. It was repulsed and his horse was killed. French cavalry rode over him without recognising him, and he was eventually rescued by an aide. The Prussian centre had been crushed, but both wings were able to withdraw under cover of darkness.[27]

Total dead, wounded, missing and captured at Ligny were 13,700 French and 18,800 Prussians, with another 120 French and 10,000 Prussians being lost in the retreat the next day.[28]

Napoleon had defeated Blücher at Ligny, but the Prussians had escaped to fight again. Wellington and Ney had drawn at Quatre Bras, but the Anglo-Dutch army was forced to retreat because of the result of Ligny. If D’Erlon’s corps had fought at either battle, it would have been a decisive French victory. If Reille had attacked earlier, Ney could have won Quatre Bras soon enough to arrive on Blücher’s flank and make Ligny a decisive victory. These mistakes were Napoleon’s fault for making the wrong appointments.

[1] M. Adkin, The Waterloo Companion (London: Aurum, 2001), p. 29.

[2] G. Wootten, Waterloo 1815: Birth of Modern Europe (London: Osprey, 1992), p. 29.

[3] D. Chandler, The Campaigns of Napoleon (London: Weidenfeld & Nicolson, 1966), p. 1023.

[4] The last three paragraphs are based on Ibid., pp. 1021-22.

[5] Wootten, Waterloo, pp. 21-23.

[6] Ibid., pp. 16-17.

[7] Chandler, Campaigns, p. 1027.

[8] The last three paragraphs are based on Ibid., pp. 1030-32.

[9] Ibid., p. 1032.

[10] Wootten, Waterloo, pp. 15-16.

[11] Ibid., p. 31.

[12] Chandler, Campaigns, pp. 1032-33.

[13] Wootten, Waterloo, pp. 31-32.

[14] Ibid., p. 32.

[15] Ibid.

[16] Chandler, Campaigns, p. 1050.

[17] Ibid., pp. 1040, 1050.

[18] Ibid., pp. 1051-52.

[19] Ibid., pp. 1052-53.

[20] Adkin, Waterloo, p. 74.

[21] Wootten, Waterloo, p. 40.

[22] Chandler, Campaigns, p. 1038.

[23] Wootten, Waterloo, p. 40.

[24] Chandler, Campaigns, p. 1041.

[25] Ibid., p. 1043.

[26] Ibid., pp. 1044-45.

[27] Ibid., pp. 1045-46.

[28] Adkin, Waterloo, p. 74.


3 Comments

Filed under War History

Napoleon Returns from Elba

The first of three posts describing Napoleon’s 100 Days, completing series on posts on the 200th anniversary of major events of the Napoleonic Wars. Napoleon was exiled to the island of Elba after abdicating the French throne in April 1814. He retained the title of Emperor, but his empire consisted only of an island 120 miles square with a population of 12,000. He had an army of about 1,100 veterans of his Imperial Guard.

On 26 February the Emperor, accompanied by his guards and retainers, sailed for France. The date was chosen because the British Colonel Sir Neil Campbell, who had remained at Napoleon’s invitation after escorting him to the island, was visiting the mainland on board HMS Partridge.

Two French warships that were supposed to be patrolling the channel between Corsica and the Italian mainland did nothing to stop the convoy, although it is unlikely that they failed to spot it. One of their captains later told Campbell that the visibility was poor, which it was not. Another French warship, the Zephyr, approached close by, but her captain, Andrieux, did no more than shout ‘How is the great man?’[1] He was promoted by Napoleon a few weeks later.

Napoleon’s force landed at Golfe Juan on 1 March and began to march towards Paris. King Louis XVIII learnt of his arrival on 5 March, declared Napoleon to be a traitor and sent two forces. each of 30,000 men to deal with him. One was commanded by his brother, the Comte d’Artois, and the other by Marshal Michel Ney who, like most of Napoleon’s Marshals, had taken service with the restored Bourbon regime.

At Grenoble on at 7 March Napoleon approached a company of Royalist troops on his own. They were ordered to fire on him, but did not. He later said that ‘Before Grenoble I was an adventurer, at Grenoble I was a ruling prince.’[2]

On 10 March Napoleon reached Lyon. The Comte, with only 3,000 men versus the Emperor’s 8,000, fled. Napoleon began issuing Imperial decrees on 13 March, the same day as the Congress of Vienna declared him to be an outlaw. It was meeting to divide up the French Empire and was dominated by Austria, Britain, Prussia and Russia, although other countries were represented.

Ney arrived at Besancon on 10 March, finding a letter from Napoleon inviting him to rejoin the Imperial cause but few Royalist soldiers. On 14 March he announced that he was changing sides. Louis fled from Paris on 19 March; Napoleon, now accompanied by two divisions, entered it the next day. He had retaken France in 20 days; the only casualties were 33 soldiers drowned when a boat capsized. He later stated that:

‘I owed my restoration to the inhabitants of the towns and villages, to the soldiers and junior company officers. I could rely only on them. All the generals I met on my journey hesitated, or received me badly, even if they were not hostile, but they were obliged to give way before the excitement of their soldiers.’[3]

Louis XVIII had guaranteed civil rights by the Bourbon Charter, but he and his regime were regarded as ‘foreign puppets…of the reactionary powers, committed to destroy the ideals of the Revolution (theoretical though many of these had proved to be.’[4] The peasants feared that their property might be given to returned landowners, whilst many disgruntled veterans found it hard to fit into civilian life, especially the 12,000 officers now living on half pay in an ‘inflationary economy.’[5]

Although happy to see Napoleon back, most French people did not want war. Aware of this, he tried to persuade the Congress to accept him as ruler of France. However, on 25 March Austria, Britain, Prussia and Russia formed the Seventh Coalition with the intention of ending his threat forever. Napoleon realised that war was inevitable, but had to try to make peace for internal political reasons and because France was  heavily outnumbered.

Napoleon inherited a Royalist army of 200,000 men, which was brought up to 500,000 by recalling those on leave, rounding up men absent without leave, raising foreign regiments, calling for volunteers, introducing conscription, forming battalions of sailors who were without ships and calling out the National Guard. He had a field army of 200,000, of which 123,000 were in the Armée du Nord, which he commanded himself. The other 300,000 were in garrisons. The field army had high morale and a high proportion of veterans. Against this he faced 700,000 Coalition troops.[6]

The Coalition plan was attack on an arc measuring 700 miles from Brussels to the south coast of France. Their main advantage was numbers; their main disadvantages were the difficulty of co-ordination and the need to avoid defeat in detail. They had won the 1813 and 1814 campaigns by a strategy of retreating when facing battle with Napoleon himself, whilst attempting to threaten his lines of supply and defeat isolated French corps, until they were able to concentrate all of their forces to win a decisive victory. Napoleon’s plan was to use his interior lines and natural barriers such as mountains and rivers to concentrate on one enemy at a time. The Armée du Nord would first attack the Anglo-Dutch and Prussian armies in Belgium.


[1] M. Adkin, The Waterloo Companion (London: Aurum, 2001), p. 13.

[2] Ibid., p. 18.

[3] Ibid., p. 20.

[4] D. Chandler, The Campaigns of Napoleon (London: Weidenfeld & Nicolson, 1966), p. 1009.

[5] Ibid., p. 1010.

[6] Adkin, Waterloo, pp. 22-24.

Leave a comment

Filed under Political History, War History

Warneford VC and the Destruction of Two Zeppelins on 7 June 1915

The first raid on the United Kingdom by German airships took place on 19 January 1915. In February Kaiser Wilhelm II relaxed his previous ban on raids on London: military targets east of the Tower of London could now be bombed. L8 had to abandon an attempt to bomb London on 26 February because of high winds. She tried again on 4 March, but was hit by gunfire and wrecked on landing in Belgium. A number of attacks were made on other targets on the East Coast of England and in France, including Paris, in March and April.[1]

In April the German army received LZ38, the first of the new P class Zeppelins. They had a maximum speed of 60 mph, a cruising speed of 40 mph, a crew of up to 19, a defensive armament of 7 or 8 machine guns and a bomb load of over two tons.[2]

The first raid on London was made by LZ38, captained by Hauptmann Erich Linnarz, on 31 May. She dropped over a ton of bombs, killing five people and injuring 35; damage worth £18,596 was done to property.[3]

Attempts by the Royal Naval Air Service to destroy airships, both by intercepting their raids and attacking their bases, had by then resulted in the destruction of only Z9. She was bombed in her shed by Flight Lieutenant Reginald Marix, flying a Sopwith Tabloid, on 8 October 1914. Squadron Commander Spenser Gray was unable to find the airship sheds, so bombed Cologne railway station.[4] Both were awarded the Distinguished Service Order. The Cuxhaven Raid on Christmas Day 1914 failed to find the German navy Zeppelin base.

On 3:15 am on 17 May the army Zeppelin LZ39 was spotted off Dunkirk. Seven RNAS aircraft took off from Dunkirk to join two other that were already on patrol. Grey and Flight Sub Lieutenant Reginald Warneford attacked the airship from below, but she climbed away from them and headed towards Ostend. Flight Commander Arthur Bigsworth, flying an Avro, managed to get 200 feet above her as she flew 10,000 feet above Ostend. He dropped four 20 pound bombs on the airship, which emitted some smoke from her tail, but continued on her way. She landed roughly but safely. One of her officers was killed and several men wounded, five gasbags damaged and one propeller lost.[5]

LZ37, LZ38, LZ39 and the navy Zeppelin L9 set out to bomb London on 6 June, but encountered strong winds and fog. Kapitänleutnant Heinrich Mathy’s L9 diverted to her alternative target, the Humber, using flares to find the docks.. She dropped 13 explosive and 39 incendiary bombs on Hull according to the British Official History: the German one says nine and 50 respectively. Around 40 shops and houses were damaged, a sawmill burnt down, 24 people killed and 40 hurt. Rioters sacked shops owned or allegedly owned by Germans. Hull had no anti-aircraft guns, so the only defensive fire came from HMS Adventure, under repair in the port. Mathy dropped seven more incendiaries on Grimsby, causing little damage, before heading home. Guns at Immingham and Waltham fired at L9 without hitting her.[6]

The fog also prevented British aircraft from taking off from Killingholme. The light cruisers HMS Aurora and Penelope, each carrying a seaplane, left Harwich in pursuit of L9, but she escaped.[7]

LZ39 suffered problems and had to turn back to her base at Evere. The other two army airships encountered fog, ad were unable to reach England, so also headed back home.[8]

In the early hours of 7 June, the RNAS airfield at Dunkirk sent four aircraft to bomb the airship bases at Evere and Berchem St Agathe. Two Henri-Farman biplanes, flown by Flight Lieutenant John Wilson and Flight Sub-Lieutenant John Mills, headed for Evere. Wilson took off at 12:40 am and arrived at 2:05 am. He replied to a series of long flashes from a searchlight with a series of short flashes, which kept the anti-aircraft guns quiet whilst he circled until there was enough light to attack. At 2:20 am he could just see the airship shed, so dropped his three 65 pound bombs from 2,000 feet. One hit the centre of the shed, sending up dense smoke but no flames. Mills turned up at 2:30 am, but was forced by anti-aircraft fire to turn away and gain height. He came back at 5,000 feet, dropped his four 20 pound bombs, setting LZ38 alight and destroying her. Both pilots had problems with fog, but got home safely, although Mills had to land on the beach between Calais and Dunkirk and Wilson in a field near Montreuil.[9]

One of the aircraft sent to attack Berchem St Agathe suffered technical problems, got lost and had to land in a field near Cassel. Warneford, flying the other, a Morane, spotted an airship just after 1:00 am. At 1:50 am he caught the Zeppelin, which was LZ37, over Bruges. Its machine guns fired on his Morane, forcing him to retire and climb. The airship turned after him and continued to fire for a period. Once Warneford had reached 11,000 feet, he headed back towards LZ37, switched off his engine, dived and dropped his six 20 pound bombs as he flew along the airship 150 feet above her. The Zeppelin exploded, throwing Warneford’s Morane upside down. He managed to regain control as it dived. One of LZ37’s crew fell through the roof of a nunnery and somehow survived, although the wreckage that fell with him killed two nuns.[10]

The explosion had damaged a petrol pipe in Warneford’s aircraft, forcing him to land behind enemy lines. He initially intended to destroy his aircraft, but then realised that he had not been seen, so set about repairing it. After 35 minutes on the ground behind enemy lines he was able to take off and landed safely, although at Cape Gris-Nez rather than Dunkirk because of the fog.

Warneford, the first pilot to destroy an airship in the air, was awarded the VC. The citation, available on naval-history.net, said that:

 29189 – 11 JUNE 1915

Admiralty, 10th June, 1915.

The KING (is) pleased to approve of the grant of the Victoria Cross to Flight Sub-Lieutenant Reginald Alexander John Warneford, Royal Naval Air Service, for the conspicuous act of bravery specified below:

For most conspicuous bravery on the 7th June, 1915, when he attacked and, singlehanded, completely destroyed a Zeppelin in mid-air. This brilliant achievement was accomplished after chasing the Zeppelin from the coast of Flanders to Ghent, where he succeeded in dropping his bombs on to it from a height of only one or two hundred feet. One of these bombs caused a terrific explosion which set the Zeppelin on fire from end to end, but at the same time overturned his Aeroplane and stopped the engine. In spite of this he succeeded in landing safely in hostile country, and after 15 minutes started his engine and returned to his base without damage.


He was killed on 17 June when an aircraft that he was testing crashed.

Wilson and Mills received the DSC:

 29201 – 22 JUNE 19….. award of the Distinguished Service Cross to:

Flight Lieutenant John Philip Wilson, R.N., and Flight Sub-Lieutenant John Stanley Mills, R.N., for their services on the 7th June, 1915, when, after a long flight in the darkness over hostile territory they threw bombs on the Zeppelin shed at St. Evere, near Brussels, and destroyed a Zeppelin, which was inside. The two Officers were exposed to heavy fire from anti-aircraft guns during the attack.

The bulk of the German army’s airships were transferred to the Eastern Front soon afterwards, where they bombed railway lines in support of the German offensive in Poland. However, two of them bombed London in July.[11]


[1] W. A. Raleigh, H. A. Jones, The War in the Air: Being the Story of the Part Played in the Great War by the Royal Air Force, 7 vols. (Oxford: Clarendon Press, 1922). vol. iii, pp. 93-97.

[2] J. H. Morrow, The Great War in the Air: Military Aviation from 1909 to 1921 (Washington DC: Smithsonian Institution Press, 1993), p. 108.

[3] Raleigh, Jones, War in the Air. vol. iii, pp. 97-98.

[4] Ibid. vol. i, pp. 389-90.

[5] Ibid. vol. ii, p. 350.

[6] Ibid. vol. iii, p. 103.

[7] Naval Staff Monograph (Historical) 1925 vol. xiii, Home Waters part iv, February 1915 to July 1915. p. 237.

[8] Raleigh, Jones, War in the Air. vol. iii, pp. 104-5.

[9] Ibid. vol. ii, pp. 351-52.

[10] Ibid. vol. ii, pp. 352-53.

[11] Morrow, Air, p. 109.

4 Comments

Filed under War History