Tag Archives: Ottoman Empire

The Battle of Imbros 20 January 1918

The evacuation of Gallipoli did not end the Royal Navy’s presence in the Aegean. There was a risk that the German battlecruiser Goeben and light cruiser Breslau might break out of the Dardanelles. This ships had officially been transferred to the Ottoman Navy and renamed Yavuz Sultan Selim and Medilli, but the German names are used here because they remained under German command and had German crews.

Rear Admiral Sydney Fremantle, commanding the RN’s Aegean Squadron, thought that  a break out would have one of three objectives: joining the Austro-Hungarians in the Adriatic was the most likely and had the highest chance of success; a raid on Allied transport routes was possible but had too low a chance of success to justify the risks involved; and raiding Mudros, Salonika, Port Said or Alexandria was unlikely as it would be a ‘desperate venture…end[ing] in the eventual destruction of the enemy.’ In fact, the last option was the one chosen.[1]

On 12 January 1918, Fremantle was succeeded by Rear-Admiral Arthur Hayes-Sadler. His squadron included the last two British pre-dreadnought battleships, HMS Agamemnon and Lord Nelson. Their speed of only 18 knots meant that they could not intercept  Goeben (22 knots) and Breslau (designed for 27.5 knots but capable of only 20 according to Arthur Marder). However, their armament of four 12 inch and ten 9.2 inch guns each versus Goeben’s ten 11 inch and twelve 5.9 inch guns and Breslau’s twelve 4.1 inch guns meant that they could stop them returning to the Dardanelles. The British had also laid a number of minefields.[2]

The Germans had also changed their command. In September Vizeadmiral Wilhelm Souchon had returned to Germany in September to take command of the 4th Battle Squadron of the High Seas Fleet. His replacement, Vizeadmiral Hubert von Rebeur-Paschwitz, hoped that a sortie would draw Allied ships away from Palestine, where the Ottomans were under pressure; boost Ottoman morale after the loss of Jerusalem; and show that warships were meant to be used.[3]

Aerial reconnaissance had told the Germans that HMS Lord Nelson was not at Mudros. She was taking Hughes-Sadler to meetings in Salonika. He would normally have used the yacht Triad for such a journey, but she was unavailable so he chose to use his flagship rather than a destroyer.[4]

The German staff assumed, on the basis of information from minesweepers, that the mines laid across the entrance to the Dardanelles in 1916 had been washed away. They did not know that more minefields had been laid since, which they could not avoid. Just before the operation began they received a captured chart that showed that there were more minefields than they had realised. It appeared to show that there was a gap between them, but they did not realise that it was only a rough indication rather than an exact plan. The German sortie achieved surprise but at the cost of not properly reconnoitring the enemy minefields .[5]

Goeben and Breslau sailed at 4:00 pm on 19 January, accompanied by four Ottoman destroyers. They left the Dardanelles at 6:00 am the next day, when destroyers turned back. Ten minutes later Goeben struck a mine, receiving only minor damage.[6]

In Mudros harbour on Lemnos the British had HMS Agamemnon, three light cruisers, a sloop, and four destroyers, only two of which were ready for action. Another minesweeper and a monitor were under repair. As well as HMS Lord Nelson, another 23 ships were on detached duty in six squadrons, including two cruisers, four light cruisers, six destroyers and eight monitors.[7]

Freemantle’s orders to detached squadrons, which were still in effect, were that if they encountered Goeben they should lead her ‘in a direction in which support may be obtained.’ However, the general signal that was to be made if Goeben was out was to ‘take all necessary action to engage the enemy.’ RN officers were bound to interpret this as an order to attack her. At 7:40 am the Germans attacked the British ships at Kusu Bay, Pyrgos. They quickly sank the monitors Lord Raglan and M28 before heading for Mudros, pursued by the destroyers HMS Tigress and Lizard.[8]

At 8:30 am Breslau struck a mine. The Germans could now see mines in the clear, blue water. Goeben attempted to take Breslau in tow but at 8:55 struck a mine, which caused serious damage. Breslau then detonated another four mines and began to sink. The Ottoman destroyers came out in order to pick up survivors but withdrew after coming under fire from the British destroyers at 9:30. The British briefly chased them but had to give up due to the risk from shore batteries and mines. They picked up 14 officers and 148 men from the Breslau.[9] Her official crew was 354.[10]

Goeben withdrew.  She struck another mine at 9:48, causing her to list by 15 degrees. She came under air attack but by 10:30 was into the Straits. At 11:32, however, she ran aground and was stuck for six days. Royal Flying Corps and Royal Naval Air Service aircraft flew 270 sorties against her, dropping 15 tons of bombs. Strong winds, low clouds and effective anti-aircraft fire meant that only two hits were scored. Even if more had been obtained, the 65 and 112 pound bombs used could have done little damage. Two seaplanes armed with 18 inch torpedoes arrived on the seaplane carrier Manxman too late to attack. Indirect fire from a monitor was also ineffective.[11]

This left submarine attack. One E-class boat, E12 was available on 21 January, but one of her engine shafts had been fractured. This restricted her surface speed and battery recharging, but not her submerged speed, so Hayes-Sadler refused to allow her to attack, although her captain, Lieutenant F. Williams-Freeman, was willing. Two more, E2 and E14 arrived on 21 January, but nothing was done until the C.-in-C. Mediterranean Fleet, Admiral Sir Somerset Gough-Calthorpe, arrived on 25 January. E14, which was newer and had a more experienced captain and crew than E2, was sent in two days later, by when Goeben had been refloated and left. E14 was detected by hydrophones, forced to the surface by depth charges and destroyed by shore batteries. Her captain, Geoffrey Saxton White, was later posthumously awarded the Victoria Cross. The citation, from naval-history.net, which also lists all the British casualties, read:

31354 – 23 MAY 1919

Admiralty, S.W., 24th May, 1919.

The KING (is) pleased to approve of the posthumous award of the Victoria Cross to the undermentioned Officers:

Lieutenant-Commander Geoffrey Saxton White, R.N.

For most conspicuous gallantry and devotion to duty as Commanding Officer of H.M. Submarine “E 14” on the 28tlh of January, 1918.

“E 14” left Mudros on the 27th of January under instructions to force the Narrows and attack the “Goeben,” which was reported aground off Nagara Point after being damaged during her sortie from the Dardanelles. The latter vessel was not found and “E 14” turned back. At about 8.45 a.m. on the 28th of January a torpedo was fired from E 14” at an enemy ship; 11 seconds after the torpedo left the tube a heavy explosion took place, caused all lights to go out, and sprang the fore hatch. Leaking badly the boat was blown to 15 feet, and at once a heavy fire came from the forts, but the hull was not hit. “E 14” then dived and proceeded on her way out.

Soon afterwards the boat became out of control, and as the air supply was nearly exhausted, Lieutenant-Commander White decided to run the risk of proceeding on the surface. Heavy fire was immediately opened from both sides, and, after running the gauntlet for half-an-hour, being steered from below, “E 14” was so badly damaged that Lieutenant-Commander White turned towards the shore in order to give the crew a chance of being saved. He remained on deck the whole time himself until he was killed by a shell.

_____

Enver Pasha, the Ottoman War Minister had warned von Rebeur-Paschwitz to be careful with his two ships because of their great value to the Ottoman Empire. The Ottomans thought that the Germans had taken too great a risk with them.[12]

Goeben’s damage was not fully repaired until after the war, by when she was the property of Turkey. She was not scrapped until 1971. although she had by then been out of service for many years.[13] The Allies did not realise the severity of her damage and continued to fear another sortie by her.[14] She did operate in the Black Sea later in 1918.[15]

Hayes-Sadler, who was in poor health, was replaced by Rear-Admiral Cecil F. Lambert. The main negative for the Royal Navy of the action was that it allowed the Press to again bring up the story of the blunders that had led to Goeben and Breslau getting to the Ottoman Empire in 1914.[16] The operation was a mistake by the Germans, who upset their Ottoman allies, lost a modern light cruiser and had a battlecruiser damaged in return for sinking two monitors and a submarine.

[1] A. J. Marder, From the Dreadnought to Scapa Flow; the Royal Navy in the Fisher Era, 1904-1919, 5 vols. vol. v, pp. 12-13.

[2] Ibid., p. 13.

[3] P. G. Halpern, A Naval History of World War I, p. 255.

[4] Marder, From. vol. v, pp.15-16.

[5] J. S. Corbett, H. Newbolt, Naval Operations, 5 vols. vol. v, pp. 85-86.

[6] Marder, From. vol. v, p. 15.

[7] Ibid., p. 14.

[8] Corbett, Newbolt, Naval. vol. v, p. 84.

[9] Ibid., pp. 88-90.

[10] R. Gray, Conway’s All the World’s Fighting Ships, 1906-1921, p. 159.

[11] Marder, From. vol. v, pp. 16-17.

[12] Corbett, Newbolt, Naval. vol. v, p. 92.

[13] Gray, Conway’s 1906-1921, p. 152.

[14] Marder, From. vol. v, pp. 18-19.

[15] Corbett, Newbolt, Naval. vol. v, p. 294.

[16] Marder, From. vol. v, pp. 19-20.

Advertisement

2 Comments

Filed under War History

Richard Bell Davies VC

Richard Bell Davies, a career naval officer, learnt to fly at his own expense in 1913 at the age of  27. He then transferred to the naval wing of the Royal Flying Corps, which was taken under the control of the Admiralty as the Royal Naval Air Service on 1 July 1914.

On 27 August he was one of the 10 pilots of the Eastchurch Squadron of the RNAS, commanded by Wing Commander Charles Samson, who flew their aircraft to Ostend. After three days they were ordered to return to England via Dunkirk. One of the aircraft crashed on landing at Dunkirk. This delayed the flight home and on 1 September they were ordered to remain at Dunkirk in order to operate against enemy airships and aircraft and to carry reconnaissance missions. As well as aircraft, they were equipped with armed motor cars that raided the enemy’s flanks.[1]

During the First Battle of Ypres, lasting from 19 October to 22 November 1914, the RNAS aircraft carried out reconnaissance missions for the army. Davies attacked German aircraft in the air on three separate occasions, but all managed to land behind their own lines.[2]

Davies and Flight Lieutenant Richard Peirse carried out a number of bombing raids on the German U-boat bases at Ostend and Zeebrugge. Both were awarded the Distinguished Service Order for an attack on Zeebrugge on 23 January 1915. Their citations, from naval-history.net, stated that:

Squadron Commander Richard Bell Davies

Flight Lieutenant Richard Edmund Charles Peirse

These Officers have repeatedly attacked the German submarine station at Ostend and Zeebrugge, being subjected on each occasion to heavy and accurate fire, their machines being frequently hit. In particular, on 23rd January, they each discharged eight bombs in an attack upon submarines alongside the mole at Zeebrugge, flying down to close range. At the outset of this flight Lieutenant Davies was severely wounded by a bullet in. the thigh, but nevertheless he accomplished his task, handling his machine for an hour with great skill in spite of pain and loss of blood.

Davies held the rank of Lieutenant in the RN and the appointment of Squadron Commander in the RNAS.

Davies was later sent to the Dardanelles. In October 1915 Bulgaria joined the Central Powers opening up a railway supply line from Germany to the Ottoman Empire. RNAS aircraft and seaplanes made several bombing raids on a rail bridge over the river Maritza south of Kulelli and a rail junction at Ferrijik. During an attack on the latter on 19 November Flight Sub-Lieutenant Gilbert Smylie’s Henri Farman was forced to land by rifle fire. Davies landed his aircraft and rescued Smylie in perhaps the first ever combat search and rescue mission. The citation for his Victoria Cross and Smylie’s Distinguished Service Cross, again from naval-history.net, stated that:

29423 – 31 DECEMBER 1915

Admiralty, 1st January, 1916.

The KING (is) pleased to approve of the grant of the Victoria Cross to Squadron-Commander Richard Bell Davies, D.S.O., R.N., and of the Distinguished Service Cross to Flight Sub-Lieutenant Gilbert Formby Smylie, R.N., in recognition of their behaviour in the following circumstances:

On the 19th November these two officers carried out an air attack on Ferrijik Junction. Flight Sub-Lieutenant Smylie’s machine was received by very heavy fire and brought down. The pilot planed down over the station, releasing all his bombs except one, which failed to drop, simultaneously at the station from a very low altitude. Thence he continued his descent into the marsh. On alighting he saw the one unexploded bomb, and set fire to his machine, knowing that the bomb would ensure its destruction. He then proceeded towards Turkish territory.

At this moment he perceived Squadron-Commander Davies descending, and fearing that he would come down near the burning machine and thus risk destruction from the bomb, Flight Sub-Lieutenant Smylie ran back and from a short distance exploded the bomb by means of a pistol bullet. Squadron-Commander Davies descended at a safe distance from the burning machine, took up Sub-Lieutenant Smylie, in spite of the near approach of a party of the enemy, and returned to the aerodrome, a feat of airmanship that can seldom have been equalled for skill and gallantry.

Davies was flying a Nieuport 10, a two seater reconnaissance aircraft that had been converted into a single seater fighter by covering the front cockpit. Smylie managed to squeeze past the controls into the front cockpit.

Davies was later awarded Air Force Cross and the French Croix de Guerre. He joined the Royal Air Force when it was formed by a merger of the RFC and the RNAS on 1 April 1918, but was one of the few former members of the RNAS to return to the RN after the war. He served in a mixture of staff appointments connected with aviation and sea going post between the wars. When the RN regained control of the Fleet Air Arm in 1939 Davies was appointed Rear Admiral, Naval Stations, commanding its shore bases.

He retired with the rank of Vice Admiral in May 1941, but then joined the Royal Naval Reserve with the rank of Commander, serving as a Convoy Commodore. They were senior Merchant Navy officers or retired admirals and commanded the merchant ships but not the escorts of a convoy. He later captained two escort carriers, HMS Dasher during her commissioning period and the trials carrier HMS Pretoria Castle. He died in 1966.


[1] W. A. Raleigh, H. A. Jones, The War in the Air: Being the Story of the Part Played in the Great War by the Royal Air Force, 7 vols. (Oxford: Clarendon Press, 1922). vol. i, pp. 371-76.

[2] Ibid. vol. i, pp. 392-93

2 Comments

Filed under War History

Allied Submarines in the Dardanelles

Allied submarines operated in the Dardanelles even before the attack on its defences by surface ships in February 1915 and the amphibious landing on 25 April. HMS B11 sank the old Ottoman battleship Mesudiye in December 1914. The French boat Saphir was lost on 15 January 1915 after either running aground or hitting a mine.[1]

Once the armies were ashore the submarines had to enter the Sea of Marmara in order to prevent Ottoman supplies from reaching the Gallipoli. Getting through the Straits in order to attack enemy shipping in the Sea of Marmara was  very difficult. The boats had to pass through minefields and steel-wire anti-submarine nets without any metal blades to cut through the nets or the mine cables. They also had to avoid shore batteries and patrol boats and get through a 10 fathom deep stratum of fresh water that often made it very hard to control a submarine.[2]

Most of the British submarines operating in the Dardanelles were of  E class boats. In April the first British submarine to try to get into the Sea of Marmara, HMS E15, ran aground and had to be destryored by a British boat expedition in order to prevent her being captured. The Australian HMAS AE2 was more successful in getting through the Straits, but was sunk by an Ottoman torpedo boat: all her crew survived to be taken prisoner. The patrols of HMS E14 in April and May 1915 and E11 in May and June were, however, highly successful.

The Ottomans were able to send some supplies to their troops by land as well as the larger quantities carried by water. Submarines, however, managed to attack the land as well as the sea routes. On 17 July HMS E7 blocked the railway from Istanbul near Kava Burnu at the entrance to the Gulf of Izmid by bombarding a cutting and then shelled a troop train that had been forced to turn back from the obstruction. E7 subsequently attacked another train and a bridge without doing much damage, but she had done enough to show that the railway was vulnerable there.[3]

E7’s captain, Lieutenant-Commander Archibald Cochrane, was awarded the Distinguished service Order. The citation, from naval-history.net [the other citations below are from the same source], stated that it was awarded for:

For services in a submarine in the Sea of Marmora, where he did great damage to enemy shipping, and after blocking the railway line near Kava Burnu by bombarding it from the sea, shelled a troop train and blew up three ammunition cars attached to it.

E11 also attacked the railways during her second patrol, as well as sinking several merchant ships and the old battleship Barbaros Hayreddin. her captain, Commander Martin Nasmith VC, was not satisfied with the results of bombardments of the railways, so on the night on 20-21 August her First Lieutenant, Guy D’Oyly Hughes, went ashore to sabotage the track. The citation for his DSO stated that it was awarded:

For his services on the 21st August, 1915, when he voluntarily swam to the shore alone from a submarine and blew up a low brickwork support to the Ismid railway line, in spite of the presence of an armed guard within 150 yards of him. After a running fight of about a mile, he dived into the sea, and was finally pulled on board the submarine utterly exhausted, having had to swim nearly a mile in his clothes.

The Allied policy was to have two submarines in the Sea of Marmara at all times. According to the British Official History, they were able to make the enemy’s supply ‘so restricted and precarious that the maintenance of the Turkish army in Gallipoli was a matter of grave concern.’[4] However, E11’s second patrol ended on 8 September and E7, her replacement, was lost after being caught in submarine nets on 4 September. After battling 12 hours to free her Cochrane was forced to scuttle her after she was badly damaged by a depth charge. He and all his crew were captured, leaving only E2 in the Sea of Marmara. She put Lieutenant H. V. Lyon ashore on 8 September with the intention that he should repeat D’Oyly Hughes’s feat, but nothing more was heard from him.[5]

E2’s cruise ended in the middle of September. She was replaced by E12, which had a 4 inch deck gun rather than the 12 pounders fitted to her sisters. She was later joined by H1, the first of a new class of boats about half the size of the E class. The H class were built in the USA but fitted with their armament in Canada in an attempt to evade neutrality regulations.[6]

These two boats were joined on 22 September by the Turquoise, the first French submarine to reach the Sea of Marmara, and by E20 the next day. Three days later E12 headed back to base after a 40 day patrol, the longest yet carried out in the Dardanelles: she was damaged after being caught in the nets and then attacked by six enemy patrol ships as well as shore batteries, but made it back. H1 completed her 29 day patrol on 31 October.[7]

The captains of E12 and H1 were awarded the DSO. The citations read that:

Lieutenant-Commander Kenneth Mervyn Bruce, R.N. For his services in command of a Submarine in the Sea of Marmora, where he made a prolonged cruise, during the course of which he inflicted much damage on enemy shipping, and engaged and put to flight by gun fire a Turkish gunboat and a destroyer, and subsequently displayed much coolness, and resource in extricating his boat from a difficult position.

Lieutenant Wilfrid Bayley Pirie, R.N. For his services in command of a Submarine in the Sea of Marmora, where he inflicted much damage on enemy shipping, and co-operated with Lieutenant-Commander-Bruce in the chase of a Turkish gunboat.

The French submarines operating in the Dardanelles, which were older and smaller than the British E class boats, had found it hard to get through the Straits. The Joule struck a mine on 1 May, while the Mariotte was forced to surface near the Chanak batteries on 27 July after being trapped by the net defences. She came under artillery and was lost, with her crew being captured.[8]

Nothing was heard from the Turquoise from 26 October until a German telegram claiming that she had been sunk on 30 October by gunfire and her crew captured. In fact, she had been stranded and captured intact. Her confidential papers, including the details of a planned rendezvous with E20 were not destroyed.[9] When E20 arrived at the rendezvous on 5 November the submerged German U-boat UB14 was waiting for her. UB14 fired a torpedo from a range of 550 yards, sinking the British boat. Only nine of her crew survived.[10]

E11, which had returned to the Sea of Marmara on 6 November, was now the only Allied submarine there. Her third patrol lasted until 23 December, during which time she sank more steamers and the destroyer Yarhissar and bombarded the railways. Her three patrols totalled 97 days, and she was credited with sinking or rendering useless a battleship, a destroyer, five large and six small steamers and five large and 30 small sailing vessels. Nasmith was promoted to Captain after only a year as a Commander. E2 joined E11 on 10 December, but the Gallipoli Campaign was coming to an end.[11]

The British claimed that a battleship, an old coastal defence ship, a destroyer, five gunboats, 11 transports, 44 steamers and 148 smaller vessels were sunk by submarines in the Dardanelles for the loss of four British and four French submarines. The German official history says 25 steamers of 26,000 tons and 3,000 tons of small craft were destroyed plus 10 steamers of 27,000 tons damaged and put out of action for the duration of the campaign. Paul Halpern suggests that the difference may be partly explained by some ships being beached and later repaired and refloated.[12]


[1] J. S. Corbett, H. Newbolt, Naval Operations, 5 vols. (London: HMSO, 1938). vol. ii, p. 140; R. Gray, Conway’s All the World’s Fighting Ships, 1906-1921 (London: Conway Maritime Press, 1985), p. 208.

[2] A. J. Marder, From the Dreadnought to Scapa Flow; the Royal Navy in the Fisher Era, 1904-1919, 5 vols. (London: Oxford University Press, 1961-70). vol. ii, p. 312.

[3] Corbett, Newbolt, Naval. vol. iii, p. 77.

[4] Ibid. vol. iii, p. 119.

[5] Ibid. vol. iii, pp. 118-19.

[6] Ibid. vol. iii, p. 161; Gray, Conway’s 1906-1921, pp. 88, 92.

[7] Corbett, Newbolt, Naval. vol. iii, pp. 177-79.

[8] Ibid. vol. iii, p. 78; Gray, Conway’s 1906-1921, pp. 209-10.

[9] Corbett, Newbolt, Naval. vol. iii, p. 179.

[10] Ibid. vol. iii, pp. 205-6.

[11] Ibid. vol. iii, pp. 206, 217-18, footnote 2 on p. 218

[12] P. G. Halpern, A Naval History of World War I (London: UCL Press, 1994), p. 119.

5 Comments

Filed under War History

The British Capture Kut-Al-Amara 28 September 1915

In June and July 1915 the British captured Amara and Nasiriyah in Mesopotamia. The force that did so was nicknamed Townshend’s Regatta because most of the troops of Major-General Charles Townshend’s 6th (Poona) Division of the Indian Army travelled along the Euphrates and Tigris in a flotilla of various types of ship and boat.

The British had landed troops at Basra in November 1914 in order to protect their interests in the region, notably but not only the Anglo-Persian Oil Company’s refinery at Abadan and the pipeline to its Persian oilfields. The capture of Amara and Nasiriyah meant that the oil facilities and the vilayet (province) of Basra were securely held and the British should then have halted.

Townshend and his division were, however, ordered to advance on Kut-al-Amara, with the intention of taking Baghdad. He argued in his memoirs that this operation should not have taken place. Basra vilayet and the oilfields should have been defended by a force based at Basra, with outposts at Qurna, Nasiriyah and Ahwaz.[1]  He was right, but the campaign continued for a number of reasons: the need for a victory somewhere after defeats elsewhere; over confidence by local commanders; and momentum created by a series of easy victories early in the campaign.

The need for re-fits and the fact that the larger ships could not move any further up the Tigris meant that the naval force was reduced to the armed tug Comet, the armed launches Shaitan and Sumana and four horse boats carrying 4.7 inch guns towed by the motor launches RN 1 and RN 2. Captain Wilfrid Nunn, the Senior Naval Officer, and his successor, Captain Colin Mackenzie, were both ill, so Lieutenant-Commander Edgar Cookson of the Comet took over.[2]

The horse boats were so called because they had no engines and were normally towed by horses walking along the river or canal bank. The 4.7 inch guns were elderly, but the launches and horse boats had very shallow draughts, so could provide fire support for the troops in waters too shallow for the sloops that had provided this earlier in the campaign. RN 1 was commanded by Leading Seaman Thompson, a veteran, and RN 2 by Able Seaman Phil Gunn, a young sailor who would later be commissioned and rise to the rank of Captain: the rest of their crews were Indians. RN 1 and RN 2 were protected against sniper fire by steel plates around their cabins and engine rooms.[3] Phil Gunn’s RN 2 would lead the advance of the whole expedition.[4]

The advance began on 12 September, with the troops moving to Ali-al-Gharbi by ship. From then on, the shallow water meant that the troops had to march along the river bank, with the shallow draught tug, launches and horse boats providing fire support. The Ottomans withdrew without offering any resistance and the British force halted at Sanniaiyat from 15-25 September, during when it received reinforcements. The temperature was 110-16° F in the shade, of which there was little.[5]

The engines of the aircraft that had operated in Mesopotamia so far had proved to be unsuitable for the hot, dusty atmosphere: 70 hp Renault ones in the Maurice Farmans and 80 hp Gnomes in the Caudrons and Martinsydes. In early September three Royal Naval Air Service Short seaplanes with 150 hp Sunbeam engines under the command of Squadron-Commander R. Gordon arrived from Africa, where they had been involved in the operation that resulted in the destruction of the light cruiser SMS Königsberg. Their climbing ability was poor and it was difficult to get a long enough take off run on the Tigris. Two had their floats replaced to allow them to operate from land, thereafter giving good service despite engine problems.[6]

"Kut1915" by This map was created by the Department of Military Art and Engineering, at the U.S. Military Academy (West Point). - http://www.dean.usma.edu/history/web03/atlases/great%20war/great%20war%20%20pages/great%20war%20map%2047.htm. Licensed under Public Domain via Commons - https://commons.wikimedia.org/wiki/File:Kut1915.jpg#/media/File:Kut1915.jpg

“Kut1915” by This map was created by the Department of Military Art and Engineering, at the U.S. Military Academy (West Point). – http://www.dean.usma.edu/history/web03/atlases/great%20war/great%20war%20%20pages/great%20war%20map%2047.htm. Licensed under Public Domain via Commons – https://commons.wikimedia.org/wiki/File:Kut1915.jpg#/media/File:Kut1915.jpg


Aerial and naval reconnaissance discovered that Nureddin Pasha’s Ottoman troops were dug in astride the river in a strong defensive position 8 miles from Sannaiyat and 7 miles from Kut. There were two Ottoman divisions with 38 guns plus two cavalry regiments and 400 camelry. Most of the mounted troops were away on a raid and missed the battle of 28 September.[7] The Ottoman divisions had only six battalions each, meaning that they were outnumbered by the 14 British battalions. Some of the Ottoman guns were obsolete, giving the British an small artillery advantage.[8]

Townshend decided to divide his force into two columns. Column A would demonstrate against the Ottoman troops on the south bank of the Tigris. Column B, its flank protected by the naval flotilla, would attack on the right bank in order to pin the enemy’s centre. Column A would then cross the river and attack the enemy’s left flank.[9]

A boat bridge was laid across the river on 27 September. Column B advanced to within 2,000 yards of the enemy, whilst Column A demonstrated during the day before crossing the river under the cover of darkness. It was ready to attack by 5:00 am, with Column B advancing at the same time. The Ottomans advanced on the south bank at 11:00 am in order to enfilade Column B, but were thrown back by fire from the naval 4.7 inch guns and army 4 and 5 inch guns. The gunboats had moved forward at 11:00 am to engage Suffra Mound, which was taken by Column B by 2:00 pm. The boats came under shell and rifle fire, but the Ottoman artillery was largely silenced by the afternoon. Contact between the two columns was maintained by the aeroplanes and seaplanes, as the strong wind created clouds of dust that made visual signalling between the columns impossible.[10]

At 4:50 pm Column A began to advance on the rear of the enemy facing Column B. Enemy reinforcements appeared 40 minutes later, but Brigadier-General W. S. Delamain re-deployed his troops to face them. A bayonet charge routed the Ottomans, who escaped under the cover of darkness, suffering heavy casualties and leaving four guns behind.[11]

At 6:00 pm the naval flotilla heard of Delamain’s success from a seaplane. Townshend asked Cookson to advance to an obstruction that blocked the river in the hope of destroying it and allowing a pursuit by water and land. The flotilla set off after dark at 6:30 pm, coming under heavy rifle and machine gun fire, as they approached the obstruction, which consisted of a dhow in the centre, attached by wire hawsers to two iron lighters. An attempt to ram the dhow failed, so Cookson jumped on it in an attempt to cut the hawsers with an axe. He quickly suffered several bullet wounds and died 10 minutes later. The flotilla then withdrew.[12]

The flotilla, now commanded by Lieutenant Mark Singleton of the Shaitan, resumed its advance the next morning, 29 September. The Ottomans had retreated from the obstruction and the British vessels reached Kut at 10:00 am. The low level of the river made navigation difficult, but they continued past Kut. On 30 September they encountered two armed Ottoman vessels, the Poineer and Basra. Sumana and Shaitan had both run aground, the former breaking both rudders, so the Comet engaged the two enemy steamers herself before being joined by the Shaitan. The Basra was damaged and withdrew. The British pursued, but then came under fire from shore based guns astern of them. The Shaitan ran aground again and there was a risk that she and the Comet would be cut off, but the Shaitan managed to re-float herself and the British retired to Kut. The difficulty of conducting a pursuit when the only means of transporting heavy equipment was along a low river meant that the Ottomans were able to withdraw to a prepared position at Ctesiphon.[13]

The British suffered 1,233 casualties of whom 94 were killed. They captured 1,700 men and 14 guns: total Ottoman casualties were 4,000.[14] Twelve men on the Comet, four of them soldiers, were wounded.[15] Cookson is the only sailor listed on naval-history.net as being killed in Mesopotamia from 27-30 September. He was awarded a posthumous Victoria Cross. The same website gives the citation:

29446 – 21 JANUARY 1916

Admiralty, 21st January, 1916.

 The KING (is) pleased to approve of the grant of the Victoria Cross to Lieutenant-Commander Edgar Christopher Cookson, D.S.O., R.N., in recognition of the following act of most conspicuous gallantry during the advance on Kut-el-Amara:

On the 28th September, 1915, the river gunboat “Comet” had been ordered with other gunboats to examine and, if possible, destroy an obstruction placed across the river by the Turks. When the gunboats were approaching the obstruction a very heavy rifle and machine gun fire was opened on them from both banks. An attempt to sink the centre dhow of the obstruction by gunfire having failed, Lieutenant-Commander Cookson ordered the “Comet” to be placed alongside, and himself jumped on to the dhow with an axe and tried to cut the wire hawsers connecting it with the two other craft forming the obstruction. He was immediately shot in several places and died within a very few minutes.


[1] C. V. F. Townshend, My Campaign in Mesopotamia (London: T. Butterworth Ltd, 1920), pp. 35-36.

[2] Naval Staff Monograph (Historical) 1921 vol. iv, Naval Operations in Mesopotamia and the Persian Gulf. pp. 75-76.

[3] D. Gunn, Sailor in the Desert: The Adventures of Phillip Gunn, DSM, RN in the Mesopotamia Campaign, 1915 (Barnsley: Pen & Sword Maritime, 2013). Kindle edition, locations 812-22, Chapter 22. This well researched book, by Phil’s son David, gives an excellent description of the Mesopotamian Campaign from the viewpoint of one of the RN’s lower deck.

[4] Ibid. Kindle locations 1067-79, Chapter 28.

[5] Naval Staff vol. iv. p. 76.

[6] W. A. Raleigh, H. A. Jones, The War in the Air: Being the Story of the Part Played in the Great War by the Royal Air Force, 7 vols. (Oxford: Clarendon Press, 1922). vol. v pp. 253-58. Naval Staff vol. iv. p. 76 says that there were four RNAS seaplanes

[7] Naval Staff vol. iv. p. 76.

[8] J. S. Corbett, H. Newbolt, Naval Operations, 5 vols. (London: HMSO, 1938). vol. iii, p. 192.

[9] Naval Staff vol. iv. p. 77.

[10] Ibid.

[11] Ibid., pp. 77-78.

[12] Ibid., p. 78.

[13] Ibid., pp. 78-79.

[14] Corbett, Newbolt, Naval. vol. iii, p. 195 and footnote 2.

[15] Naval Staff vol. iv. p. 78. Footnote 1.

11 Comments

Filed under War History

The Royal Navy and Townshend’s Regatta

British troops landed near Basra on 6 November, the day after hostilities began with the Ottoman Empire with the objective of securing British interests in the region, notably but not only the Anglo-Persian Oil Company’s refinery at Abadan and the pipeline from it to APOC’s Persian oilfields. These had been achieved by 9 December when they took Qurna.

In early 1915 Ottoman forces attacked from Amara on the Tigris towards the oil pipe-line and from Nasiriyah on the Euphrates towards Basra. The pipeline was cut around Ahwaz. By then General Sir John Nixon was in command of the Mesopotamian Corps of two infantry divisions and a cavalry brigade. He did not, however, have all the equipment, especially transport and medical services, of a corps.

On 12 April the Ottoman attack towards Basra was defeated at Barjisiya. Nixon then launched offensives towards Ahwaz and Amara to protect the pipeline and Nasiriyah to protect Basra. The politicians in London, Lord Crewe, Secretary of State for India until the Liberal/Conservative Coalition was formed in May 1915, and his successor Austen Chamberlain, both urged caution in Mesopotamia once the oil facilities and Basra were safe. They were, however, ignored by the government and army command of British India, which had more ambitious plans.[1]

The lack of a railway and the poor quality of the roads meant that the rivers were vital for communications. The attack on Amara, carried out by Major-General Charles Townshend’s 6th (Poona) Division, was made at a time of unusually high floods, meaning that the land was flooded for miles around the Tigris. The flood water was often shallow, but with ditches, cuts and canals that made it impossible to wade. The Naval Staff Monograph said that ‘there was too much water for the Army, but generally too little for the Navy.’[2]

Infantry were carried were carried on armoured bellums (local boats holding about eight people and propelled by paddles or poles). Other bellums were loaded with supplies, including ammunition. Artillery was loaded on barges, rafts, tugs and paddlers, with machine guns on rafts. Rafts were also used as ambulances, with roofed mahelas (large river sailing boats) used as hospitals. Townshend and some of his staff travelled on the sloop HMS Espiègle, along with the Senior Naval Officer Captain Wilfrid Nunn. The rest of his staff were split between the sloops HMS Clio and Odin. The flotilla also included the Indian Marine ship Lawrence, the armed tugs Comet and Miner, the armed launches Bahrein, Lewis Pelly, Shaitan and Sumana and the stern wheelers Shushan and Muzaffri. The troops called the force ‘Townshend’s Regatta.’[3]

Townshend’s attack began at 5:00 am on 31 May and by noon had succeeded in taking its first objective, a series of Ottoman outposts. Aerial reconnaissance showed that the enemy was in full retreat: the two British aircraft had to fly from Basra as there was no closer ground dry enough for them to land on. Townshend, his staff and a dozen other soldiers boarded the flotilla and headed off in pursuit. A captured Ottoman officer, who was put in one of the launches being used as minesweepers, pointed out the enemy mines on the river.[4]

The next Ottoman position, at Bahran, was bombarded at 5:30 am on 1 June, but had been evacuated. Four lighters had been sunk in an attempt to block the river, but it was possible to pass, although navigation was difficult because the ships had only rough maps of the river, which bent and twisted and whose channel was hard to identify because of the floods.[5]

At 5:50 pm Shaitan, the leading vessel, opened fire on the Ottoman gunboat Marmariss, which was towing some mahelas. The sloops joined in, also firing on the steamers Mosul and Bulbul By 8:05 pm, when the British ships anchored to wait for the moon to rise, the Bulbul had been sunk. The Marmariss escaped by abandoning the craft that she was towing. The British resumed the pursuit at 2:00 am on 2 June. At daybreak they found the Marmariss, abandoned, aground and on fire. The Mosul was found aground nearby, full of troops and stores.[6] As well as the Marmariss and Mosul, two steel lighters, seven mahelas, two field guns, a large quantity of rifles and ammunition, 140 prisoners and over £1,000 worth of treasure were captured.[7]

Townshend decided to press on to Amara with the lighter draught vessels: the sloops could not go any further. He set off at 11:00 am on 2 June with the Shaitan, Sumana, Lewis Polly, three horse-boats, each armed with a 4.7 inch gun, and Sir Percy Cox, the Principal Political Officer, in his steam launch L2. No opposition was met and white flags were being flown. Shaitan entered Amara at 2:00 pm on 3 June. She was surrounded, but was not fired upon. Townshend then arrived and took the surrender of 30-40 Ottoman officers and 700 men. The British were heavily outnumbered, although sources differ on the number involved: the Naval Staff Monograph says ‘Townshend and his 22 men’, whilst Naval Operations, one of the British Official Histories, says 100 ‘besides Lascar stokers.’[8] Possibly the smaller is the number who actually took the surrender and the larger includes all the crews of the vessels involved. The 2nd Battalion of the Norfolk Regiment arrived in the morning to secure Amara.

Townshend’s reputation was later destroyed by his defeat in the Siege of Kut-Al-Amara and his behaviour during his subsequent captivity, when he lived in comfort in Istanbul and made no attempt to find out about the appalling conditions in which his men were being held as prisoners. In this action, however, he led from the front, belying the clichéd image of the First World War general miles behind the lines. He wrote that ‘I owe the whole of the success firstly to the Royal Navy.’[9]

From 31 May to 4 June Townshend’s force captured 139 officers, 1,634 men, 12 field guns and five naval guns and captured or sank the Marmariss, five steamers and several barges and small craft. British casualties from 31 May to 4 June were one officer and three men killed and three officers and 18 men wounded.[10] The Ottomans suffered 120 killed or wounded as well as those captured.[11]

The next stage of the Mesopotamian Campaign was to take Nasiriyah in order to protect Basra. It was too difficult to move on it across the desert at that time of year, so the advance had to be made by river. This meant bringing the ships and river craft back from Amara to Qurna and then along a waterway that went through the very shallow and 10 mile broad Hammar Lake to the Euphrates. Some ships had been sent away: Clio to Bombay for a refit, Lawrence to Bushire and others to Ceylon (now Sri Lanka) to allow their crews to recover from the heat at a hill station.[12]

Nunn’s force was augmented by another stern wheeler, the, but was weaker than at Amara. Espiègle, Odin and Miner could not cross the Hammar Lake. The remaining force consisted of Sumana, the stern wheelers Shushan (armed with a 12 pounder, a 3 pounder and a maxim), Muzaffri (a maxim) and Messoudieh (a 3 pounder and a maxim), two horse-boats, each armed with a 4.7 inch gun, three transports full of troops, each with two 18 pounder guns on her foredeck and four tugs towing mahelas or lighters full of ammunition and supplies. The stern wheelers were given some armour plate, but the amount was restricted because the shallow water meant their draughts could not increase much. There were also mountain guns mounted on bellums. Nunn was onboard Shushan. The troops were from the 30th Brigade of Major-General George Gorringe’s 12th Indian Division, reinforced with additional artillery and engineers.[13]

The force began to cross the Hammar Lake at 4:00 pm on 27 June. Navigating the narrow, shallow and almost unmarked channels was difficult, even without being under fire. Open water was not reached until 4:00 am on 4 July. An Ottoman position at Gurma-Safha, defended by 2,300 troops, later reinforced to 3,000, was attacked and taken the next day. The British had 114 men killed or wounded, but captured 132 men and two guns.[14]

The next resistance was encountered at the Majinina Creek, about six miles from Nasiriyah, where the Ottomans had established a strong defensive position.[15] It was initially defended by about 2,000 Turks, six guns, two launches and ‘large numbers of hostile Arabs.’[16]

Both sides were receiving reinforcements and had about 5,000 men each by 24 July. The British, however, had more artillery and the advantage of an aircraft for reconnaissance.[17] Their attack began with an artillery bombardment at 4:30 am that day, with the infantry assault starting 30 minutes later. Sumana, under heavy fire, positioned a barge to allow the troops to cross the creek with fire support from the stern wheelers. The Ottomans offered stiff resistance but were forced back. [18]

Nunn took Shushan towards Nasiriyah, where white flags were flying, but she was forced to retreat after coming under fire. The Ottomans, however, evacuated the town overnight. On 25 July the leading Arab citizens invited the British to enter the town. Two days later Nunn took Shushan a further 71 miles up the Euphrates to Samawa, a telegraph station whose small garrison had fled after hearing of the fall of Nasiriyah. The Euphrates operation cost the British over 500 dead and wounded, including five sailors wounded. They took 15 guns at Nasiriyah.[19]

The Basra vilayet (province) was now secure and the British should have halted. Townshend and his 6th Division were, however, ordered to advance on Kut-al-Amara, with the intention of taking Baghdad. He argued in his memoirs that this operation should not have taken place. Basra vilayet and the oilfields should have been defended by a force based at Basra, with outposts at Qurna, Nasiriyah and Ahwaz.[20] He was right, but the campaign continued for a number of reasons: the need for a victory somewhere after defeats elsewhere; over confidence by local commanders; and momentum created by a series of easy victories early in the campaign.


[1] This is a summary of the relevant part of my PhD thesis. M. W. Gibson, ‘British Strategy and Oil 1914-1923.’ (University of Glasgow, 2012), pp. 48-55.

[2] Naval Staff Monograph (Historical) 1921 vol. iv, Naval Operations in Mesopotamia and the Persian Gulf. p. 52.

[3] Ibid.

[4] J. S. Corbett, H. Newbolt, Naval Operations, 5 vols. (London: HMSO, 1938). vol. iii, pp. 18-19.

[5] Naval Staff vol. iv. pp. 54-55.

[6] Ibid., pp. 55-56.

[7] Corbett, Newbolt, Naval. vol. iii, p. 20, footnote 1.

[8] Naval Staff vol. iv. p. 56; Corbett, Newbolt, Naval. vol. iii, p. 22

[9] Naval Staff vol. iv. p. 57.

[10] Ibid., pp. 56-57.

[11] Corbett, Newbolt, Naval. vol. iii, p. 23.

[12] Ibid. vol. iii, p. 183.

[13] Naval Staff vol. iv. pp. 59-60.

[14] Ibid., pp. 61-62.

[15] A. J. Barker, The First Iraq War, 1914-1918: Britain’s Mesopotamian Campaign (New York, NY: Enigma, 2009), p. 69.

[16] Naval Staff vol. iv. p. 63.

[17] Barker, The First Iraq War, 1914-1918: Britain’s Mesopotamian Campaign, p. 70.

[18] Naval Staff vol. iv. pp. 64-65.

[19] Ibid., p. 65.

[20] C. V. F. Townshend, My Campaign in Mesopotamia (London: T. Butterworth Ltd, 1920), pp. 35-36.

6 Comments

Filed under War History

Lieutenant-Commander Martin Nasmith VC and HM Submarine E11

Lieutenant-Commander Martin Nasmith was captain of the submarine HMS E11 at the outbreak of WWI. In October 1914 E11 was one of three British submarines that tried to enter the Baltic Sea. The other two succeeded, but E11 was delayed by technical problems. On 19 October she mistook a neutral Danish submarine for a German U-boat, but her torpedo attack fortunately missed. She was spotted by a seaplane whilst recharging her batteries on the surface the next day; destroyers searched for her all day. After trying but failing to get past the Germans patrols again the next day Nasmith headed back to base on 22 October.[1]

On 17 December E11 was at southern end of a patrol line of British submarines in Helgoland Bight. Just after 7:00 am a number of German destroyers appeared, searching at high speed. An hour later large ships, which must have been returning from the German raid on the English north east coast, came into sight. Nasmith approached to 400 yards of one of them and fired a torpedo, but it ran too deep. He tried to get a shot on the third in the German line, but its zigzag course left it 500 yards away and heading straight for E11, forcing Nasmith to dive rapidly. This disturbed the boat’s trim, and she broke the surface when returning to periscope depth. She was able to escape. but the Germans made off at high speed.[2] On Christmas Day 1914 E11 rescued four of the airman who took part in the Cuxhaven Raid.

By May 1915 E11 was in the Dardanelles. On 17 May E14 returned from a successful patrol in the Sea of Marmara that earned her captain, Lieutenant-Commander Edward Boyle, the Victoria Cross and every member of her crew a medal. E11 was to head through the Straits to replace her the next day. The night before Boyle briefed Nasmith on the mines, nets and guns defending the straits.[3]

19 May: E11 set off at 1:10 am on 19 May, passing through the Allied destroyer line at 3:20 am and then diving. At 6:10 am she saw the Ottoman battle ships Targut Reis and Heredin Barbarossa, accompanied by several destroyers. The battleships withdrew and the destroyers fired on E11 whenever her periscope was raised. It was very easy to spot because of the speed that she was making and the light conditions. By 9:45 pm she was through the Straits. At 10:00 pm she surfaced in order to charge her batteries.[4]

20 May: She stayed on the surface, charging her batteries until 4:00 am, apart from 0:30 – 0:40 am, when a destroyer appeared, forcing her to dive. No merchant ships were seen during the day. Generally E11 stayed on the surface at night in order to charge her batteries. During the day she was on the surface if it was safe to do so.

21 May: At 11:30 am E11 stopped a small sailing vessel. Four chickens were taken; the scared but polite skipper declined payment. E11 used the vessel as a screen for the rest of the day: it was then very foggy.

22 May: Only warships were encountered and evaded. Attempts to radio the destroyer HMS Jed failed.

23 May: Course was altered towards Istanbul at 3:00 am. A transport was encountered at 4:50 am, whilst E11 was inspecting a sailing vessel. E11 dived to attack, but the transport spotted her and made off. At 5:50 am the 775 ton Ottoman gunboat Peleng-I Derya was seen anchored off Istanbul.[5] E11 dived, approached her and fired a torpedo into her. The gunboat sank, but first got off rifle fire and shots from her 6 pounder gun; one of the latter put E11’s forward periscope out of action.

24 May: Radio contact was made with Jed. Thereafter E11 and Jed were in regular contact.

At 10:30 am a smaller steamer was spotted heading west. E11 surfaced and ordered her to stop. The steamer tried to flee, but stopped after coming under rifle fire from E11. Her crew panicked and started to abandon ship. The panic was calmed by Silas Q. Swing, the war correspondent of the New York Sun. He said that the steamer was a passenger ship that was heading for Chanak and was not, as far he knew, carrying stores, before just making the last boat.

The steamer was in fact carrying a 6 inch gun, other gun mountings and a large amount of ammunition. After taking some souvenirs E11’s crew set a demolition charge, sinking the ship, which was the 480 ton naval auxiliary Naga.[6]

More smoke had by then been spotted. It was another steamer, similar to the Naga. E11 dived to attack, but was spotted. The target headed for Rodasto, with E11 pursuing on the surface. Large quantities of stores could be seen on the steamer’s deck. She berthed at Rodasto’s pier. E11 dived and approached, but ran aground 2,000 yards away as the water quickly became shallower. She fired a torpedo, which sank the steamer; she was the 512 ton SS Hunkar Iskelesi.[7] E11 then withdrew under rifle fire, which seemed to be aimed at her remaining periscope. It was hit but not damaged.

Another vessel was then observed. It was a small paddle steamer, which initially tried to flee. It stopped after coming under rifle fire, but then tried to ram E11 after realising that the submarine did not have any guns other than rifles. The paddle steamer, which was carrying horses, finally ran ashore. E11 approached, but came under fire from 50-100 cavalrymen. She fired a torpedo, but it missed; only the stern could be targeted and the shallow water made it impossible to close the range.

At 10:30 pm E11 headed towards Istanbul.

25 May: On the same day as U21 sank the battleship HMS Triumph E11 arrived at the Golden Horn. At 12:30 pm she fired torpedoes at two transports moored at the Arsenal Wharf. One hit and damaged the 3,559 ton SS Istanbul, which beached herself in shallow water, while the other, aimed at SS Kismet, circled back, forcing E11 to take evasive action, before escaping back to the Sea of Marmara.[8] The action was observed by the USS Scorpion, guard ship to the US Embassy. Her log noted that four torpedo boats fired on E11.[9]

26 May: The spare torpedoes were made ready. The rest of the day was spent bathing, repairing and mending clothes and resting.

27 May: An Ottoman battleship and two destroyers were seen at 1:30 am, but one of the destroyers forced E11 to dive as she was about to fire. A small steamer was observed at 5:00 pm, but not attacked after she fired on E11.

28 May: Smoke was spotted at 6:00 am. Half an hour later a convoy of one large and four small transports, escorted by a destroyer became visible. At 7:30 am a torpedo was fired at the largest transport, hitting and sinking the 474 ton SS Bandirma. Nasmith, conscious of the risk to E11’s periscope from Ottoman fire, dived his boat. He brought her back to periscope depth once safely clear, observing the destroyer searching for the submarine and the other transports continuing on their course.

At noon a steamship was seen approaching. A torpedo was fired, but no explosion was heard, although the target was seen to stop briefly. The torpedo was later found floating and hoisted back on board after Lieutenant Robert Browne had removed the firing pistol. Damage to the torpedo’s head showed that it had struck the ship, the 216 ton SS Dogan, without exploding.[10]

A small sailing vessel was stopped at 4:30 pm. She was not carrying any cargo and was allowed to continue after being relieved of various delicacies.

29 May: An attack on a store vessel at 7:00 am failed, with E11 breaking surface. Only two or three destroyers were seen during the rest of the day.

30 May: Day spent mainly in clearing the foul air in E11, cleaning her as far as possible and washing and bathing by the crew.

31 May: At 8:00 am a large ship of the German Rickmers Line was seen embarking troops at Panderma. At 9:20 am a torpedo was fired that hit her. She listed heavily to port, but her crew managed to beach her. The ship, the 3,431 ton SS Madeline Rickmers, was wrecked.[11]

1 June: A quiet day.

2 June: A destroyer was spotted at 8:10 am but E11 evaded her by diving. At 9:00 am E11 surfaced and headed to intercept a ship whose smoke had been observed just before diving. At 9:20 am E11 dived. She fired a torpedo 20 minutes later and the target, which was the 390 ton store SS Tecielli, sank in 3 minutes.[12]

At 12:30 pm the smoke of a small ship escorted by two destroyers was spotted. E11 dived at 1:15 pm. She fired a torpedo at the merchant ship at 2:15pm , but it passed under the target, which was the 400 ton SS Basangic.[13] The torpedo was found and floated back in to E11 via the stern torpedo tube after the firing pistol had been removed.

3 June: Smoke was seen at 3:00 pm. E11 dived and approached the vessel, which resembled a steam yacht. She was not closing the range quickly enough, so surfaced. When the range was down to 2,000 yards the enemy vessel turned and headed straight towards E11, which dived. The enemy had disappeared when E11 surfaced. A destroyer forced her to dive at 4:00 pm and remain submerged until midnight.

4 June: The only ship observed was a destroyer in the afternoon and evening, which was thought to be the one that had been hunting for E11 the day before.

5 June: The day was spent ventilating the boat, charging the batteries and bathing. Problems were found in one of the main motors and the intermediate shaft was cracked, so Jed was asked to give E11 permission to return to base.

6 June: A quiet Sunday of bathing, prayers, exercise and battery charging. A destroyer an some sailing vessels were seen in the afternoon. At 9:30 pm E11 headed slowly on the surface towards the north entrance to the Dardanelles.

7 June: E11 dived at 3:40 am and entered the Straits. At 6:30 am she passed Gallipoli at 90 feet. She examined all the anchorages, but found no battleships. A few small vessels and sailing ships were seen. The nest target was a troopship anchored off Moussa Bank. At noon a torpedo was fired at her. It struck, and the ship, which was the 3,590 ton SS Ceyhan, sank.[14]

E11 passed Nagara Point at 1:30 pm and Chanak 30 minutes later. A large mine became attached to the port foremost hydroplane at Chanak. At 4:00 pm E11 cleared the mine by surfacing stern first and heading astern at full speed. She was then met by the destroyer HMS Grampus, which escorted her to Port Mudros.

On 25 June the London Gazette printed the citation for the award of the Victoria Cross to Nasmith. Lieutenant Guy D’Oyly Hughes, his second in command, and Browne both received the Distinguished Service Cross and every petty officer and rating was awarded the Distinguished Service Medal. Nasmith’s citation, reproduced on Naval-History.net, said that:

 29206 – 25 JUNE 1915

Admiralty, 24th June, 1915.

The KING (is) pleased to approve of the grant of the Victoria Cross to Lieutenant-Commander Martin Eric Nasmith, Royal Navy, for the conspicuous bravery specified below:

For most conspicuous bravery in command of one of His Majesty’s Submarines while operating in the Sea of Marmora. In the face of great danger he succeeded in destroying one large Turkish gunboat, two transports, one ammunition ship and three storeships, in addition to driving one storeship ashore. When he had safely passed the most difficult part of his homeward journey he returned again to torpedo a Turkish transport.

The number of ships that E11 was credited with sinking ties in with the ships named by Nicholas Lambert in his footnotes to the Navy Records Society’s reprint of the report of E11’s patrol on which the above is based. Their total tonnage was 13,211 tons.

This was only the first of three patrols that Nasmith and the crew of E11 made in the Dardanelles. The other two will be the subject of later posts.


[1] J. S. Corbett, H. Newbolt, Naval Operations, 5 vols. (London: HMSO, 1938). vol. i, pp. 237-38.

[2] Ibid. vol. ii, pp. 45-46.

[3] Ibid. vol. iii, 32.

[4] This account of E11’s patrol is based on [142] ‘The First Sea of Marmora Patrol’ by HM Submarine E11, 19 May to 7 Hune 1915 by Lieutenant-Cammander Martin Nasmith, Lieutenant Guy d’Oyly Hughes and Lieutenant Robert Browne, document no. 142 in N. A. Lambert, ed. The Submarine Service, 1900-1918 (Aldershot: Ashgate for the Navy Records Society, 2001), pp. 301-13. Additional comments made by the editor are footnoted.

[5] Ibid. Footnote 1, p. 303.

[6] Ibid. Footnote 1, p. 305.

[7] Ibid. Footnote 2, p. 305.

[8] Ibid. Footnotes 1-3, p. 306.

[9] Ibid., p. 307.

[10] Ibid., pp. footnote 1, p. 309.

[11] Ibid. Footnote 1, p. 310.

[12] Ibid. Footnote 1, p. 311.

[13] Ibid. Footnote 2, p. 311.

[14] Ibid. Footnote 1, p. 313.

15 Comments

Filed under War History

The Naval Attack on the Dardanelles 1915 (2) The Attack

The previous entry in this series described the reasons why the British decided to launch a naval attack on the Dardanelles in February 1915.

The attack was to be led by Vice Admiral Sir Sackville Carden, who was then commanding RN forces in the Mediterranean. His force included the RN’s newest dreadnought, HMS Queen Elizabeth, which was the first battleship in the world to be fuelled entirely by oil and the first dreadnought to be armed with 15 inch guns. An accident reduced her speed to 15 knots, so the battlecruiser HMS Inflexible, which was originally intended to return to the Grand Fleet, stayed in order to give Carden a ship fast enough to bring SMS Goeben, the German battlecruiser now in Ottoman service, to action.

The other 12 British battleships in Carden’s force were all pre-dreadnoughts; some had been released from overseas stations after the British victory at the Falkland Islands and others were transferred from the Channel Fleet. They included HMS Agamemnon and Lord Nelson, which had been completed after HMS Dreadnought because the 12 inch gun turrets originally intended for them were fitted to Dreadnought in order to expedite her construction. The others were of the older Majestic, CanopusFormidableDuncan and Swiftsure classes. Carden also had four French pre-dreadnoughts, giving him a total of 18 capital ships, and the six seaplanes of the carrier HMS Ark Royal.

Carden had devised a seven stage plan:

  1. Destroy the forts at the entrance to the straits.
  2. Sweep the minefields and reduce the defences up to the Narrows.
  3. Destroy the forts defending the Narrows.
  4. Sweep the principal minefield at Kephez.
  5. Destroy the forts above the Narrows
  6. Enter the Sea of Marmara.
  7. Operate in the Sea of Marmara and patrol the Dardanelles.

Each attack on the forts would comprise three stages: a direct or indirect long range bombardment out of either range or bearing of the forts; a medium range bombardment by direct fire, including secondary armaments; and then a final bombardment at a range of 3-4,000 yards. Ships were to withdraw to long range if they came under fire: the largest Ottoman guns were thought to have a maximum range of 12,000 yards.[1]

Winston Churchill, the First Lord of the Admiralty, was urged by some staff officers to send the Royal Naval Division, an infantry force under the Admiralty’s control, to Carden. It had been formed at the start of the war from marines, naval reservists who were not needed at sea ships and wartime volunteers, and had fought in Belgium in 1914. At this stage of the war it lacked the supporting forces of an army infantry division. However, Churchill was willing to send only two battalions of Royal Marines to act as landing parties to destroy Ottoman guns.[2]

On 16 February it was decided to send the 29th Infantry Division, consisting mostly of regulars recalled from colonial garrisons, from the UK and the two divisions of the  Australian and New Zealand Army Corps from Egypt to Lemnos, the naval base of operations. However, Lord Kitchener, the Secretary of State for War, decided three days later that the 29th might be needed in France.[3]

This was the start of the military operation, but at this stage it was still expected that the fleet would force the Dardanelles. The troops were intended to demolish forts, destroy concealed howitzers, take the Gallipoli peninsula once the Ottomans had withdrawn and occupy Istanbul  if the expected revolution occurred.[4]

The naval attack began on 19 February. It showed that direct hits were required in order to knock out a heavy gun in a modern emplacement; indirect fire was not accurate enough to achieve such hits.[5]

Source: "Dardanelles defences 1915" by Gsl - Own work. Licensed under Public Domain via Wikimedia Commons - http://commons.wikimedia.org/wiki/File:Dardanelles_defences_1915.png#/media/File:Dardanelles_defences_1915.png

Source: “Dardanelles defences 1915” by Gsl – Own work. Licensed under Public Domain via Wikimedia Commons – http://commons.wikimedia.org/wiki/File:Dardanelles_defences_1915.png#/media/File:Dardanelles_defences_1915.png

The attack resumed on 25 February after a period of bad weather. The forts on either side of the entrance were silenced. Attempts by marine landing parties on 26 February and 1 and 4 March to complete the destruction of the forts were only partly successful because the Ottomans had re-occupied them once the naval fire lifted.[6]

Lieutenant Commander Eric Robinson of HMS Triumph was awarded the Victoria Cross for his courage whilst leading one of the landing parties on 26 February.

Carden’s first stage of silencing the forts at the entrance to the Dardanelles had now been achieved. There were no minefields in the first half of the 14 miles to the Narrows, but the battleships could not proceed through the minefields in the second seven miles. The trawlers that were employed as minesweepers had a speed of only four to six knots when sweeping, which was halved because they were going against the current. The remaining Ottoman guns were unable to do serious damage to battleships, although some were hit, but their howitzers were deadly against the minesweepers. Carden decided to use the minesweepers at night, but the Ottomans had anticipated this and installed searchlights.[7]

The battleships were unable to find the concealed howitzers. Air reconnaissance failed because the seaplanes were vulnerable to ground fire if they flew low and could not see the guns if they stayed high enough to be safe. Carden also employed a slow approach in which he used only a few of his battleships each day.[8]

On 11 March the Admiralty sent Carden a telegram saying that:

‘Caution and deliberate methods were emphasised in your original instructions…If, however, success cannot be obtained without loss of ships and men, results to be gained are important enough to justify such a loss.’[9]

Carden replied two days later that he intended a last attempt at night sweeping that night, which failed. It was now realised that the searchlights made night sweeping impossible. The only remaining option was a daylight operation in which the battleships suppressed the guns in order to allow the minesweepers to operate safely. A plan using all 18 battleships for an attack on 18 March was produced on 15 March.

The next day Carden’s health gave way. Command was given to Rear Admiral John de Robeck, his second in command. The RN’s rules of seniority meant that it ought strictly have gone to Rear Admiral Rosslyn Wemyss, commanding the base at Mudros, but he agreed to work under the man on the spot.[10]

The fleet was divided into three divisions: the First of the four newest ships; the Second of eight British pre-dreadnoughts; and the Third of the four French battleships and two British ones. Observation would come from the air. Aerial reconnaissance and other sources indicated that the main forts were armed with 42 guns of 8 inches or more, including six 14 inch guns.

First Division (Acting Vice Admiral John De Robeck):

HMS Queen Elizabeth, Inflexible, Agamemnon and Lord Nelson.

Second Division (Commodore Arthur Hayes-Sadler)

HMS Ocean, Irresistible, Albion, Vengeance, Swiftsure, Majestic, Canopus and Cornwallis.

Third Division (Contre-amiral Émile Guépratte):

Suffren, Bouvet, Gaulois, Charlemagne, HMS Triumph and Prince George.

The First was to bombard the main forts from 14,000 yards. The two British ships of the Third would engage the mobile howitzers and field guns. The French ships would attack the principal forts from 8,000 yards, which was the closest that had been swept of mines, once the British ships had dominated them. Six ships of the Second would relieve the French after four hours; the other two would support the minesweepers at night.

The fleet entered the Straits at 10:30 am. It came under fire by 11:00 am, but was at the firing position by 11:30 am. Soon after noon enough damage had been done to allow the French ships to move in to begin firing from closer range. Agamemnon, Inflexible, Suffren and Gaulois were all damaged, but by 1:45 pm the Ottoman fire was tailing off. De Robeck called up the minesweepers and ordered the Third Division to relieve the French. Around 2:00 pm the Bouvet suffered two explosions, the second apparently from a magazine blowing up, and sank rapidly. Only 48 men were saved, with about 600 going down with her.

The action continued. The forts stopped firing periodically, but this was because the gunners had to clean their guns of dust thrown up by shells landing in front of their emplacements. Between 3:30 and 4:00 pm the battleships began to encounter mines, which they assumed were unmoored, floating ones.

About 4:05 pm Inflexible struck a mine. She was badly damaged, and it seemed for a while that she might sink. Around 10 minutes later Irresistible hit a moored mine. Most of her crew were taken off by the destroyer HMS Wear, with ten men staying on board to try and get a wire to Ocean, which was ordered to tow the disabled battleship. However, it was impossible to do so because of Irresistible’s list. Ocean was coming under heavy fire, and was ordered to abandon the attempt at 5:50 pm.

The attack was then abandoned, and the fleet ordered to withdraw. At 6:05 pm Ocean struck a mine. Her crew was taken off by destroyers. Destroyers were sent at night to try and tow the two battleships, but both had sunk.[11]

As well as the three battleships sunk, Inflexible, Suffren and Gaulois all required dockyard repair. British human losses on 18 March were not high considering the number of ships lost and damaged: naval-history.net lists 13 killed on Irresistible, 35 on Invincible, one on Ocean and one on Majestic, including five men who later died of wounds received that day, but excluding one who died that day of wounds received earlier; including him, 71 British marines and sailors had been killed earlier in the attack. Robert Massie says that 639 men were killed on the Bouvet and 61 in the rest of the fleet. Ottomans and Germans were killed and wounded.[12]

The mines that caused the losses had been laid on the night of 8 March by a small Ottoman ship called the Nusret. The minesweepers had swept the central area, finding no mines; they had then assumed that the sides must also be clear. The seaplanes had failed to spot them.[13]

It was intended at this stage to resume the attack. The pre-dreadnoughts HMS Queen and Implacable were already on their way and HMS Prince of Wales and London and the French Henri IV were sent to replace the ships lost on 18 March.[14]

Bad weather from 19 to 24 March prevented operations. De Robeck originally intended to continue with the naval attack but on the 22 March he told a conference of generals and admirals that the fleet could not get through without the support of the army. The army would not be ready until 14 April. Destroyers were being fitted as minesweepers, but would not be ready until about 2 or 3 April.[15]

Churchill asserted that the Ottomans were almost out of ammunition when the attack was called off, a claim repeated by some others, including the early 60s BBC documentary series The Great War. However, Naval Operations, the British Official History, says that the Ottomans had about 70 rounds per heavy gun, 130 per 6 inch gun and 150 for each of those defending the minefields. Forts had been damaged but few guns knocked out. Research by Tim Travers in the Turkish archives shows that the howitzers and other field guns also had plenty of ammunition.[16]

The defences of the minefields had suffered little damage, and Naval Operations argues that the chances of a battleship getting through all 350 mines undamaged was 15 to 1 against, meaning that the Allies could expect only one battleship to reach the Sea of Marmara if the minefields were not cleared. It believes that the confidence of the Ottoman General Staff that they could not be cleared ‘was probably justified.’[17]

The army landed at Cape Helles on 25 April. From then on, the Gallipoli Campaign was primarily a land one, with the navy confined to landing troops, transporting supplies and wounded, providing supporting fire and ultimately evacuating the army. It could not attempt to break through the Dardanelles until the army had taken the high ground, which it never managed to do.[18]


[1] J. S. Corbett, H. Newbolt, Naval Operations, 5 vols. (London: HMSO, 1938). vol. ii, pp. 140-44.

[2] A. J. Marder, From the Dreadnought to Scapa Flow; the Royal Navy in the Fisher Era, 1904-1919, 5 vols. (London: Oxford University Press, 1961-70). vol. ii, p. 232.

[3] T. Travers, Gallipoli, 1915 (Stroud: Tempus, 2001).

[4] Marder, From. vol. ii,. p. 233.

[5] Corbett, Newbolt, Naval. vol. ii, p. 149.

[6] Marder, From. vol. ii, p. 234.

[7] R. K. Massie, Castles of Steel: Britain, Germany, and the Winning of the Great War at Sea (London: Jonathan Cape, 2004), pp. 449-51.

[8] Travers, Gallipoli, pp. 26-27.

[9] Quoted in Marder, From. vol. ii, p.243

[10] Ibid., pp. 243-45.

[11] Corbett, Newbolt, Naval. vol. ii, pp. 213-28.

[12] Massie, Castles, pp. 463-4.

[13] Marder, From. vol. ii, p. 247.

[14] Corbett, Newbolt, Naval. vol. ii, p. 227.

[15] Travers, Gallipoli, pp. 38-40.

[16] Corbett, Newbolt, Naval. vol. ii, pp. 223-24; Travers, Gallipoli, pp. 36-37.

[17] Corbett, Newbolt, Naval. vol. ii, p. 224.

[18] Marder, From. vol. ii, p. 258.

4 Comments

Filed under War History

The Naval Attack on the Dardanelles 1915 (1) Planning

From late 1914 onwards there was a dispute over British military strategy. The ‘Westerners’, including most generals, saw the Western Front as the decisive theatre. However, the ‘Easterners’, mostly politicians or admirals, thought that stalemate on the Western Front could not be broken, so wanted to launch an offensive elsewhere, probably the Near East, where they hoped to knock the Ottoman Empire out of the war and persuade Italy and neutral Balkan countries to join the Allies.[1]

Admiral Lord Fisher, the First Sea Lord proposed a number of schemes, including attacks on Zeebrugge. Borkum, Cuxhaven and the Baltic.[2] On 3 January 1915 he gave Winston Churchill, the First Lord and thus his political superior, a plan that he and Lieutenant-Colonel Maurice Hankey, Secretary to the War Council, had devised for a major offensive against the Ottoman Empire. It involved attacks on Gallipoli and Istanbul: although then referred to as Constantinople in English, it has officially been called Istanbul since the Turks captured it in 1453.

It looked good on paper, but was impractical. It needed far more British troops than would have been released from France and assumed that Bulgaria and Greece, strong rivals and both neutral, would enter the war on the Allied side and co-operate.[3]

The day before, Grand Duke Nicholas of Russia had requested that the British carry out a ‘demonstration’ in order to distract the Ottomans who were attacking in the Caucasus; Lord Kitchener, the Secretary of State for War, told Churchill that the only place where such an action might succeed was the Dardanelles, but there were no troops available.[4]

By 4 January the Russians had forced the Ottomans to retreat from Sarikamish, but the British, apparently unaware of this, continued to look for ways to help their ally against the Ottomans.

Churchill was attracted by part of Fisher’s plan, which was for an attack by old battleships on the Dardanelles. He ignored Fisher’s requirement for the warships to be accompanied by troops, who would take the high ground along the Gallipoli side of the Dardanelles.[5]

The Royal Navy had always argued that warships could rarely attack forts successfully without support from land forces. Lord Nelson had argued that ‘any sailor who attacked a fort was a fool,’ and the former First Sea Lord Sir Arthur Wilson was the only senior officer of the early twentieth century who disagreed.[6]

On 3 November 1914 and Anglo-French squadron had bombarded the outer forts of the Dardanelles from 13,000 yards, damaging one of them. This led some to think that it might be possible to destroy them from a range at which they could not reply. However, it also alerted the Ottomans to the fact that they might be attacked. After the war, this was described as an ‘unforgivable error’ by Admiral Sir John Jellicoe and ‘an act of sheer lunacy’ by Admiral Sir Reginald Bacon.[7]

Hankey told Arthur Balfour, the former Conservative Prime Minister who would soon succeed Churchill as First Lord in a Coalition government, that:

‘from Lord Fisher downwards every naval officer in the Admiralty who is in the secret believes that the Navy cannot take the Dardanelles position without troops. The First Lord still professes to believe that they can do it with ships, but I have warned the Prime Minister that we cannot trust in this.’[8]

Balfour was one of the few that favoured an attack by only ships.[9] Churchill later admitted that he would not have gone ahead with a naval only attack had he known that 80-100,000 troops would be available by May. However, in January Kitchener had said that 150,000 men would be needed and few could be spared.[10]

Arthur Marder argues that in the end the ‘famed Churchillian impetuosity, eloquence and doggedness carried the day.’[11] Churchill argued, on the basis of the performance of German artillery against Belgian forts in 1914, that the Ottoman forts would not be able to resist the fire from 12 and 15 inch battleship guns. However, the Germans had forward observers to correct their fire, whilst the Allied ships would be firing on concealed positions from several miles away with no observers on shore. The Germans were also using howitzers with a higher angle of fire than battleship guns.

It had been hoped that seaplanes could act as spotters, but they found it difficult to take off unless the sea was very calm and could not fly high enough to safely and successfully spot the fire. The sea also affected the stability of the ships as gun platforms, another disadvantage compared with shore guns.

The risk from minefield was also ignored or under-estimated. The Ottoman shore batteries only needed to sink or force away the minesweepers, which were trawlers manned by peacetime fishermen who were members of the Royal Naval Reserve, to prevent the battleships from continuing.

Even if the battle fleet did manage to get past all the gun batteries, it was not clear what it was then supposed to do. It was apparently assumed that its appearance at Istanbul would cause a revolution, even though it would not have been accompanied by any land forces to occupy the city and its communications would be open to attack by any remaining forts.

Jellicoe later wrote in the margin of his copy of volume ii of Churchill’s The World Crisis:

‘Has anyone who wants to push battleships through the Dardanelles said what they propose they should do when through and how their communications are to be maintained and from what base are they to work?’[12]

Churchill assumed that the old battleships were of little value in the North Sea, so could be risked in this operation. However, before the Battle of Jutland, most British admirals thought that a major fleet action might cause such heavy losses amongst the dreadnoughts of both sides that the RN’s vast superiority in pre-dreadnought battleships would then become decisive.[13]

The next entry in this series will describe the actual attack.


[1] A. J. Marder, From the Dreadnought to Scapa Flow; the Royal Navy in the Fisher Era, 1904-1919, 5 vols. (London: Oxford University Press, 1961-70). vol. ii, p. 202.

[2] T. Travers, Gallipoli, 1915 (Stroud: Tempus, 2001), p. 20.

[3] Marder, From. vol. ii, p. 204.

[4] Travers, Gallipoli, pp. 19-20.

[5] Marder, From. vol. ii, pp. 204-5.

[6] Quoted in Ibid., p. 200.

[7] Quoted in Ibid., p. 201.

[8] Quoted in R. A. Hough, The Great War at Sea, 1914-1918 (Oxford: Oxford University Press, 1983), p. 153.

[9] Ibid.

[10] Marder, From, p. 212.

[11] Ibid., p. 213.

[12] Quoted in Hough, Great, p. 152.

[13] Marder, From, pp. 214-19.

4 Comments

Filed under War History

The First British Invasion of Basra, 22 November 1914

At the outbreak of the First World War Britain intended to send three forces from its Indian Army overseas. The largest, Indian Expeditionary Force A, was headed for France. IEF B and C were both to be sent to East Africa, the former to attack German colonies and the latter to defend British ones.

Once it became likely that the Ottoman Empire would enter the war on the side of the Central Powers an additional force, IEF D, was sent to Basra in the Persian Gulf, now part of Iraq but then Ottoman territory. The British in those days normally called modern day Iraq Mesopotamia.

The IEF sailed from India on 16 October. The Royal Navy’s role in the transport of IEF A and C was confined to protecting them from German cruisers by escorting them to their destinations. However, IEF B and D had to land on enemy territory.

IEF B arrived at Tanga in German East Africa (now Tanzania) on 2 November, landing the next day. On 4 November it was defeated by local German forces commanded by Paul von Lettow-Vorbeck. The defeated troops were re-embarked the next day.

The British Official History of Naval Operations suggests that defeat was owed ‘partly perhaps to insufficient artillery support from the sea.’[1] The expedition was accompanied only by the protected cruiser HMS Fox. The pre-dreadnought battleship HMS Goliath had suffered mechanical problems and the modern light cruisers HMS Chatham, Dartmouth and Weymouth were blockading the German light cruiser SMS Königsberg in the Rufiji River.

IEF D was intended to protect Britain’s interests in the Gulf, the most important of which were the oil refinery on the Persian (now Iranian) island of Abadan at the mouth of the Shatt at Arab river and the pipeline connecting it to the Persian oilfields. The oilfields, pipeline and refinery were owned by the Anglo-Persian Oil Company (now BP).

The Royal Navy had gradually switched from coal to oil in the 10 years leading up to the war. By 1914 the light cruisers and battleships under construction were to be fuelled exclusively by oil. This meant that it needed secure supplies, so in 1914 the Admiralty took a 50% stake in APOC and gave it a 20 year supply contract in return for providing the capital needed to develop the Persian oilfields.[2]

Admiral Sir Edmond Slade, the Admiralty’s oil expert, wanted troops to be sent to protect the oilfields:

‘It is…of urgent importance that the troops indicated should be sent at once in order to safeguard our supply of oil…This question of defence has nothing to do with the investment of Government capital in the Company…It is necessary in order to ensure the due supply of oil required for the Fleet.’[3]

On the other hand, Winston Churchill, who as First Lord of the Admiralty was responsible for the deal with APOC, disagreed with Slade, writing on his minute that ‘[t]here is little likelihood of any troops being available for this purpose. Indian forces must be used at the decisive point. We shall have to buy our oil from elsewhere.[4]

Churchill’s reluctance to protect the Persian oil installations appears surprising given his role in the government’s purchase of shares in APOC, but it is consistent with his pre-war opinion. In a 1913 Cabinet memorandum on naval oil supplies he assumed ‘that in time of war money would be no object.’[5] The objective of the APOC contract was to build up an oil reserve of six months’ wartime naval oil consumption relatively cheaply in peacetime.

The oil facilities were very important, but they were not Britain’s only interest in the region. It is now assumed that everything in the Middle East is about oil, but in 1914 General Sir Edmund Barrow, the Military Secretary to the India Office, argued that:

‘troops could be landed on Persian soil at Mohammerah [now Khorramshahr] or at Abadan island, ostensibly to protect the oil installation, but in reality to notify to the Turks that we meant business and to the Arabs that we were ready to support them… With the Arabs on our side a Jihad is impossible, and our Indian frontier is safe from attack.’[6]

Britain then had good relations with a number of Arab rulers who were nominally subjects of the Ottoman Empire but had a fair degree of autonomy. It feared that in a war with the Ottoman Empire the Ottoman Sultan, who was also the Caliph, might call a Jihad, resulting in a revolt by Britain’s Muslim subjects, especially in British India, which included modern Pakistan and Bangladesh.

Despite Churchill’s views IEF D was sent to the Gulf. It initially consisted of the 16th Brigade of the 6th (Poona) Division, commanded by Brigadier-General Walter Delamain.

There were only three small British warships in the region: the sloops HMS Espiègle and Odin of the Cadmus class and the Indian Marine ship Dalhousie. They were too small to deal with SMS Emden, which was known to be in the Indian Ocean, so IEF D was escorted by the pre-dreadnought battleship HMS Ocean, captained by Captain Arthur Hayes-Sadler, who was put in charge of the naval part of the operation.

IEF D reached Bahrain on 28 October. The next day the Ottoman fleet, commanded by the German Admiral Wilhelm Souchon, and including the battlecruiser Goeben and the light cruiser Breslau, attacked Russian bases in the Black Sea. On 30 October, Delamain was ordered to proceed to the Shatt-al-Arab and another brigade of the 6th Division, the 18th, was sent to the Gulf. The next day he was warned that war with the Ottoman Empire was imminent.

Lord Crewe, the Secretary of State for India, had given the following instructions to the Indian Government regarding the operation:

‘The intention is to occupy Abadan, with the Force under orders, protect the oil-tanks and pipe-line, cover the landing of reinforcements, in the event of such being necessary, and show the Arabs that our intention is to support then against the Turks.’[7]

The British force reached the sandbar in the estuary of the Shatt-al-Arab on 3 November. Two days later Britain declared war on the Ottoman Empire. The next day the convoy entered the Shatt, apart for Ocean, which was too big to cross the bar. A battery of four guns beside the ruined fort of Fao was quickly silenced by Odin and the position taken by a landing force of 600 men. An Ottoman force appeared near Abadan, but were dispersed by gunfire from Espiègle.

Source: http://commons.wikimedia.org/wiki/File:Meso-WW1-1.jpg Original Source: http://www.westpoint.edu/history/SiteAssets/SitePages/World%20War%20I/WWOne43.jpg This work is in the public domain in the United States because it is a work prepared by an officer or employee of the United States Government as part of that person’s official duties under the terms of Title 17, Chapter 1, Section 105 of the US Code

Source: http://commons.wikimedia.org/wiki/File:Meso-WW1-1.jpg
Original Source: http://www.westpoint.edu/history/SiteAssets/SitePages/World%20War%20I/WWOne43.jpg
This work is in the public domain in the United States because it is a work prepared by an officer or employee of the United States Government as part of that person’s official duties under the terms of Title 17, Chapter 1, Section 105 of the US Code

Delamain then took the rest of his brigade, two or three miles up the river and landed on the Ottoman side. By 10 November his troops, less a small garrison at Fao, were entrenched in a position that covered the oil refinery. An Ottoman attack on 11 November was beaten off.

The Ottoman telegraph cable from Upper Mesopotamia connected to the British one to Persia and India at Fao. The Ottomans had cut the cable, but the British quickly repaired it.

By 15 November the 18th Brigade and the artillery and divisional troops of the 6th Division had arrived. Its commander, Lieutenant General Sir Arthur Barrett, had instructions to take Basra. Intelligence from prisoners indicated that an attack by up to 10 Ottoman battalions was likely. A rapid victory was also likely to impress the Arabs, so Barrett decided to move on Basra quickly.[8]

Delamain’s brigade, plus two batteries of mountain artillery, defeated an Ottoman force at Saihan on 15 November. By the next day all the infantry and cavalry but only part of the artillery was ashore. Barrett decided to advance, with Odin, Espiègle, the armed yacht Lewis Pelly and the armed tug Sirdar-i-Naphte providing fire support from the river.

The main Ottoman force covering the route to Basra was attacked on 19 November at the mud fort at Kut-az-Zain. The Ottomans withdrew once the fort was destroyed by artillery and naval gunfire, but heavy rain turned the ground into a quagmire, meaning that the British cavalry could not turn the retreat into a rout. This action is referred to as being at Sahil by the British Official Histories.[9] “Sahil” is actually the local word for “shore”, so the name probably results from a misunderstanding.[10]

The Ottomans now made an attempt to block the Shatt-al-Arab using a Hamburg-Amerika liner that had been trapped in Basra and a number of smaller vessels. Barrett’s force was dependent on river transport, so this was potentially a very serious setback to his plans

On 19 November Hayes-Sadler went to investigate the obstacle in Espiègle. She came under fire from a shore battery of four 15 pounders, an armed launch and the gunboat Marmariss. Espiègle silenced the shore guns, sank the launch and forced Marmariss to withdrew without being hit herself. It then transpired that the passage was not completely blocked.

The Ottoman forces defending the approach to Basra and the city’s garrison withdrew the next day. By 5 pm on 21 November Espiègle, Odin and the newly arrived Indian Marine ship Lawrence were anchored off Basra’s Custom House. A blank round was fired in order to discourage looters, and naval parties were landed to deal with the fires that they had started. The first infantry arrived on the morning of 22 November.

The next day it was proclaimed that Basra was under British protection. The Sheikh of Kuwait was informed that Britain now recognised his territory as being an independent principality under British protection. The Ottoman Empire claimed it, but the Sheikh had placed himself under British protection by treaty in 1899.

The next stage of the campaign was an advance up river to Qurna, which was taken on 9 December. The initial objectives had then been achieved, but the Mesopotamian Campaign then grew as a result of mission creep. The capture of one place led to claims that somewhere else had to be taken to protect it. Easy early victories led to over confidence and there was a desire for further victories in a war that was going badly.

The lack of railways and roads meant that the Rivers Euphrates and Tigris were vital for communications, meaning that the RN continued to play an important role in this land campaign.

[1] J. S. Corbett, H. Newbolt, Naval Operations, 5 vols. (London: HMSO, 1938). vol. i, p. 374.

[2] M. Gibson, ‘”Oil Fuel Will Absolutely Revolutionize Naval Strategy”: The Royal Navy’s Adoption of Oil before the First World War,’ in A Military Transformed? Adaption and Innovation in the British Military, 1792-1945, ed. R. Mahoney, Mitchell, S., LoCicero, M. (Solihull: Helion and Company, 2014), pp. 110-23.

[3] NA, ADM 137/6, ‘Persian Gulf, Part 1, 30 July – 31 October 1914’, 1914.

[4] Ibid.

[5] NA, CAB 37/115/39, ‘Oil Fuel Supply for H.M. Navy’, 1913, p. 5.

[6] Quoted in F. J. Moberly, The Campaign in Mesopotamia, 1914-1918, 4 vols. (London: HMSO, 1923). vol. i, p. 87.

[7] PP, Mesopotamia Commission. Report of the Commission Appointed by Act of Parliament to Enquire into the Operations of War in Mesopotamia, Together with a Separate Report by Commander J. Wedgwood, D.S.O., M.P., and Appendices, HMSO 1917 [Cd. 8610]. p. 12.

[8] Moberly, Mesopotamia. vol i, p. 109.

[9] Corbett, Newbolt, Naval. vol. i, p. 389; Moberly, Mesopotamia. vol. i, p. 120.

[10] A. J. Barker, The First Iraq War, 1914-1918: Britain’s Mesopotamian Campaign (New York, NY: Enigma, 2009). This book was originally published in 1967 under the titles The Neglected War in the UK and The Bastard War in the US.

2 Comments

Filed under War History

SMS Goeben and Breslau Escape to Constantinople August 1914

At the outbreak of war the Royal Navy’s Mediterranean Fleet was commanded by Admiral Sir Archibald Berkley Milne, a well connected officer whose career had benefitted from his service on the royal yacht. His father had commanded the RN’s North America and West Indies Station during the American Civil War and his grandfather had also been an admiral.

Milne had been told by the Admiralty on 30 July that in the event of war:

‘The attitude of Italy is, however, uncertain, and it is especially important that your squadron should not be seriously engaged with Austrian ships before we know what Italy will do. Your first task should be to aid the transportation of their African Army, and if possible, bringing to action individual fast German ships, particularly Goeben, who may interfere with that transportation…Do not at this stage be brought to action against superior forces, except in combination with the French, as part of a general battle. The speed of your squadron is sufficient to enable you to choose your moment.’[1]

The German Mediterranean squadron, commanded by Rear Admiral Wilhelm Souchon, consisted of the battlecruiser SMS Goeben and the light cruiser SMS Breslau.

Goeben was armed with 11 inch guns compared with the 12 inch guns of the three British battlecruisers, HMS Inflexible, Indefatigable and Indomitable, in the Mediterranean. However, she had 12 of them compared with eight in the British ships and was faster and better armoured than them. Rear Admiral Ernest Troubridge’s First Cruiser Squadron included four armoured cruisers, HMS Defence, Black Prince, Duke of Edinburgh and Warrior. They were armed with 9.2 inch and either 6 inch or 7.5 inch guns.

 Goeben’s broadside was 6,680 lbs, more than any individual ship, but far less than the combined totals of 15,300 lbs for the British battlecruisers and 8,680 lbs for the armoured cruisers. [2]

Breslau was faster than the four British light cruisers, but was armed with 12 4.1 inch guns compared with HMS Gloucester‘s two 6 inch and 10 4 inch and the other three British ships’ eight 6 inch guns. The British also had 16 destroyers, but they were of the relatively slow Beagle class, the last coal fired British destroyers.

The bulk of the French navy was in the Mediterranean under the command of Vice Admiral Augustin Boué de Lapeyrère. He had been Minister of Marine from 1909-11, producing a coherent plan for the expansion of the French navy after a period in which it lacked a strategy because of frequent change in the Minister of Marine.

De Lapeyrère divided the French Mediterranean fleet, the 1ère armée navale into three group. One consisted of six semi-dreadnoughts, three armoured cruisers and twelve destroyers; the second of a dreadnought, five pre-dreadnoughts, three armoured cruisers and twelve destroyers; and the last of four older pre-dreadnoughts. Its main task at the outbreak of war was to protect the transit of the French XIX Corps from Algeria to France.

Britain and France had agreed that their combined forces in the Mediterranean would be commanded by a French admiral. As Milne was senior to de Lapeyrère, this meant that the British contingent would be commanded at sea by Troubridge. The combined Anglo-French fleet comfortably outnumbered the Austro-Hungarian navy and the German Mediterranean squadron,

The two sides would have been evenly balanced had Italy entered the war on the side of its Triple Alliance, but it declared its neutrality on 2 August. Fear that the long Italian coastline was vulnerable to Anglo-French naval attacks was a factor in this decision. It was justified on the grounds that the alliance was defensive and Austria-Hungary was the aggressor in the war.

Robert Halpern describes Italian neutrality in 1914 ‘as being one of their biggest services to the British and French during the war.’[3] See this post for the naval balance in 1914.

Milne was told by the Admiralty on at 12:55 pm on 3 August that ‘the Italian Government have declared neutrality. You are to respect this neutrality rigidly and should not allow any of H.M. ships to come within 6 miles of the Italian coast.’[4]

As well as meaning that his fleet was outnumbered, Italian neutrality restricted the options open to the Austro-Hungarian fleet commander Admiral Anton Haus. He could have moved his fleet into the Mediterranean had Italy been allied to Austria-Hungary, but the location of its only major base at Pola, now Pula in Croatia, meant that it was now restricted to the Adriatic.

The Chief of the Austrian General Staff Field Marshall Franz Conrad von Hötzendorff, supported by Foreign Minister Count Leopold Berchtold, wanted the fleet to move to the Black Sea to operate against the Russians. He feared that it would soon be destroyed by the Anglo-French fleet. Haus rejected this: his fleet would lack bases, coal stocks and a fleet train in the Black Sea; the Allies might destroy it in transit; and the Austro-Hungarian Adriatic coast would be left unprotected.

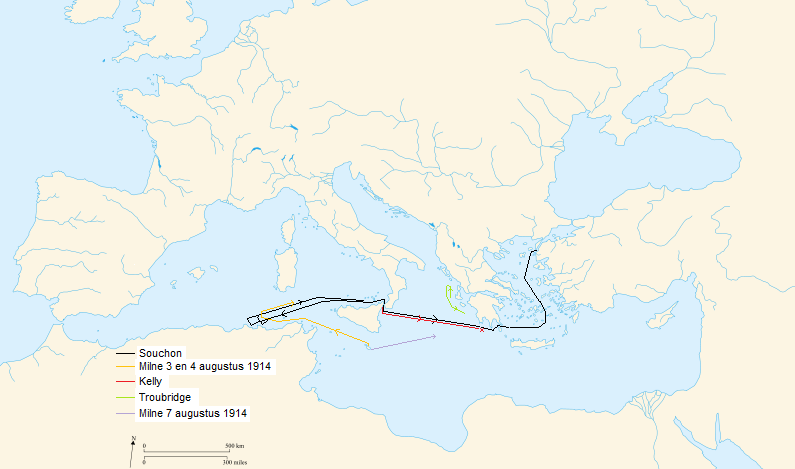
Goeben was at Pola undergoing repairs to her boilers when Austria-Hungary declared war on Serbia on 28 July. Souchon, according to Robert Massie, did not want to be ‘subordinate to an Austrian admiral not inclined to fight Britain and France.’[5] He therefore sailed the next day with the repairs incomplete. He had difficulties obtaining coal from Italian ports, but replenished his supplies from German merchant ships at Messina.

On the evening of 3 August, the day that Germany declared war on France, Goeben and Breslau fired the first shots of the naval war when they bombarded the French ports of Philippeville and Bône in Algeria.

Souchon’s subsequent options appeared to be to attempt to exit the Mediterranean via the Straits of Gibraltar or to return to Pola, possibly first attacking the French troop transports.

Unknown to the Allies, Germany and the Ottoman Empire had signed an alliance on 2 August. In the early hours of 4 August Souchon received a signal ordering him to make for Constantinople, now Istanbul. Goeben did not have enough coal to make the voyage at its normal cruising speed, so he ordered a return to Messina to refuel.

Milne, aware that the German had been at Taranto, guessed correctly that she would then make for Messina, but they had left by the time that the light cruiser HMS Chatham arrived. At 6:30 pm [times quoted are local unless otherwise stated] he was ordered that ‘two battle-cruisers must proceed to Straits of Gibraltar at high speed ready to prevent Goeben leaving Mediterranean.’[6]

At 10:46 am on 4 August Indomitable and Indefatigable reported that they had sighted Goeben and Breslau. Britain and Germany were not yet at war, but the British ships, later joined by the light cruiser HMS Dublin, tailed the German ones. The British battlecruisers could not keep up with the Germans, losing sight of them at 5 pm. Dublin stayed in touch with them until 10:25 pm.[7]

The British vessels needed their hulls to be de-fouled and their engines overhauled. They had peace rather than war complements, which meant that they were short of stokers. Coal fired ships needed more stokers in order to maintain full speed, so carried more in wartime than in peacetime.

Indomitable reported that the Germans were making 26-27 knots.[8] Arthur Marder says that Goeben ‘managed to increase her speed to 24 knots for a short period. Her mean speed from noon to 8 pm was 22.5 knot.’[9] This exaggeration of the speed of the German ships would have consequences later.

War between Britain and Germany began at 11 pm British time (midnight Central European) on 4 August, but neither Britain nor France was yet at war with Austria-Hungary.

The German ships reached Messina in the early hours of 5 August. Milne argued that his orders to stay more than six miles from the Italian coast meant that he could not follow the Germans into the straits of Messina because they were only two miles wide. He further claimed that the Germans could have escaped from any ship more than six miles from the Italian coast because of their greater speed.

Milne expected Souchon move north out of the Straits of Messina, head west and attack the French troop transports. Alternatively, he could take the south exit and head for the Adriatic.

Milne took his flagship HMS Inflexible to join Indefatigable well to the west of the Straits of Messina. Indomitable was sent to Bizerte to refill her coal bunkers. Troubridge and his armoured cruisers were near Corfu in case Souchon headed for the Adriatic. The light cruiser HMS Gloucester was the closest British warship to Messina, covering the south exit.

At 10 am on 6 August Indomitable informed Milne that ‘[t]he French Admiral reports first transport left Algerian coast and French Fleet will not probably be free until 10th August as second shipment is necessary.’[10]

Milne appeared not to realise that the troopships were now sufficiently protected since at 4:33 pm he offered the French the assistance of ‘two battle-cruisers and 1 light cruisers’ if the Germans had sailed undetected.[11]

Souchon sailed at 5:00 pm. His plan was to feint towards Pola, before turning towards Constantinople after dark. Half an hour after issuing his orders he was informed by the German Admiralty that ‘[a]rrival Constantinople not possible for political reasons’, but decided to go ahead anyway.[12]

Milne was informed of the German departure by Gloucester at 6:16 pm.[13] He then headed west, as his orders prevented him entering the Straits of Messina and the Germans might still turn west towards the transports after exiting the southern end of the Straits.

Too late, a signal from the Admiralty told him that ‘[i]f Goeben goes south from Messina, you should follow through the Straits, irrespective of territorial waters.’[14] It was sent at 7:45 pm, but not received until 10:54 pm.

Gloucester, under the command of Captain Howard Kelly, followed the Germans as Goeben tried to sail as quickly as possible. Kelly managed to keep his superiors informed of the German movements despite their attempts to jam his ship’s wireless transmissions, Souchon did not know that Gloucester was alone, so could not take the chance of turning back to sink her.

Unknown to Souchon, the risk of a major action had already passed. Troubridge, with his four armoured cruisers and eight destroyers, was positioned off Cephalonia, south of Corfu. However, his destroyers were short of coal. The light cruiser Dublin, captained by Howard Kelly’s brother John, and the destroyers HMS Beagle and Bulldog were on the way to join him. John Kelly intended to be in position to attack Goeben at 3:30 am on 7 August, but his ships failed to find the enemy.

Troubridge at first assumed that Souchon was heading for the Adriatic and that he was heading south in order to shake off Southampton. He headed north, with the intention of engaging them in narrow waters where he could choose his range.

At midnight, however, he realised that the Germans were going to the eastern Mediterranean. He could intercept them, but the action would take place in daylight. E. W. R. Lumby says that Troubridge believed that his squadron could defeat the enemy only ‘by night, in half light, or in narrow waters.’[15]

Troubridge had earlier told Milne that ‘I consider a battle-cruiser to be a superior force to a cruiser squadron, unless they can get within their range of her.’ Milne replied ‘That question won’t arise as you will have the Indomitable and Indefatigable with you’, which in the event he did not.[16]

Although he thought that to do so would break his orders not to engage a superior force, Troubridge had reluctantly decided to attack, telling his Flag Captain Fawcet Wray at 2:45 am on 7 August that ‘[t]he Mediterranean [Fleet] will stink if we don’t attack her.’ He later explained to his court martial that thought that the Fleet ought not to have allowed Goeben to escape from the Straits of Messina.

However, at 3:30 am Wray persuaded Troubridge that engaging Goeben was ‘likely to be the suicide of your squadron.’[17] Goeben was faster and had longer ranged guns, so would be able to stand off and destroy the British squadron. At 4:49 am Troubridge signalled to Milne that:

‘Being only able to meet Goeben outside the range of our guns and inside his I have abandoned the chase with my squadron request instructions for light cruisers. Goeben evidently going to Eastern Mediterranean. I had hoped to have met her before daylight.’[18]

Wray later claimed that his advice ‘was not given with the intention of dissuading [Troubridge] from continuing the chase of the Goeben’, stating that ‘I actually remonstrated with him when I realised that he had decided to abandon the chase.’[19] His objection was to the idea that the British squadron might ‘lie across Goeben’s bows and more or less go bald-headed for her.’[20]

Gloucester continued to pursue the enemy. She exchanged fire with Breslau at 1:35 pm. Goeben then joined in, forcing Gloucester to withdraw, but Souchon could not afford to waste coal engaging a light cruiser. Only Breslau was hit, but she suffered no casualties and her speed was unaffected.

Goeben was pushing her machinery and men to the limit. Massie says that leaks of boiling water from her partially repaired boiler tubes meant that ‘[f]our men were scalded to death.’[21] The chase continued until the ships reached Cape Matapan at 4:40 pm. Gloucester was almost out of coal and Kelly had been explicitly ordered by Milne to go no further.

The British still had one chance. Milne took his battlecruisers east, but slowly. On 8 August, the Admiralty erroneously signalled him that Britain was at war with Austria-Hungary. An over-zealous clerk had seen a telegram prepared in advance of the declaration of war and sent it too soon. Milne therefore abandoned the chase until he was informed of the mistake.

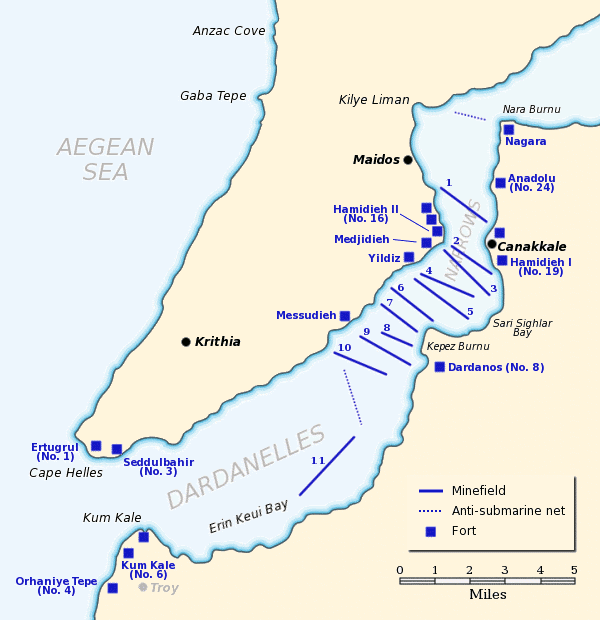
The Germans were delayed by Goeben’s need to coal, so Milne might have caught them without the 24 hour delay caused by the telegram error. They reached the Dardanelles on the evening on 10 August, still not knowing if they would be welcome, which they were.

The next evening the British light cruiser HMS Weymouth, sent ahead of the battlecruisers by Milne, was turned away from the Dardanelles after being informed that Goeben and Breslau were now the Ottoman ships Yavuz Sultan Selim and Midilli. They formally changed hands on 16 August, but retained their German crews, who wore fezzes on ceremonial occasions. Souchon was appointed commander of the Ottoman fleet on 23 September.

The presence of these two ships in Turks led the British keeping Indomitable, Indefatigable, Defence, Gloucester and all available destroyers in the eastern Aegean. They were nominally under de Lapeyrère’s command, but effectively the force was separate from the Allied fleet in the rest of the Mediterranean.

Of the British commanders, only Howard Kelly, who was made a Companion of the Bath, came out of this well.

Milne was cleared of any blame, but did not receive another appointment. He had previously been told his next position would be the prestigious Nore Command. This went instead to Admiral Sir George Callaghan, who had been removed from command of the Grand Fleet on the outbreak of war, five months before his term was due to expire. Admiral of the Fleet Lord Fisher, who had previously called Milne ‘a serpent of the lowest order’ when Milne took Admiral Lord Charles Beresford’s side in his feud with Fisher, said that he would ‘have shot Sir Berkeley Milne for the Goeben.’[22]

Milne’s best option would seem to me to have been the one that Marder proposes, namely to close the north exit of the Straits of Messina with two battlecruisers and the south one with the other one and Troubridge’s squadron.[23] Since their guns had a range of over six miles, the ships could have waited outside Italian territorial waters.

Troubridge initially remained in command of the RN forces in the Aegean, but was then called in front of a Court of Inquiry. It sent him for a Court Martial, where he was defended by a leading barrister, Leslie Scott KC MP, and acquitted. This made it hard for the Admiralty to refuse him further employment, but he was giving only shore based jobs. He was knighted and finished his career with the rank of Admiral.

Although Goeben was vastly superior to any of Troubridge’s ships, he had four armoured cruisers, two light cruisers and a number of destroyers. I would agree with Admiral Prince Louis Battenberg, the First Sea Lord, argued that ‘[s]uperior speed (which undoubtedly existed) in a single ship can be nullified by proper tactical dispositions of four units.’[24]

It is difficult to see how Goeben could have kept out of the gun range of all the armoured cruisers and the torpedo range of all the light cruisers and destroyers. Any damage that reduced her speed would have enabled the British battlecruisers to catch her and steaming at full speed during a battle would have used a lot of her coal.

Commenting on Troubridge’s acquittal, Rear Admiral Frederick Tudor, the Third Sea Lord, thought that Troubridge’s ships ‘stood a chance of being severely punished’ if they had attacked. but that it was ‘out of the question’ that Goeben had enough ammunition to destroyed all of them.[25]

One point that perhaps says a lot about the RN’s attitude to ship design is that the arguments over Troubridge’s conduct revolved around the relative speeds, firepower and gun ranges of the ships involved. Little was said about the Goeben’s superior armour.

Wray was, according to Marder, ‘virtually ostracised’ in the RN.[26] However, he received a number of commands during the rest of the war and was awarded the DSO when captaining HMS Talbot in the Dardanelles. He was promoted to Rear Admiral on retirement and later to Vice Admiral on the Retired List.

Finally, the Admiralty must take a lot of blame. It sent a series of confusing orders instead of giving the local commanders all the facts and then leaving them to make the decisions.

Its order to Milne quoted at the beginning of this post told him to avoid battle with ‘superior forces’ but to seek battle Goeben, whilst noting his squadron’s speed. Taken together these comments appear to mean that the ‘superior forces’ were the Austrian battleships, but this was not explicitly stated, resulting in Troubridge concluding that Goeben was a ‘superior force’, with which he should avoid battle.


[1] Admiralty to C.-in-C., 3:10 pm, 30 July 1914 quoted in E. W. R. Lumby, Policy and Operations in the Mediterranean, 1912-14 (London: Navy Records Society, 1970), p. 146. Orginal source National Archives ADM 137/19

[2] Figures from A. J. Marder, From the Dreadnought to Scapa Flow; the Royal Navy in the Fisher Era, 1904-1919, 5 vols. (London: Oxford University Press, 1961-70). ii, p. 21

[3] P. G. Halpern, A Naval History of World War I (London: UCL Press, 1994), p. 52.

[4] Admiralty to C.-in-C. and Admiral Superintendent, Malta, 12:55 pm 3 August 1914 quoted in Lumby, Policy, p. 157. Original Source ADM 137/19.

[5] R. K. Massie, Castles of Steel: Britain, Germany, and the Winning of the Great War at Sea (London: Jonathan Cape, 2004), p. 27.

[6] Admiralty to C.-in-C. 6:30 pm 3 August 1914 quoted in  Lumby, Policy, p. 153. Original source ADM 137/19.

[7] Times in this paragraphs are from signals quoted in Ibid., pp. 163-64. Original sources Naval Staff Monograph No. 21, The Mediterranean 1914-15, Appendix B.

[8] Signal of 4:10 pm 3 August quoted in Ibid., p. 160. Original source ‘Naval Staff Monograph No. 21’, Appendix B.

[9] Marder, From. ii, p. 23. His source is Hermann Lorey, Der Krieg zur See, 1914-1918. Der Krieg in den turkischen Gewassern (Berlin, 1928-38, 2 vols.), vol. i, pp. 6-7.

[10] Signal of 10:00 am 6 August 1914 quoted in Lumby, Policy, p. 170. Original source ‘Naval Staff Monograph 21’, Appendix B.

[11] Signal of 4:33 pm quoted in Ibid., p. 171. Original source ‘Naval Staff Monograph 21’, Appendix B.

[12] Quoted in J. S. Corbett, H. Newbolt, Naval Operations, 5 vols. (London: HMSO, 1938). i. p. 63.

[13] Signal of 6:16pm 6 August 1914 quoted in Lumby, Policy, p. 172. Original source ‘Naval Staff Monograph 21’, Appendix B.

[14] Signal of 7:45 pm quoted in Ibid., p. 173. Original source ADM 137/19.

[15] Ibid., p. 142.

[16] The Court of Inquiry and the Court Martial 7 September to 9 November 1914 Ibid., p. 367. Original source ADM 156/76

[17] Ibid., p. 324.

[18] Signal of 4:49 am 7 August 1914 quoted in Ibid., p. 181. Original source ‘Naval Staff Monograph 21’, Appendix B

[19] ‘Declaration of Captain Fawcet Wray, 3 August 1917’ Ibid., p. 404. Original source Roskill Paper, which are now ar Churchill Ciollege, Cambridge..

[20] Ibid., p. 406.

[21] Massie, Castles, p. 44.

[22] Quoted in Marder, From. ii. pp. 32-33.

[23] Ibid. ii, p. 24

[24] Ibid. ii, p. 33.

[25] ‘Minutes commenting upon the Court Martial Proceedings, By the Third Sea Lord, 9 December 1914’ Lumby, Policy, p. 398. Original source ADM 156/76.

[26] Marder, From. ii, p. 27, note 5.

14 Comments

Filed under War History