Allied troops landed on the Gallipoli peninsula on 25 April 1915, two days later than originally planned because of bad weather.
All the troops, equipment and supplies had to be brought, and wounded evacuated, by sea. Warships provided fire support. Submarines raided Ottoman ships bringing reinforcements and supplies. The small Allied air force came from the Royal Naval Air Service. There was even a naval contribution to the land campaign: the Royal Naval Division.
In 1914 the RN found that it had more reservists than it needed to man its ships. It therefore formed the extra men and some Royal Marines into an infantry division. Some men also volunteered directly for the RND.
The RND was landed at Dunkirk on 20 September 1914 in order to help defend Antwerp. Some of its troops managed to return from Antwerp to the UK, arriving on 11 October; others were forced to flee into the Netherlands, where they were interned for the rest of the war.
The division’s infantry battalions were brought back up to strength before it was sent to Egypt in 1915. At this stage of the war it lacked the artillery and other supporting units of an army infantry division.
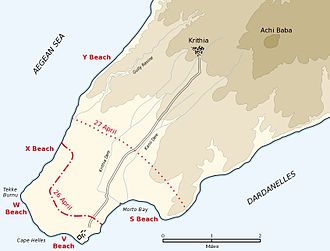
The invading force consisted of 30,000 Australians and New Zealanders, divided into two divisions; the 17,000 troops of the British 29th Division, made up of regulars who had been serving in remote colonial garrisons; the 10,000 men of the RND; and a 16,000 strong French division. The 29th would land at Cape Helles and the Anzacs 13 miles up the coast at a place now called Anzac Cove. The RND and the French would make diversionary landings at Bulair and Kum Kale on the Asiatic shore respectively. Preparations were slow because ships had been loaded in the wrong order for an invasion, meaning that they had to be unloaded and re-loaded at Alexandria.[1]
The fleet was commanded by Vice Admiral John de Robeck, who had taken over towards the end of the naval attack on the Dardanelles. His Chief of Staff was Commodore Roger Keyes, an aggressive officer who had previously commanded the RN’s submarines, including at the Battle of Helgoland Bight.
De Robeck’s fleet comprised one British dreadnought; 15 British and four French pre-dreadnought battleships; nine British, three French and one Russian cruisers; 24 British and five French destroyers; seven British, one Australian and four French submarines; a British seaplane carrier; and various minesweepers and other auxiliary craft. One each of the French pre-dreadnoughts and the French cruisers did not take part in the events of 25 April.[2]
Security for the operation was poor. Enemy agents in Athens learnt of preparations on the Greek Islands from the crews of Greek caiques; letters were sent by ordinary post from the United Kingdom to Egypt addressed to the ‘Constantinople Force, Egypt’; and there was open speculation in the Egyptian press.[3] Despite the large number of Allied troops in Egypt, it was officially neutral, so the British could not censor its newspapers.
Tim Travers highlights that the army and navy had different views of the invasion, which created confusion. The navy’s emphasis was on a combined attack on the Narrows, but the army believed that the navy’s role was to weaken the defences in order to permit the landing.[4]
A meeting of RN captains on 21 April decided to abandon the original concept of anchoring offshore in order to shell the beaches and approaches. Instead, the beaches would be bombarded before the landing, but the guns would then switch to the coastal ridges. Keyes rejected Captain Hughes Lockyer of the battleship HMS Implacable’s idea of firing on the beaches on the way in as he thought that the gun control system made it impossible to change the range and bearing quickly enough. The orders stated that ‘ships will cover the landings and support its advance.’[5]
This left captains with a fair degree of discretion. They were no longer required to anchor, but Lockyer said that Keyes’s comments meant that some were reluctant to move close to the shore. The casualties were heaviest at the beaches where the ships remained anchored offshore: V and W at Cape Helles. The landings at S and X at Helles and Anzac Cove benefitted from close naval support.[6]
The fifth beach at Helles, Y, was a late addition, intended to threaten any Ottoman retreat and reinforcements. The initial landing met little resistance, but the troops, lacking a clear objective, did not press on and were withdrawn the next day.[7]
W Beach was target of the 1st Lancashire Fusiliers plus 50 men of the Anson Battalion of the RND. They came ashore in cutters which were first towed by steam boats before being rowed the final part of the journey, which was slow because of an unexpectedly strong current. The boats had to come back to carry the second wave. Casualties amongst both the Fusiliers and the sailors were heavy, with some boats being reduced to two rather than six rowers.[8]
The beach was taken thank to the courage of the Lancashire Fusiliers, six of whom were awarded the Victoria Cross. However, their casualties were too heavy for them to link up with V Beach. This beach was later known as Lancashire Landing.[9]
After disembarking the men intended for W Beach, Implacable bombarded X Beach, with Lockyer taking her to within 450 yards of the shore. She and the light cruiser HMS Dublin were so close in that they came under rifle fire. The small number of men defending the beach were so overwhelmed by the bombardment that the 2nd Royal Fusiliers landed without casualties. Implacable helped to repel an Ottoman attack in the evening. This beach was later known as Implacable Beach.[10]
Captain Alexander Davidson of the battleship HMS Cornwallis was concerned about the small size of the landing force at S Beach, which consisted of two companies of the 2nd South Wales Borderers and a detachment of marines. He therefore augmented it with marines and sailors from his ship and also landed himself. The beach was taken with only 63 casualties. However, Davidson was supposed to move Cornwallis to V Beach once S was captured, but stayed longer in order to evacuate wounded and provide fire support.[11]
The first wave at V Beach consisted of three companies of the Dublin Fusiliers and 50 men of the Anson Battalion in boats each crewed by a midshipman and six seaman. They were followed by the rest of the 1st Royal Dublin Fusiliers, the 1st Royal Munster Fusiliers, half the 2nd Hampshires and 50 more men from the Anson Battalion on board the steamer River Clyde, captained by Commander Edward Unwin.[12]
The River Clyde was to be grounded. She would still be too far offshore for the men to land, so a steam hopper and three wooden lighters would provide a bridge for the troops to land from exits cut in her hull. However, problem with the steam hopper prevented the bridge being put into place.[13] The conversion of the River Clyde into a specialist landing ship was Unwin’s idea.[14]
Unwin and Able Seaman William Williams dived into the sea and managed to move two of the lighters into position with the help of Midshipman George Drewry, commanding the hopper. There was nothing that the lighters could be secured to, so Unwin and Williams used their own bodies to weigh it down. This allowed the Munsters to attempt to land, but most were killed or wounded. Some jumped into the water, but many of them, weighed down by heavy packs, drowned. Williams was also hit and Unwin had to release the line in order to stop him drowning.
Lieutenant John Morse and Midshipman Wilfred Malleson managed to restore a bridge of boats. An attempt to land smaller parties failed and the attack was halted.[15] The men would have got ashore more quickly had the hopper and lighters been able to form a bridge as planned, but casualties would still have been heavy.[16]
The few men who had made it ashore were able to shelter behind a sandbank. The naval fire support at V Beach was inadequate. The battleship HMS Albion stayed 1,400 yards offshore, too far to be useful without forward observers. Cornwallis was late arriving and also stayed too far offshore. Unwin was later very critical of Davidson, arguing that he should have been court martialled for lingering at the lightly defended S Beach.[17]
The cruiser HMS Euryalus did provide accurate fire support at V Beach, but she stayed further offshore than Implacable did at X Beach.[18]
It had not originally been intended to use French troops on 25 April, but it was decided that this was a waste, so they were landed at Kum Kale on the Asian shore. The objective was to prevent the Ottomans from bombarding the S Beach invasion force. Fire support was provided by the French battleship Henri IV, the British battleship HMS Prince George and the Russian cruiser Askold. Henri IV came close inshore to provide accurate fire support. The landing was successful, but the troops were withdrawn on 27 April as they could not advance further without reinforcements.[19]
The first part of the feint by the RND at Bulair was to begin just before dusk with men being rowed towards the shore. They would return to their ships without landing once darkness hid them from the Ottomans. A single platoon of the Hood Battalion would then land and light flares, fire rifles and give the impression that a real landing had taken place.
However, Lieutenant Commander Bernard Freyberg argued that this risked unnecessary casualties. A strong swimmer, he proposed that he should swim ashore alone and set off the flares. This was accepted. The movement of Ottoman reserves was delayed for while, but the original plan would have caused more problems.[20]
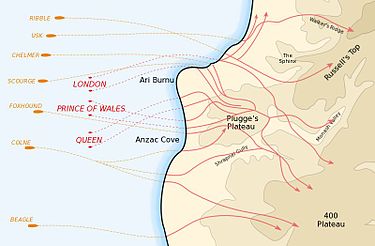
The final attack was by the Anzacs at Gaba Tepe, now called Anzac Cove. There was confusion over the intended landing spot and charts were poor. Some senior army officers claimed that the troops were landed a mile and a half to two miles too far north. Travers suggests that the choice of place was ‘quite flexible.’[21]
Peter Hart and Nigel Steel argue that the landing was no more than 500 yards away from the planned location. They note that the naval orders used 2,025 yard nautical miles rather than 1,760 yard statute miles.[22]
Lieutenant General Sir William Birdwood, the Anzac commander, and others later said that change in landing beach was beneficial. It took the Ottomans by surprise and steep cliffs protected the troops. However, Travers comments that the Anzacs were confused by landing at the wrong point and that the Ottomans reacted quickly. Units became mixed up, resulting in a loss of cohesion.[23]
Naval gunfire could give little help at first because the situation was unclear, the terrain was difficult and there was no observation. Most ships stayed too far out, but the right flanks was helped by the cruiser HMS Bacchante, which came in as close as the rocks allowed. She and the battleship HMS Triumph, unlike other ships at Anzac, adjusted their fire according to heliographic signals from ashore.[24]
Although the army was now ashore, the navy continued to play a vital role in the Gallipoli campaign. Ships provided fire support to the troops; supplies and reinforcements had to be brought and wounded evacuated 50 or 60 miles to bases on the islands of Lemnos, Mudros and Tenedos. Rear Admiral Rosslyn Wemyss, commanding at Mudros said that there in September there were always between 150-70 ships at Mudros, excluding small ships. The supply chain was threatened by German U-boats, which intelligence reports said correctly were on their way.[25]
Six Victoria Crosses were awarded to sailors for actions at V Beach on 25 April. Four went to Unwin, Williams, Drewry and Malleson. One went to Seaman George Samson, who worked on a lighter all day under fire, helping wounded and putting out lines, before being badly wounded by machine gun fire. The sixth was Sub Lieutenant Arthur Tisdall of the RND, who went to the aid of wounded men on the beach who were under fire. Only Williams’s award was posthumous, although Tisdall was killed on 6 May. Drewry received the Distinguished Service Order.
De Robeck’s despatch, including a list all Special Recommendation to men under his command, which did not include the RND, is listed on naval-history.net, as are all the RN recipients of gallantry awards and all RN men killed, including the RND.
[1] A. Moorehead, Gallipoli. (London: New English Library, 1963), pp. 107-11.
[2] J. S. Corbett, H. Newbolt, Naval Operations, 5 vols. (London: HMSO, 1938). vol. ii, pp. 310-12
[3] Moorehead, Gallipoli., p. 109.
[4] T. Travers, Gallipoli, 1915 (Stroud: Tempus, 2001), p. 56.
[5] Ibid., p. 63.
[6] Ibid., p. 64.
[7] Ibid., pp. 72-74.
[8] Corbett, Newbolt, Naval. vol. ii, pp. 330-32.
[9] N. Steel, P. Hart, Defeat at Gallipoli (London: Papermac, 1995), pp. 86-90, 96.
[10] Corbett, Newbolt, Naval. vol. ii, pp. 325-27.
[11] Travers, Gallipoli, pp. 61-62.
[12] Corbett, Newbolt, Naval. vol. ii, p. 332.
[13] Travers, Gallipoli, pp. 64-65.
[14] Steel, Hart, Defeat, p. 41.
[15] Ibid., pp. 90-96.
[16] Travers, Gallipoli, p. 65.
[17] Ibid., pp. 65-66.
[18] Ibid., pp. 71-72.
[19] Ibid., pp. 75-78.
[20] Steel, Hart, Defeat, pp. 78-80.
[21] Travers, Gallipoli, p. 85.
[22] Steel, Hart, Defeat.
[23] Travers, Gallipoli, p. 83.
[24] Ibid., pp. 89-90.
[25] P. G. Halpern, A Naval History of World War I (London: UCL Press, 1994), p. 116.


