
After the Allied victory at the Battles of the Nive on 9-12 December 1814 Wellington paused his offensive. He left the 18,000 British and Portuguese troops of the 1st and 5th Divisions and three independent brigades plus 16,000 Spaniards to besiege Bayonne under the command of Sir John Hope. This left him with a field army of 48,000 men. The French commander Marshal Nicolas Soult had 62,500 men, but 17,000 of them were at Bayonne and 3,500 more were garrisoning St Jean Pied-de-Port and Navarrenx, leaving him with a field army potentially 42,000 strong.[1]
The weather improved in early February, and Wellington began his offensive on 14 February. St Jean Pied-de-Port was invested by Spanish guerrillas. On 23 February the French fortress of Navarrenx, which was too strong to attack, was masked by Morillo’s Division, the only Spanish troops in Wellington’s field army
Also on 23 February Hope ferried part of his corps across the Adour. The next day, the Allies, supported by Royal Navy boats on the Adour, completed construction of a pontoon bridge across the river. Bayonne was now surrounded.
By 27 February Wellington’s army had crossed four defensible rivers and was facing Soult’s army across the River Gave de Pau at Orthez. Soult had about 36,000 men and 48 guns, with another division of 3,750 conscripts on the way to reinforce him.[2] They were drawn up along an L shaped ridge, which ran a mile north from Orthez at right angles to the Gave de Pau before heading 3 miles west parallel to the river. Three smaller ridges extended from the main ridge to the river. The village of St Boes was situated at the western end of the ridge.
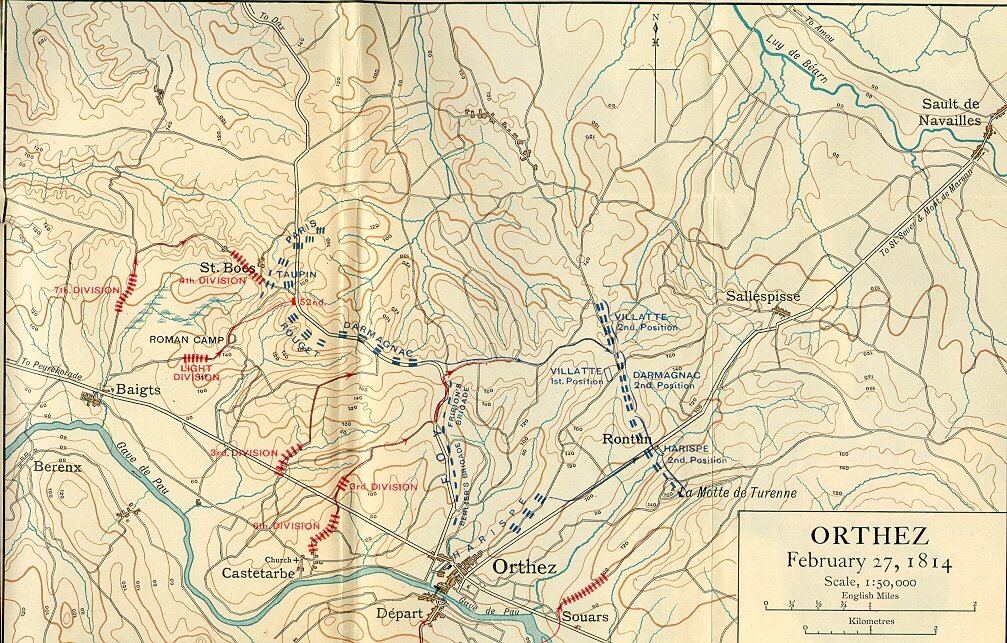
Wellington had 43,000 men and 54 guns.[3] Early on 27 February five of his seven infantry divisions and most of his cavalry crossed the river. The 2nd and Le Cor’s Portuguese Divisions and some light cavalry under Sir Rowland Hill remained on the south bank at Orthez opposite the eastern end of the ridge.
Hill’s orders were to skirmish and demonstrate at Orthez. He was not to cross the river there, but could cross further east if the attack in the west succeeded. The main assault, commanded by Lord Beresford, would be made at 8:30 am by the 4th Division, supported by the 7th, on St Boes from the western end of the ridge. Its intention was to turn the French western flank.
The French centre would be pinned by an attack by the Sir Thomas Picton’s 3rd Division along the most easterly and the centre of the three smaller ridges, supported by the 6th Division.
The Light Division would take a ruined Roman Camp at the north end of the most westerly of the three lesser ridges, the only one that did not connect directly to the main ridge. Wellington would then direct operations from the Roman Camp.
The attempt to turn the French right flank at St Boes failed, whilst Picton was halted just out of enemy artillery range. The Light Division took the Roman Camp. Wellington now changed his plan. The 3rd and 6th Divisions would launch a full scale assault rather than a pinning attack in the centre, the 7th Division would replace the 4th in the west and the 1/52nd (Oxfordshire) Battalion of the Light Division would attack the flank of the French troops defending St Boes. Only two British and three Portuguese battalions of the Light Division were left in reserve: two other British battalions of that division were not on the battlefield.
The second attack started at 11:30 am. The co-ordinated assaults at St Boes and along the eastern and central less ridges all succeeded in breaking the French line, forcing Soult to order his army to retreat after two hours of fierce fighting. Hill took most of his corps two miles east to a ford across the river when he saw that the Allied attacks were succeeding.
Jac Weller notes that the French had usually managed to successfully retreat after their defeats in the Peninsular.[4] On this occasion they were helped by Wellington being wounded after a bullet hit the hilt of his sword, forcing it against his hip and thigh. He had more cavalry than Soult, which might have turned a victory into a rout had he been in a position to properly direct its pursuit, but Wellington’s wound meant that he could not keep up with the advance.
Soult lost just over 4,000 men, including 1,350 prisoners: 1,060 of those captured came from units that covered the retreat. Wellington suffered 2,164 casualties: only 48 were from Hill’s corps.[5]
Sir Charles Oman contends that this battle showed that
with fairly equal numbers in the field, passive defence is very helpless against an active offensive concentrated on certain limited points, unless the defender uses adequate reserves for counter-attacks.[6]
Wellington took ‘a considerable risk’ in his final assault, when he attacked five enemy divisions with five of his own, but he knew from past experience that Soult would not launch a counter-attack.[7]
[1] J. Weller, Wellington in the Peninsula 1808-1814 (London: Greenhill, 1992), pp. 342, 363.
[2] C. W. C. Oman, A History of the Peninsular War, 7 vols. (Oxford: Clarendon Press, 1902-30). vol. xii, p. 355.
[3] Ibid., p. 357.
[4] Weller, Peninsula, p. 349.
[5] Oman, Peninsular. vol. vii, pp. 372-73.
[6] Ibid., p. 374.
[7] Ibid., p. 375.

Just as on my site, the number of casualties is outrageous. No wonder they say – no one actually wins a war.
Yes, and until recently even more soldiers died from disease than in combat during wars.
Pingback: The Battle of Toulouse 10 April 1814 | War and Security