Tag Archives: WW1

Frederick Parslow VC and the Merchantman Anglo Californian’s Battle with U39

On 4 July 1915 the 7,333 ton merchant ship Anglo-Californian was 70 miles south of the Fastnet Rock, close to the end of a journey from Montreal. She normally carried nitrate, but on this voyage her cargo was 927 horses, intended for the Western Front. This was the fifth time that she had brought horses across the Atlantic. She was captained by 59 year old Frederick Parslow, whose son, also called Frederick, was her second officer. As well as her crew of 44 men, there were 50 American and Canadian cattlemen on board to look after the horses.[1]

At 8:00 am the Anglo-Californian, which was then 24 hours from its destination, Avonmouth, was spotted by SMS U39, captained by Kapitänleutnant Walther Forstmann. In order to conserve his torpedoes, Forstmann decided to surface and call on the merchantman to surrender. U39, capable of 16.5 knots on the surface, was three miles away from the Anglo-Californian, which was designed to sail at 12 knots. Parslow, however, believed that his ship, being lightly loaded, could make two knots more than this, so decided to flee.

The Anglo-Californian made radio contact with the Q-ship Princess Ena, a former cross-Channel ferry that had been armed with three concealed 12 pounder guns in order to act as a trap for U-boats. She was capable of only 15 knots, so would struggle to arrive in time, but she called up the destroyers HMS Mentor and Miranda.

Forstmann opened fire at 9:00 am from a range of one and a half miles. Captain Parslow remained on the open bridge with his son, ordering his crew to take cover below. The Parslows had no protection from the German gunfire. They had to lie down, with the son steering from a prone position and the father occasionally lifting his head to command the ship on a zig-zag pattern At 10:30 am Forstmann called on the Anglo-Californian to surrender. Captain Parslow realised that his ship could not escape, so ordered her to stop and the crew to abandon ship.[2]

At this point, Princess Ena opened fire from 9,000 yards. Her shots fell short, but Parslow then received a radio message urging him to ‘hold on’ as the destroyers were on their way. He therefore ordered his crew to return below decks, and to get the ship underway again. The Germans resumed firing, this time with rifles as well as U39’s deck gun. They targeted the bridge, which was soon wrecked, with the steering wheel and compass being damaged.[3]

With several holes in the hull, a fire in the hold and no sign of the Royal Navy, Captain Parslow decided that he had no choice but to surrender. He ordered the engines stopped and the crew to abandon ship. The lifeboats were swung out under the direction of Chief Officer Harold Read. Forstmann, however, was unwilling to risk being tricked a second time, so continued to fire from a range of only 1,500 yards. One lifeboat was upended as it was being lowered into the sea after one of the davits was hit, and another lifeboat capsized.

Captain Parslow was then killed, just as the two British destroyers appeared. Forstmann dived his boat and escaped. Twenty of the men and twenty of the horses on board the Anglo-Californian were killed. She was escorted into Queenstown (now Cobh) early the next day.[4]

Captain Parslow’s son and Chief Engineer James Crawford were awarded the Distinguished Service Cross on 10 September. The citations below are from Naval-History.net:

 29292 -10 SEPTEMBER 1915

….. award of the Distinguished Service Cross to the following Officers:

Sub-Lieutenant Frederick Parslow, R.N.R. For his services in the horse-transport “Anglo-Californian,” which was attacked by a German submarine on the 4th July, and subjected to heavy gun-fire for an hour and a half. Sub-Lieutenant Parslow steered the ship throughout the action, and maintained his post after his father, the Captain of the ship, had been killed by a shell, until some of our patrol boats arrived and drove the submarine off.

Engineer James Crawford, R.N.R. For his services as Chief Engineer of the same transport, in the escape of which he was largely instrumental by maintaining the vessel’s maximum speed in spite of a shortage of firemen.

Captain Parslow was not given any official award until 23 May 1919, when he was posthumously commissioned as a Lieutenant in the Royal Naval Reserve and awarded a Victoria Cross. The Admiralty may have feared that awarding a gallantry medal to a member of the Merchant Marine during the war could have allowed the Germans to claim that its members were combatants.

Parslow’s citation below is from Naval-History.net:

 31354 –  23 MAY 1919

Admiralty, S.W.,  24th May, 1919.

The KING (is) pleased to approve of the posthumous award of the Victoria Cross to the undermentioned Officers:

Lieutenant Frederick Parslow, R.N.R.

For most conspicuous gallantry and devotion to duty when in command of the Horse Transport “Anglo-Californian” on  the 4th July, 1915.

At  8 a.m. on  4th July, 1915, a large submarine was sighted on the port beam at a distance of about one mile. The ship, which was entirely unarmed, was immediately manoeuvred to bring the submarine astern; every effort was made to increase speed, and an S.O.S. call was sent out by wireless, an answer being received from a man-of-war. At  9 a.m. the submarine opened fire, and maintained a steady fire, making occasional hits, until  10.30 a.m., meanwhile Lieutenant Parslow constantly altered course and kept the submarine astern.

At 10 30 am the enemy hoisted the signal to “abandon the vessel as fast as possible,” and in order to save life Lieutenant Parslow decided to obey, and stopped engines to give as many of the crew as wished an opportunity to get away in the boats On receiving a wireless message from a destroyer, however, urging him to hold on as long as possible, he decided to get way on the ship again The submarine then opened a heavy fire on the bridge and boats with guns and rifles, wrecking the upper bridge, killing Lieutenant Parslow, and carrying away one of the port davits, causing the boat to drop into the sea and throwing its occupants into the water.

At about  11am two destroyers arrived on the scene, and the submarine dived

Throughout the attack Lieutenant Parslow remained on the bridge, on which the enemy fire was concentrated, entirely without protection, and by his magnificent heroism succeeded, at the cost of his own life, in saving a valuable ship and cargo for the country He set a splendid example to the officers and men of the Mercantile Marine.

This website includes a painting of the Parslows under fire by Thomas M. M. Hemy, titled Unconquerable, and other pictures of the action, the Parslows and the Anglo-Californian.


[1] B. Edwards, War under the Red Ensign 1914-1918 (Barnsley: Pen & Sword Maritime, 2010), pp. 61-62.

[2] The last 3 paragraphs are based on Ibid., pp. 65-67.

[3] A. S. Hurd, The Merchant Navy, 3 vols. (London: HMSO, 1921). vol. ii, pp. 18-19.

[4] The last two paragraphs are based on Edwards, War, pp. 68-69.

2 Comments

Filed under War History

Lieutenant-Commander Martin Nasmith VC and HM Submarine E11

Lieutenant-Commander Martin Nasmith was captain of the submarine HMS E11 at the outbreak of WWI. In October 1914 E11 was one of three British submarines that tried to enter the Baltic Sea. The other two succeeded, but E11 was delayed by technical problems. On 19 October she mistook a neutral Danish submarine for a German U-boat, but her torpedo attack fortunately missed. She was spotted by a seaplane whilst recharging her batteries on the surface the next day; destroyers searched for her all day. After trying but failing to get past the Germans patrols again the next day Nasmith headed back to base on 22 October.[1]

On 17 December E11 was at southern end of a patrol line of British submarines in Helgoland Bight. Just after 7:00 am a number of German destroyers appeared, searching at high speed. An hour later large ships, which must have been returning from the German raid on the English north east coast, came into sight. Nasmith approached to 400 yards of one of them and fired a torpedo, but it ran too deep. He tried to get a shot on the third in the German line, but its zigzag course left it 500 yards away and heading straight for E11, forcing Nasmith to dive rapidly. This disturbed the boat’s trim, and she broke the surface when returning to periscope depth. She was able to escape. but the Germans made off at high speed.[2] On Christmas Day 1914 E11 rescued four of the airman who took part in the Cuxhaven Raid.

By May 1915 E11 was in the Dardanelles. On 17 May E14 returned from a successful patrol in the Sea of Marmara that earned her captain, Lieutenant-Commander Edward Boyle, the Victoria Cross and every member of her crew a medal. E11 was to head through the Straits to replace her the next day. The night before Boyle briefed Nasmith on the mines, nets and guns defending the straits.[3]

19 May: E11 set off at 1:10 am on 19 May, passing through the Allied destroyer line at 3:20 am and then diving. At 6:10 am she saw the Ottoman battle ships Targut Reis and Heredin Barbarossa, accompanied by several destroyers. The battleships withdrew and the destroyers fired on E11 whenever her periscope was raised. It was very easy to spot because of the speed that she was making and the light conditions. By 9:45 pm she was through the Straits. At 10:00 pm she surfaced in order to charge her batteries.[4]

20 May: She stayed on the surface, charging her batteries until 4:00 am, apart from 0:30 – 0:40 am, when a destroyer appeared, forcing her to dive. No merchant ships were seen during the day. Generally E11 stayed on the surface at night in order to charge her batteries. During the day she was on the surface if it was safe to do so.

21 May: At 11:30 am E11 stopped a small sailing vessel. Four chickens were taken; the scared but polite skipper declined payment. E11 used the vessel as a screen for the rest of the day: it was then very foggy.

22 May: Only warships were encountered and evaded. Attempts to radio the destroyer HMS Jed failed.

23 May: Course was altered towards Istanbul at 3:00 am. A transport was encountered at 4:50 am, whilst E11 was inspecting a sailing vessel. E11 dived to attack, but the transport spotted her and made off. At 5:50 am the 775 ton Ottoman gunboat Peleng-I Derya was seen anchored off Istanbul.[5] E11 dived, approached her and fired a torpedo into her. The gunboat sank, but first got off rifle fire and shots from her 6 pounder gun; one of the latter put E11’s forward periscope out of action.

24 May: Radio contact was made with Jed. Thereafter E11 and Jed were in regular contact.

At 10:30 am a smaller steamer was spotted heading west. E11 surfaced and ordered her to stop. The steamer tried to flee, but stopped after coming under rifle fire from E11. Her crew panicked and started to abandon ship. The panic was calmed by Silas Q. Swing, the war correspondent of the New York Sun. He said that the steamer was a passenger ship that was heading for Chanak and was not, as far he knew, carrying stores, before just making the last boat.

The steamer was in fact carrying a 6 inch gun, other gun mountings and a large amount of ammunition. After taking some souvenirs E11’s crew set a demolition charge, sinking the ship, which was the 480 ton naval auxiliary Naga.[6]

More smoke had by then been spotted. It was another steamer, similar to the Naga. E11 dived to attack, but was spotted. The target headed for Rodasto, with E11 pursuing on the surface. Large quantities of stores could be seen on the steamer’s deck. She berthed at Rodasto’s pier. E11 dived and approached, but ran aground 2,000 yards away as the water quickly became shallower. She fired a torpedo, which sank the steamer; she was the 512 ton SS Hunkar Iskelesi.[7] E11 then withdrew under rifle fire, which seemed to be aimed at her remaining periscope. It was hit but not damaged.

Another vessel was then observed. It was a small paddle steamer, which initially tried to flee. It stopped after coming under rifle fire, but then tried to ram E11 after realising that the submarine did not have any guns other than rifles. The paddle steamer, which was carrying horses, finally ran ashore. E11 approached, but came under fire from 50-100 cavalrymen. She fired a torpedo, but it missed; only the stern could be targeted and the shallow water made it impossible to close the range.

At 10:30 pm E11 headed towards Istanbul.

25 May: On the same day as U21 sank the battleship HMS Triumph E11 arrived at the Golden Horn. At 12:30 pm she fired torpedoes at two transports moored at the Arsenal Wharf. One hit and damaged the 3,559 ton SS Istanbul, which beached herself in shallow water, while the other, aimed at SS Kismet, circled back, forcing E11 to take evasive action, before escaping back to the Sea of Marmara.[8] The action was observed by the USS Scorpion, guard ship to the US Embassy. Her log noted that four torpedo boats fired on E11.[9]

26 May: The spare torpedoes were made ready. The rest of the day was spent bathing, repairing and mending clothes and resting.

27 May: An Ottoman battleship and two destroyers were seen at 1:30 am, but one of the destroyers forced E11 to dive as she was about to fire. A small steamer was observed at 5:00 pm, but not attacked after she fired on E11.

28 May: Smoke was spotted at 6:00 am. Half an hour later a convoy of one large and four small transports, escorted by a destroyer became visible. At 7:30 am a torpedo was fired at the largest transport, hitting and sinking the 474 ton SS Bandirma. Nasmith, conscious of the risk to E11’s periscope from Ottoman fire, dived his boat. He brought her back to periscope depth once safely clear, observing the destroyer searching for the submarine and the other transports continuing on their course.

At noon a steamship was seen approaching. A torpedo was fired, but no explosion was heard, although the target was seen to stop briefly. The torpedo was later found floating and hoisted back on board after Lieutenant Robert Browne had removed the firing pistol. Damage to the torpedo’s head showed that it had struck the ship, the 216 ton SS Dogan, without exploding.[10]

A small sailing vessel was stopped at 4:30 pm. She was not carrying any cargo and was allowed to continue after being relieved of various delicacies.

29 May: An attack on a store vessel at 7:00 am failed, with E11 breaking surface. Only two or three destroyers were seen during the rest of the day.

30 May: Day spent mainly in clearing the foul air in E11, cleaning her as far as possible and washing and bathing by the crew.

31 May: At 8:00 am a large ship of the German Rickmers Line was seen embarking troops at Panderma. At 9:20 am a torpedo was fired that hit her. She listed heavily to port, but her crew managed to beach her. The ship, the 3,431 ton SS Madeline Rickmers, was wrecked.[11]

1 June: A quiet day.

2 June: A destroyer was spotted at 8:10 am but E11 evaded her by diving. At 9:00 am E11 surfaced and headed to intercept a ship whose smoke had been observed just before diving. At 9:20 am E11 dived. She fired a torpedo 20 minutes later and the target, which was the 390 ton store SS Tecielli, sank in 3 minutes.[12]

At 12:30 pm the smoke of a small ship escorted by two destroyers was spotted. E11 dived at 1:15 pm. She fired a torpedo at the merchant ship at 2:15pm , but it passed under the target, which was the 400 ton SS Basangic.[13] The torpedo was found and floated back in to E11 via the stern torpedo tube after the firing pistol had been removed.

3 June: Smoke was seen at 3:00 pm. E11 dived and approached the vessel, which resembled a steam yacht. She was not closing the range quickly enough, so surfaced. When the range was down to 2,000 yards the enemy vessel turned and headed straight towards E11, which dived. The enemy had disappeared when E11 surfaced. A destroyer forced her to dive at 4:00 pm and remain submerged until midnight.

4 June: The only ship observed was a destroyer in the afternoon and evening, which was thought to be the one that had been hunting for E11 the day before.

5 June: The day was spent ventilating the boat, charging the batteries and bathing. Problems were found in one of the main motors and the intermediate shaft was cracked, so Jed was asked to give E11 permission to return to base.

6 June: A quiet Sunday of bathing, prayers, exercise and battery charging. A destroyer an some sailing vessels were seen in the afternoon. At 9:30 pm E11 headed slowly on the surface towards the north entrance to the Dardanelles.

7 June: E11 dived at 3:40 am and entered the Straits. At 6:30 am she passed Gallipoli at 90 feet. She examined all the anchorages, but found no battleships. A few small vessels and sailing ships were seen. The nest target was a troopship anchored off Moussa Bank. At noon a torpedo was fired at her. It struck, and the ship, which was the 3,590 ton SS Ceyhan, sank.[14]

E11 passed Nagara Point at 1:30 pm and Chanak 30 minutes later. A large mine became attached to the port foremost hydroplane at Chanak. At 4:00 pm E11 cleared the mine by surfacing stern first and heading astern at full speed. She was then met by the destroyer HMS Grampus, which escorted her to Port Mudros.

On 25 June the London Gazette printed the citation for the award of the Victoria Cross to Nasmith. Lieutenant Guy D’Oyly Hughes, his second in command, and Browne both received the Distinguished Service Cross and every petty officer and rating was awarded the Distinguished Service Medal. Nasmith’s citation, reproduced on Naval-History.net, said that:

 29206 – 25 JUNE 1915

Admiralty, 24th June, 1915.

The KING (is) pleased to approve of the grant of the Victoria Cross to Lieutenant-Commander Martin Eric Nasmith, Royal Navy, for the conspicuous bravery specified below:

For most conspicuous bravery in command of one of His Majesty’s Submarines while operating in the Sea of Marmora. In the face of great danger he succeeded in destroying one large Turkish gunboat, two transports, one ammunition ship and three storeships, in addition to driving one storeship ashore. When he had safely passed the most difficult part of his homeward journey he returned again to torpedo a Turkish transport.

The number of ships that E11 was credited with sinking ties in with the ships named by Nicholas Lambert in his footnotes to the Navy Records Society’s reprint of the report of E11’s patrol on which the above is based. Their total tonnage was 13,211 tons.

This was only the first of three patrols that Nasmith and the crew of E11 made in the Dardanelles. The other two will be the subject of later posts.


[1] J. S. Corbett, H. Newbolt, Naval Operations, 5 vols. (London: HMSO, 1938). vol. i, pp. 237-38.

[2] Ibid. vol. ii, pp. 45-46.

[3] Ibid. vol. iii, 32.

[4] This account of E11’s patrol is based on [142] ‘The First Sea of Marmora Patrol’ by HM Submarine E11, 19 May to 7 Hune 1915 by Lieutenant-Cammander Martin Nasmith, Lieutenant Guy d’Oyly Hughes and Lieutenant Robert Browne, document no. 142 in N. A. Lambert, ed. The Submarine Service, 1900-1918 (Aldershot: Ashgate for the Navy Records Society, 2001), pp. 301-13. Additional comments made by the editor are footnoted.

[5] Ibid. Footnote 1, p. 303.

[6] Ibid. Footnote 1, p. 305.

[7] Ibid. Footnote 2, p. 305.

[8] Ibid. Footnotes 1-3, p. 306.

[9] Ibid., p. 307.

[10] Ibid., pp. footnote 1, p. 309.

[11] Ibid. Footnote 1, p. 310.

[12] Ibid. Footnote 1, p. 311.

[13] Ibid. Footnote 2, p. 311.

[14] Ibid. Footnote 1, p. 313.

15 Comments

Filed under War History

Warneford VC and the Destruction of Two Zeppelins on 7 June 1915

The first raid on the United Kingdom by German airships took place on 19 January 1915. In February Kaiser Wilhelm II relaxed his previous ban on raids on London: military targets east of the Tower of London could now be bombed. L8 had to abandon an attempt to bomb London on 26 February because of high winds. She tried again on 4 March, but was hit by gunfire and wrecked on landing in Belgium. A number of attacks were made on other targets on the East Coast of England and in France, including Paris, in March and April.[1]

In April the German army received LZ38, the first of the new P class Zeppelins. They had a maximum speed of 60 mph, a cruising speed of 40 mph, a crew of up to 19, a defensive armament of 7 or 8 machine guns and a bomb load of over two tons.[2]

The first raid on London was made by LZ38, captained by Hauptmann Erich Linnarz, on 31 May. She dropped over a ton of bombs, killing five people and injuring 35; damage worth £18,596 was done to property.[3]

Attempts by the Royal Naval Air Service to destroy airships, both by intercepting their raids and attacking their bases, had by then resulted in the destruction of only Z9. She was bombed in her shed by Flight Lieutenant Reginald Marix, flying a Sopwith Tabloid, on 8 October 1914. Squadron Commander Spenser Gray was unable to find the airship sheds, so bombed Cologne railway station.[4] Both were awarded the Distinguished Service Order. The Cuxhaven Raid on Christmas Day 1914 failed to find the German navy Zeppelin base.

On 3:15 am on 17 May the army Zeppelin LZ39 was spotted off Dunkirk. Seven RNAS aircraft took off from Dunkirk to join two other that were already on patrol. Grey and Flight Sub Lieutenant Reginald Warneford attacked the airship from below, but she climbed away from them and headed towards Ostend. Flight Commander Arthur Bigsworth, flying an Avro, managed to get 200 feet above her as she flew 10,000 feet above Ostend. He dropped four 20 pound bombs on the airship, which emitted some smoke from her tail, but continued on her way. She landed roughly but safely. One of her officers was killed and several men wounded, five gasbags damaged and one propeller lost.[5]

LZ37, LZ38, LZ39 and the navy Zeppelin L9 set out to bomb London on 6 June, but encountered strong winds and fog. Kapitänleutnant Heinrich Mathy’s L9 diverted to her alternative target, the Humber, using flares to find the docks.. She dropped 13 explosive and 39 incendiary bombs on Hull according to the British Official History: the German one says nine and 50 respectively. Around 40 shops and houses were damaged, a sawmill burnt down, 24 people killed and 40 hurt. Rioters sacked shops owned or allegedly owned by Germans. Hull had no anti-aircraft guns, so the only defensive fire came from HMS Adventure, under repair in the port. Mathy dropped seven more incendiaries on Grimsby, causing little damage, before heading home. Guns at Immingham and Waltham fired at L9 without hitting her.[6]

The fog also prevented British aircraft from taking off from Killingholme. The light cruisers HMS Aurora and Penelope, each carrying a seaplane, left Harwich in pursuit of L9, but she escaped.[7]

LZ39 suffered problems and had to turn back to her base at Evere. The other two army airships encountered fog, ad were unable to reach England, so also headed back home.[8]

In the early hours of 7 June, the RNAS airfield at Dunkirk sent four aircraft to bomb the airship bases at Evere and Berchem St Agathe. Two Henri-Farman biplanes, flown by Flight Lieutenant John Wilson and Flight Sub-Lieutenant John Mills, headed for Evere. Wilson took off at 12:40 am and arrived at 2:05 am. He replied to a series of long flashes from a searchlight with a series of short flashes, which kept the anti-aircraft guns quiet whilst he circled until there was enough light to attack. At 2:20 am he could just see the airship shed, so dropped his three 65 pound bombs from 2,000 feet. One hit the centre of the shed, sending up dense smoke but no flames. Mills turned up at 2:30 am, but was forced by anti-aircraft fire to turn away and gain height. He came back at 5,000 feet, dropped his four 20 pound bombs, setting LZ38 alight and destroying her. Both pilots had problems with fog, but got home safely, although Mills had to land on the beach between Calais and Dunkirk and Wilson in a field near Montreuil.[9]

One of the aircraft sent to attack Berchem St Agathe suffered technical problems, got lost and had to land in a field near Cassel. Warneford, flying the other, a Morane, spotted an airship just after 1:00 am. At 1:50 am he caught the Zeppelin, which was LZ37, over Bruges. Its machine guns fired on his Morane, forcing him to retire and climb. The airship turned after him and continued to fire for a period. Once Warneford had reached 11,000 feet, he headed back towards LZ37, switched off his engine, dived and dropped his six 20 pound bombs as he flew along the airship 150 feet above her. The Zeppelin exploded, throwing Warneford’s Morane upside down. He managed to regain control as it dived. One of LZ37’s crew fell through the roof of a nunnery and somehow survived, although the wreckage that fell with him killed two nuns.[10]

The explosion had damaged a petrol pipe in Warneford’s aircraft, forcing him to land behind enemy lines. He initially intended to destroy his aircraft, but then realised that he had not been seen, so set about repairing it. After 35 minutes on the ground behind enemy lines he was able to take off and landed safely, although at Cape Gris-Nez rather than Dunkirk because of the fog.

Warneford, the first pilot to destroy an airship in the air, was awarded the VC. The citation, available on naval-history.net, said that:

 29189 – 11 JUNE 1915

Admiralty, 10th June, 1915.

The KING (is) pleased to approve of the grant of the Victoria Cross to Flight Sub-Lieutenant Reginald Alexander John Warneford, Royal Naval Air Service, for the conspicuous act of bravery specified below:

For most conspicuous bravery on the 7th June, 1915, when he attacked and, singlehanded, completely destroyed a Zeppelin in mid-air. This brilliant achievement was accomplished after chasing the Zeppelin from the coast of Flanders to Ghent, where he succeeded in dropping his bombs on to it from a height of only one or two hundred feet. One of these bombs caused a terrific explosion which set the Zeppelin on fire from end to end, but at the same time overturned his Aeroplane and stopped the engine. In spite of this he succeeded in landing safely in hostile country, and after 15 minutes started his engine and returned to his base without damage.


He was killed on 17 June when an aircraft that he was testing crashed.

Wilson and Mills received the DSC:

 29201 – 22 JUNE 19….. award of the Distinguished Service Cross to:

Flight Lieutenant John Philip Wilson, R.N., and Flight Sub-Lieutenant John Stanley Mills, R.N., for their services on the 7th June, 1915, when, after a long flight in the darkness over hostile territory they threw bombs on the Zeppelin shed at St. Evere, near Brussels, and destroyed a Zeppelin, which was inside. The two Officers were exposed to heavy fire from anti-aircraft guns during the attack.

The bulk of the German army’s airships were transferred to the Eastern Front soon afterwards, where they bombed railway lines in support of the German offensive in Poland. However, two of them bombed London in July.[11]


[1] W. A. Raleigh, H. A. Jones, The War in the Air: Being the Story of the Part Played in the Great War by the Royal Air Force, 7 vols. (Oxford: Clarendon Press, 1922). vol. iii, pp. 93-97.

[2] J. H. Morrow, The Great War in the Air: Military Aviation from 1909 to 1921 (Washington DC: Smithsonian Institution Press, 1993), p. 108.

[3] Raleigh, Jones, War in the Air. vol. iii, pp. 97-98.

[4] Ibid. vol. i, pp. 389-90.

[5] Ibid. vol. ii, p. 350.

[6] Ibid. vol. iii, p. 103.

[7] Naval Staff Monograph (Historical) 1925 vol. xiii, Home Waters part iv, February 1915 to July 1915. p. 237.

[8] Raleigh, Jones, War in the Air. vol. iii, pp. 104-5.

[9] Ibid. vol. ii, pp. 351-52.

[10] Ibid. vol. ii, pp. 352-53.

[11] Morrow, Air, p. 109.

4 Comments

Filed under War History

U21 Sinks Two British Battleships in Three Days

Following the Allied landings on Gallipoli on 25 April 1915 a force of British and French pre-dreadnought battleships and cruisers gave fire support to the troops ashore. It was known that German U-boats were on their way to the Dardanelles.

The first to arrive was U21, captained by Kapitänleutnant Otto Hersing. He had been in command of her on 5 September 1914 when she sank HMS Pathfinder, the first time that a submarine had sunk a ship with a motor torpedo.

U21 had sailed from Germany on 25 April 1915. She was supposed to re-fuel from a ship on the way, but its oil was unsuitable; her tanks were almost empty when she reached the Austro-Hungarian port of Cattaro in the Adriatic on 13 May. On 5 May she was spotted by HM Torpedo Boat 92 near the island of Alborán in the western Mediterranean, but attempts by U21 to torpedo 92 and by 92 to ram U21 failed. The Germans also sent ten smaller submarines of the UB type by rail in sections to the Adriatic. Three had arrived and were being assembled when U21 reached Cattaro, now Kotor.[1]

Reports of the imminent arrival of U21 meant that on 17 May the number of battleships operating offshore was reduced from seven to four at Cape Helles and four to tow at Anzac Cove. Anti-submarine precautions were taken, including nets and destroyer patrols.[2]

U21 appeared at the Dardanelles on 25 May. Around 7:30 am the Grimsby trawler Minoru spotted her and alerted the destroyers by giving blasts on her siren. HMS Harpy made for U21, which seemed to be heading for the French battleship St Louis, but did not attack. The British Official History speculates that U21 may have made off because of the presence of Harpy, but also notes that she had orders to attack the ships off Anzac.[3]

Her periscope was spotted passed between the battleships HMS Swiftsure and Agamemnon; the former fired at her, but missed. Just after 10 am she fired a torpedo at the battleship HMS Vengeance, which evaded it. All available destroyers and trawlers were ordered to search for the submarine. Her periscope was spotted and fired on four times, and a destroyer passed over her, but she was too deep to be damaged. Since U21 was heading north the balloon ship HMS Manica and transports in that direction were ordered away. The battleship HMS Canopus, which was zigzagging and escorted by the destroyer HMS Ribble, spotted U21, but was not attacked.[4]

About 12:25 the destroyer HMS Chelmer, which was patrolling round the battleship HMS Triumph at 15 knots off Anzac, spotted the wash of U21’s periscope 500 yards off Triumph. Chelmer made for it and Triumph opened fire, but Triumph was quickly hit by a torpedo that had passed through her anti-torpedo nets as if they had been ‘a spider’s web.’[5]

Triumph’s watertight doors were all closed, but she capsized ten minutes after she had been hit. However, the order to abandon ship was given as soon as her list became dangerous, with the result that over 500 men were saved; only three officers and 70 men were lost, according to the Official History.[6] The large number of survivors was thanks to the ‘skilful handling of the Chelmer‘ by her captain, Lieutenant-Commander Hugh England.[7]

The sinking of Triumph resulted in the Allied battleships being withdrawn to Imbros, a protected harbour. However, the next day Vice Admiral Sir John de Robeck, the naval commander, decided that there should always be two off Helles, one of them in the Aegean and the other in the Dardanelles.[8]

On 26 May the French battleship Jauréguiberry spotted a periscope 100 yards away whilst off the entrance to the Dardanelles. She was in the process of turning and ran over the submarine. Some of her crew thought that she had rammed the submarine, but this was not the case.[9]

At 6:45 am on 27 May U21’s periscope appeared 400 yards from the battleship HMS Majestic. She fired on it, missing. Hersing fired a torpedo which went through a gap in the transports, passed through the nets and struck Majestic with what the British Official History called ‘a shot the best might envy.’[10] She capsized in nine minutes, but did not sink because the water was only nine fathoms deep. Instead, she rested on her foremast, with her keel exposed, leaving her ‘looking like a stranded whale.[11] All but 43 of her crew were saved.[12] The men lost on both battleships sunk by U21 are listed on naval-history.net.

The Allied battleships and cruisers were withdrawn to Imbros. They now provided fire support only when specifically requested by the army, with the day to day work being carried out by destroyers and monitors.[13]

The Official History noted that U21’s feats had ‘grave moral effects’, both positively for the Ottomans and negatively for the Allies.[14] There was also a considerable material impact, as supply arrangements were further complicated and ‘continuous battleship support for the army was no longer possible.[15]

Tim Travers, however, contends that naval fire was not accurate enough to deal with ‘precise targets like trenches, machine guns or enemy batteries.’[16] Henceforth, the Allied troops were dependent on shore based artillery. Many officers subsequently described this as being inadequate, but Travers suggests that they are comparing Allied artillery support at Gallipoli with the volumes of fire that they later experienced on the Western Front. He notes that ‘comments at the time often praised the artillery.’[17]

Hersing kept his boat in the area for two more days, before putting into an Ottoman coast station. He had difficulties entering the Straits because of a whirlpool, but reached Istanbul on 5 June with only half a ton of oil left to ‘scenes of great enthusiasm.’[18] He was later awarded Germany’s highest decoration, the Pour le Mérite. He and his boat survived the war.

[1] J. S. Corbett, H. Newbolt, Naval Operations, 5 vols. (London: HMSO, 1938). vol. ii, p. 384 and footnote 1.

[2] N. Steel, P. Hart, Defeat at Gallipoli (London: Papermac, 1995), p. 184.

[3] Corbett, Newbolt, Naval. vol. iii, p. 28.

[4] Ibid. vol. iii, p. 29.

[5] Ibid. vol. iii, p. 29.

[6] Ibid. vol. iii, pp. 29-30.

[7] Steel, Hart, Defeat, p. 185.

[8] Ibid.

[9] Corbett, Newbolt, Naval. vol. iii, p. 30.

[10] Ibid. vol. iii, p. 31.

[11] Ibid.

[12] Steel, Hart, Defeat, p. 185.

[13] Ibid., p. 186.

[14] Corbett, Newbolt, Naval. vol. iii, p. 31.

[15] Ibid. vol. iii, p. 30.

[16] T. Travers, Gallipoli, 1915 (Stroud: Tempus, 2001), p. 226.

[17] Ibid., p. 227.

[18] R. H. Gibson, M. Prendergast, The German Submarine War, 1914-1918. (London: Constable, 1931), p. 72.

7 Comments

Filed under War History

Lieutenant Commander Edward Boyle VC and HMS E14

Allied submarines had tried to pass through the Narrows of the Dardanelles long before the main campaign began. HMS B11 had sunk the old Ottoman battleship Mesudiye on 13 December 1914: her captain, Lieutenant Norman Holbrook, was awarded the Victoria Cross and every member of the crew decorated. The French submarine Saphir managed to get past the mines in January 1915, but then ran aground and was lost

From late April 1915 submarines tried to pass through the Narrows in order to attack enemy supply ships in the Sea of Marmara. The French boats had too short a range to get to the Marmara, but tried to operate above the Narrows. However, the Bernouilli was unable to progress against the strong current and the Joule was lost with all mines after striking a mine on 1 May.[1]

The more modern British E-class boats, which had a longer range than the French ones, had more success, but still faced a difficult task in attempting to reach the Sea of Marmara. One, E15, had already been lost. She ran aground on 15 April and was destroyed by a British boat expedition three days later in order to prevent her being captured.

They had to pass through minefields and steel-wire anti-submarine nets without any metal blades to cut through the nets or the mine cables. They also had to avoid shore batteries and patrol boats, and to get through a 10 fathom deep stratum of fresh water that often made it very hard to control a boat.[2]

The first submarine to reach the Sea of Marmara was the Australian HMAS AE2, captained by Lieutenant Henry Stoker, followed by the British HMS E14. Lieutenant-Commander Edward Boyle, E14’s captain, took her past the forts at Chanak at dawn on 27 April. At noon she encountered a number of patrol boats and fired a torpedo at a torpedo boat. It hit, but she was forced to dive, so could not see if the Ottoman vessel had sunk.

E14 was hampered by the efforts of enemy patrols to find her and one of her periscopes had been damaged. On the afternoon of 29 April she attacked two troopships that were escorted by three destroyers. The calm sea meant that her periscope was very obvious, so she had to dive immediately after firing. An explosion was heard and half an hour later one transport was seen to be heading for the shore, emitting a great deal of yellow smoke.

That evening E14 met AE2, which had had no luck and had only one torpedo left. Three days later the Australian boat was caught by the Ottoman torpedo boat Sultanhisar and sunk after a two hour fight. However, all her crew survived as prisoners.

On 1 May Boyle decided to attack the enemy vessels that were harassing E14. She sank a small gunboat and fired two torpedoes at a larger one, but they missed. This made the Ottoman patrols more cautious, but they and shore look outs continued to restrict E14’s actions. Her presence had some impact, but she was unable to completely stop reinforcements crossing the Sea of Marmara.[3]

Four days later E14 encountered a large transport that was escorted by a destroyer. A calm sea and a well handled escort made the attack difficult, but Boyle was able to fire a torpedo from 600 yards when the destroyer was on the other side of the transport. However, it failed to explode.

The next day E14 met another transport, but it spotted her in time to turn back towards Istanbul. She pursued several ships over the next few days, but allowed all that she caught to continue as they were all carrying refugees.

Early on 10 May E14 evaded a destroyer. In the evening she encountered two large transports, escorted by a destroyer. The torpedo did not run true, but the second hit the second transport, which was the Gul Djemal, formally the White Star liner Germania, carrying troops to Gallipoli. She disappeared into the darkness. A witness later claimed that she sank with all hands, but the German Official History states that she was damaged, but was towed back to the Golden Horn the next day.

E14 now had only one torpedo left, which turned out to be faulty. Boyle kept her in the Marmara for a while in the hope that her presence would impede enemy movements, but on 17 May he was ordered to return to base.[4]

Boyle was awarded the Victoria Cross, E14’s other two officers the Distinguished Service Cross and all her petty officers and ratings the Distinguished Service Medal. Boyle’s citation, quoted on naval-history.net, stated that:

The KING (is) pleased to approve of the grant of the Victoria Cross to Lieutenant-Commander Edward Courtney Boyle, Royal Navy, for the conspicuous act of bravery specified below:

For most conspicuous bravery, in command of Submarine E.14, when he dived his vessel under the enemy minefields and entered the Sea of Marmora on the 27th April, 1915. In spite of great navigational difficulties from strong currents, of the continual neighbourhood of hostile patrols, and of the hourly danger of attack from the enemy, he continued to operate in the narrow waters of the Straits and succeeded in sinking two Turkish gunboats and one large military transport.


[1] J. S. Corbett, H. Newbolt, Naval Operations, 5 vols. (London: HMSO, 1938). vol. ii, p. 374.

[2] A. J. Marder, From the Dreadnought to Scapa Flow; the Royal Navy in the Fisher Era, 1904-1919, 5 vols. (London: Oxford University Press, 1961-70). vol. ii, p. 312.

[3] Corbett, Newbolt, Naval. vol. ii, pp. 374-75.

[4] Ibid. vol. iii, pp. 26-27.

5 Comments

Filed under War History

Admiral Fisher Resigns as First Sea Lord

On 13 May 1915 at a meeting at the Admiralty Field Marshall Lord Kitchener, the Secretary of State for War, criticised the Admiralty’s recent decision to recall the super dreadnought HMS Queen Elizabeth from the Dardanelles. He argued that this would damage Allied morale and boost that of the enemy.[1]

The report of The Dardanelles Commission, later set up to investigate the campaign, noted that ‘[i]t is difficult to say why Lord Kitchener should have attached to much importance to the retention of the Queen Elizabeth.’[2] Kitchener by then was dead. The results of naval gunfire support to the army had been disappointing and the removal of Queen Elizabeth was more than compensated for by the despatch of other ships, including monitors, to the Dardanelles.

In return, Admiral Lord Fisher, the First Sea Lord, threatened to resign if Queen Elizabeth remained. Winston Churchill, the First Lord of the Admiralty, backed Fisher, albeit reluctantly in the view of Major General Charles Callwell, the Director of Military Operations and Intelligence, who was present.[3]

The next day the War Council met. The Admiralty argued that it would not have agreed to a solely naval attack on the Dardanelles had it been aware that 100,000 soldiers would soon be available for an amphibious landing. The demands on the Royal Navy by the German U-boat offensive, the Allied Italian Naval Convention and the need to maintain the strength of the Grand Fleet meant that the campaign must now be a land one with naval support rather than the other way round.

The army, however, claimed that the presence of Queen Elizabeth and her 15 inch guns had been a major factor in its belief that it could see the fleet through to Istanbul. It could not see how a rapid victory could be achieved, but withdrawal was inconceivable at this stage. This left siege warfare as the only option, but it was unclear how many troops could be provided, given the demands of the Western Front and home defence.

Fisher had originally proposed a combined land and naval attack on the Dardanelles, which he hoped would have won a quick victory. He had been reluctant in his support for the naval only attack. He now feared that the ships that he had been constructing to use in operations in the northern waters would instead he sent to the Dardanelles.[4]

The War Council meeting left Fisher with the impression that more ships would be sent to the Dardanelles. He told Captain Thomas Crease, his Naval Assistant, that if operations in the Dardanelles were to continue ‘they should henceforth be directed on the naval side by somebody who believed in them.’[5]

On 15 May Fisher received a memo from Churchill that proposed sending far more naval reinforcements to the Dardanelles than the two men had agreed the evening before. Fisher had offered his resignation several times before, but this time he finally quit. He officially remained First Sea Lord until 22 May, but seems to have visited his office only once more, on 17 May to remove some personal items.[6]

The departure of Fisher, coupled with the revelation that the British Army lacked enough high explosive shells, led to the replacement of the Liberal Government with a Liberal/Conservative Coalition. It was certain that the Conservatives would insist that Churchill, who had left them to join the Liberals in 1904 over the issue of free trade, would be removed from the office of First Lord.

Fisher at first had a substantial degree of public support, with several newspapers, led by The Times, arguing that he should become First Lord. There were several precedents from the 18th and early 19th centuries for that position, a political rather than a military one, to be held by an Admiral.

However, Fisher made two mistakes on 17 May. Room 40, the Admiralty’s code-breakers, decoded signals indicating that the German High Seas Fleet was about to put to sea. Crease told Fisher that he should go to the Admiralty to supervise operations. but he refused to do so. Vice Admiral Sir Frederick Hamilton had to act as First Sea Lord. He was the Second Sea Lord, with responsibility for personnel and shore establishments, so was not sufficiently versed in operational matters to stand in for the First Sea Lord. As it happened, the High Seas Fleet was only covering mine laying operations and did not go far into the North Sea.

H. H. Asquith, the Prime Minister, said that ‘[s]trictly speaking, [Fisher] ought to be shot’ with King George V, who had supported Fisher until then, stating that his behaviour ‘was bound to have a deplorable, if not a disastrous effect upon the public, not only at home, but abroad.’[7]

Fisher’s second mistake was to say that he would stay as First Sea Lord subject to various conditions that no politician was likely to accept. He insisted that Churchill’s replacement should not be Arthur Balfour, the Conservative who did become First Lord. Fisher also wanted an increase in the responsibilities of the First Sea Lord at the expense of the First Lord and the other members of the Board of Admiralty.

Even then, it was not until 22 May that Asquith accepted Fisher’s resignation. A final attempt the day before to persuade him to stay failed because Fisher would not serve under Balfour. The Coalition took power on 25 May, with Balfour as First Lord. Churchill remained in the Cabinet as Chancellor of the Duchy of Lancaster, a job without ministerial responsibilities usually given to inexperienced ministers.

The new First Sea Lord was Admiral Sir Henry Jackson. As he was ‘almost unknown to the nation, the appointment elicited a lukewarm response.’[8] The outstanding candidate, Admiral Sir John Jellicoe, could not be spared from his current post as Commander-in-Chief of the Grand Fleet.

[1] A. J. Marder, From the Dreadnought to Scapa Flow; the Royal Navy in the Fisher Era, 1904-1919, 5 vols. (London: Oxford University Press, 1961-70). vol. ii, p. 276.

[2] PP, The Final Report of the Dardanelles Commission. (Part II–Conduct of Operations, &C.) with Appendix of Documents and Maps (1919), p. 23.

[3] Marder, From. vol. ii, pp. 276-77.

[4] This and the two previous paragraphs are based on J. S. Corbett, H. Newbolt, Naval Operations, 5 vols. (London: HMSO, 1938). vol. ii, pp. 408-10.

[5] Quoted in Marder, From. vol. ii, p. 277.

[6] The remainder of this post is based on Ibid. vol. ii, pp.279-91.

[7] Quotes from Ibid. vol. ii, p. 283.

[8] Ibid. vol. ii, p.291.

2 Comments

Filed under War History

The Sinking of HMS Goliath 13 May 1915

Following the amphibious landings at Cape Helles and Anzac Cove on 25 April 1915 Allied warships continued to give fire support to the troops. Their fire was not always accurate, but its potential benefitted the Allies in both physical and moral terms.[1]

Each night two battleships, escorted by five destroyers covered the right hand flank of the Allied position, giving fire support to the French at the ravine of Kereves Dere. On the night of 12-13 May Kapitänleutnant Rudolph Firle, a German officer serving with the Ottoman navy, was given permission to take the destroyer Muavenet-i Milliye, captained by Senior Lieutenant Ayasofyali Ahmed Saffed, to attack them.

The night was dark and foggy, with no moon, which helped the Muavenet to avoid the British destroyers. However, she was spotted and hailed by the battleship HMS Goliath at 1:15 am. The Ottomans made some sort of reply, the challenge was repeated and the Muavenet rushed forward and fired three torpedoes as Goliath was ordered to fire.

Hits abreast of the fore turret and the foremost funnel caused Goliath to list badly to port before the third torpedo struck her close to the after turret. She turned turtle before most of her crew could get to the deck and sank after floating upside down for a couple of minutes. The Muavenet was able to escape into the darkness, although the British destroyers picked up her wireless signals reporting her success.[2]

The 4-5 knot current made it impossible for men to swim to shore. Only about 180 of the 750 men on board Goliath survived. The dead and the survivors are listed on naval-history.net. This was the most men to die on board a single Royal Navy ship in the Dardanelles, although more French sailors were killed when the battleship Bouvet struck a mine on 18 March. Every member of the Muavenet’s crew was given a gold watch and an embroidered purse full of gold.[3]

Goliath was the first battleship to be sunk in combat with another surface ship during the war. HMS Audacious and the two RN ships sunk along with the Bouvet on 18 March struck mines, HMS Formidable and the Ottoman Mesudiye were torpedoed by submarines and HMS Bulwark blew up accidentally. The ships sunk at Helgoland Bight, Coronel and the Falklands were all cruisers. SMS Blücher, sunk at Dogger Bank, is sometimes referred to as a battlecruiser, but was really an armoured cruiser.

The Admiralty now decided to bring the super dreadnought HMS Queen Elizabeth home. Winston Churchill, the First Lord of the Admiralty, later wrote that the sinking of the Goliath led Lord Fisher, the First Sea Lord, to make ‘a most strenuous counter-demand to that effect.’[4]

However, the sequence of events given in the Official History suggests that the issue was decided on 12 March, before Goliath was sunk. The Admiralty believed that Queen Elizabeth was needed by the Grand Fleet, where she would work with HMS Warspite, her newly completed sister ship. At least three U-boats were known to be on their way to the Dardanelles: one was unsuccessfully attacked by French destroyers off Sicily on 11 May. As replacements two pre-dreadnoughts, HMS Venerable and Exmouth and the first two of the Abercrombie class of monitors were to be sent to the Dardanelles.[5]

The four Abercrombies were each armed with a twin 14 inch gun turret that that had originally been built in the USA for the Greek dreadnought Salamis, which was under construction at Hamburg. Since they would never get through the British blockade, the manufacturer offered them to the RN. Because of their US guns, the ships were originally named after American Civil War leaders. However, their names were changed to those of British generals because the sale of the guns to the UK was controversial enough in the USA without highlighting it by naming the ships after Americans. The monitors were less vulnerable than battleships or cruisers to torpedoes because of their shallow draft and anti-torpedo bulges.[6]

Lord Kitchener, the Secretary of State for War, was very unhappy at the removal of the RN’s biggest and newest ship from the Dardanelles. He argued that it would have a major effect on the morale of both sides, but Fisher, who threatened to resign, got his way and Queen Elizabeth was ordered home.[7]


[1] N. Steel, P. Hart, Defeat at Gallipoli (London: Papermac, 1995), p. 183.

[2] This and the two previous paragraphs are based on J. S. Corbett, H. Newbolt, Naval Operations, 5 vols. (London: HMSO, 1938). vol. ii. pp. 406-8.

[3] R. K. Massie, Castles of Steel: Britain, Germany, and the Winning of the Great War at Sea (London: Jonathan Cape, 2004), pp. 483-84.

[4] W. S. Churchill, The World Crisis, 1911-1918, 5 vols. (London: Odhams Press, 1939). vol. ii, Kindle edition. Location 5351 of 9134.

[5] Corbett, Newbolt, Naval. vol. ii, pp. 405-6.

[6] R. Gray, Conway’s All the World’s Fighting Ships, 1906-1921 (London: Conway Maritime Press, 1985), pp. 43-44.

[7] A. J. Marder, From the Dreadnought to Scapa Flow; the Royal Navy in the Fisher Era, 1904-1919, 5 vols. (London: Oxford University Press, 1961-70). vol. ii, pp. 276-77.

4 Comments

Filed under War History

The Italian Naval Convention 10 May 1915

Italy, although a member of the Triple Alliance with Austria-Hungary and Germany, had remained neutral in 1914. It had not been consulted beforehand and the treaty did not require it to participate in an attack on Serbia. Austria-Hungary was Italy’s traditional enemy and incorporating the 800,000 Italian speakers around Trieste and in the Trentino region of the Hapsburg empire into Italy was the main objective of Italian nationalists.

Italy had joined the Triple Alliance in 1882 for defensive reasons: it was too weak to fight Austria-Hungary on its own and it considered the German army to be the best in Europe. However, Italy and Austria-Hungary both strengthened their navies and the fortifications on their mutual frontier whilst supposedly allied.

Once war between the Central Powers of Germany and Austria-Hungary and the Entente of France, Russia and the United Kingdom had begun, neutrality was the obvious and most popular course for Italy. It had a long coastline and imported most of its wheat and coal by sea, making it very vulnerable to attack by the Royal Navy.

Italy, however, was biding its time. the question was whether it could best achieve its objectives by joining the Central Powers, the Entente or staying neutral. The Treaty of London of 26 April 1915 required it to join the Entente within a month.

The Italian speaking regions of Trieste and Trentino would become Italian. It would also obtain defensible frontiers and dominance of the Adriatic by the incorporation of German, Croatian and Slovenian speaking areas and receive colonies in Africa and Asia Minor.

The Italians expected wrongly that their objectives could be gained by a quick war against Austria-Hungary, so declared war initially on only it.[1]

On 10 May, a week after Italy had renounced the Triple Alliance, a Naval Convention was signed between France, Italy and the UK. The French navy and the RN would support the Italian navy until the end of the war, unless the Austro-Hungarian fleet was destroyed earlier. The Italians would command in the Adriatic and the French elsewhere in the Mediterranean, except in Ottoman waters, where the British would command until the end of the Dardanelles operation.

The Italian navy would be reinforced by four British battleships, four British light cruisers, 12 French destroyers, as many torpedo boats, submarines and minesweepers as the French could spare, including at least six submarines and six French seaplanes, with a seaplane carrier if possible.[2]

This resulted in the following balance of power in the Adriatic:

Type Austria-Hungary Italy Lent by UK & France
Dreadnoughts 3 4
Pre-dreadnoughts 3 2 4
Smaller battleships 6 4
Cruisers 2 9
Fast light cruisers 5 3 2
Old light cruisers 2 3 2
Destroyers 18 39 12
Torpedo boats 42 28
Submarines 7 21 7

Source: Naval Staff Monograph (Historical) 1923 vol. viii The Mediterranean 1914-1915, p. 143.

These figures exclude an Austro-Hungarian and two Italian dreadnoughts that were close to completion and some German submarines that were assembled at the Austro-Hungarian base at Pola for operations in the Dardanelles.[3]

The British ships would come from the Dardanelles, where they would be replaced by four French cruisers and an increase in the French battleship force to six.[4]

The Italian handed their declaration of war to the Austro-Hungarians on 23 May: it came into effect at midnight. The British squadron was at the Italian naval base of Taranto by the morning of 27 May.[5]

[1] The above is based on D. Stevenson, 1914-1918: The History of the First World War (London: Allen Lane, 2004), pp. 110-13.

[2] Naval Staff Monograph (Historical) 1923 vol. viii The Mediterranean 1914-1915. pp. 141-42.

[3] Ibid. Footnotes 1, 2 & 11, p. 143.

[4] J. S. Corbett, H. Newbolt, Naval Operations, 5 vols. (London: HMSO, 1938). vol. ii, p. 396.

[5] Naval Staff vol. viii. pp. 144-45.

3 Comments

Filed under War History

The Sinking of the Lusitania 7 May 1915

On 1 May 1915 the Cunard Liner RMS Lusitania, captained by Captain William Turner, left New York for Liverpool. The German Embassy to the USA took out advertisements in US newspapers warning passengers that the waters round the British Isles were a war zone in which merchant ships were liable to be sunk without warning. The German ad did not specifically mention the Lusitania or Cunard, but the most commonly reproduced version shows it to be placed below Cunard’s announcement of the departure times of its services to Liverpool.[1]170px-Lusitania_warning

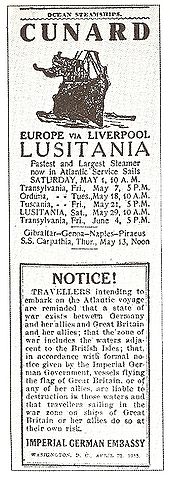
The day before the Lusitania sailed, the German U-boat U-20 departed from Germany. Her captain, Kapitänleutnant Walther Schweiger, had orders to attack transports off Liverpool.[2] He had been in command when U20 sank three British merchants hips off Le Havre on 30 January, before the German declaration of unrestricted submarine warfare. He had also unsuccessfully tried the sink the hospital ship Asturias, claiming that he thought that she was a troopship and could not in any case have been carrying wounded as she was heading from the United Kingdom.[3]

Schweiger sank the schooner Earl of Lathom (132 tons), carrying bacon, eggs and potatoes to Liverpool, by gunfire on 5 May off the Old Head of Kinsale on the south coast of Ireland after giving her crew time to abandon ship. Later that day he fired a torpedo at a 3,000 ton steamer but missed.

The next day he made a surface attack on the steamer Candidate (6,000 tons) in the St George’s Channel. She was heading for Jamaica with a cargo of hardware and groceries. She tried to flee into fog banks, but was eventually forced to stop by gunfire. Schweiger fired a torpedo at her after the crew had abandoned ship, but she would not sink, so U20 had to finish her off by gunfire.

Later that day, after being unable to get into position to torpedo the 16,000 ton passenger liner Arabic, Schweiger fired a torpedo at the steamer Centurion (6,000 tons), en route to Durban. She did not sink, and he finished her off with another torpedo after the crew had abandoned ship. This left him with only three torpedoes; his standing orders said that he was to keep a minimum of two for the return journey.[4]

The large number of patrol ships in the area meant that U-20 would have to proceed to Liverpool submerged, which would be difficult because fog restricted visibility using the submarine’s periscope. Consequently, Schweiger decided to remain in the entrance to the Bristol Channel.

On 7 May he spotted the cruiser HMS Juno, which he followed in the hope of an opportunity to torpedo her. However, she headed for the Queenstown (now Cobh) on the south coast of Ireland. Schweiger, not wanting to approach a well defended naval base, turned away to the west.

Soon afterwards Schweiger spotted a four funnelled liner off the Old Head of Kinsale. It did not appear that he could get his boat into an attacking position until the liner, which was the Lusitania, turned towards U20. Schweiger fired a torpedo at 2:10 pm at a range of 700 metres. It struck just astern of the bridge, producing a large explosion and causing the ship to stop and list.

Schweiger, realising that the Lusitania was doomed, left the scene. He fired a torpedo that suffered a mechanical failure at another Cunarder later the same day.

An SOS signal from the Lusitania was received at 2:11 pm. HMS Juno was ordered to go to her aid, in contravention of Admiralty orders that the old ships of Cruiser Force E at Queenstown should not be put at risk of submarine attack. All available tugs, small craft and patrol vessels were also sent. At 2:33 pm a signal reporting that the Lusitania had sunk was received. Juno was then recalled.[5]

The Lusitania was capable of only 21 knots rather than her full speed of 24 knots. This was because of a commercial decision by Cunard to use only 18 of her 24 boilers in order to make it economic to run her when passenger traffic was reduced in wartime: she was capable of carrying 2,350 passengers and had a crew of 750 in peacetime.[6] Because of the fog Turner had reduced her speed to 15 knots, but had increased it to 18 knots by the time of the sinking as visibility had improved.[7]

U20 returned to Wilhemshaven on 13 May with ‘only 19 tons of oil left’, according to the British Naval Staff Monograph, written in 1925 for internal Royal Navy use only.[8] This phrase makes it sound as if his tanks were almost dry, but U20’s fuel capacity was only 77 tons:[9] presumably 1925 RN officers would have been expected have at least a rough idea of this number.

A total of 1,201 people were killed when the Lusitania sank: 785 out of 1,257 passengers, including 128 Americans, 413 of the 702 strong crew and three stowaways. Some sources quote 1,198, omitting the stowaways. [10] They were German speakers, so were suspected of being spies or saboteurs and held in confinement below decks.[11] Only six out of 48 lifeboats reached Queenstown intact.[12]

Many of the survivors were rescued by small craft from Queenstown, including the Indian Prince and the Flying Fox, and by fishing vessels such as the Peel 12 and the Bluebell.[13]

The Lusitania’s cargo included a number of cases of munitions: 4,200 each containing about 1,000 rifle cartridges, 1,250 of 3.3 inch shrapnel shells and 18 of percussion fuses. The shells and fuses were stated in the official manifest to be without explosives. it was also carrying material for military uniforms and leather equipment.[14]

These items were all classed as contraband under the rules of cruiser warfare. These rules entitled Schweiger to stop and search Lusitania and, on finding the contraband, to require the crew and passengers to take to the lifeboats before he sank the liner and her cargo. They did not allow him to sink her without warning. However, he would have been putting his boat at severe risk by acting in accordance with the rules so close to the British base at Queenstown.

Some media sources, including The Guardian and The Daily Telegraph, have suggested that the British government admitted only recently that the Lusitania was carrying munitions after some Foreign Office documents from 1982 were made public. They dealt with concerns that salvage operations then proposed might reveal the presence of explosives. However, the fact that she was carrying munitions was revealed by the 1918 Mayer hearing into lawsuits against Cunard, although allegations that there were more explosives on board than then admitted persist.[15]

There are several mysteries about the sinking of the Lusitania. One is when Schweiger realised which ship he had sunk. The Naval Staff Monograph, sourcing the German Official Naval History, says that it was not until he saw her name painted on her bows in gold letters, but notes that Lusitania’s captain says that this had been painted over.[16]

German U-boats carried a pilot, a merchant navy officer intended to help with ship identification. Simpson says that U20’s pilot identified the liner as being either the Lusitania or her sister the Mauretania before firing.[17]

Preston argues that there were only five four funnelled British liners and that the Germans knew that the Lusitania was the only one of them that could be inbound on 7 May. She contends that Schweiger’s war diary was later altered to conceal the fact that he knew exactly what ship he was torpedoing.[18]

A major issue is that there were two explosions. The British Official History of The Merchant Navy claims that Schweiger fired two torpedoes, whilst quoting a German source that says that he did not.[19] It is now accepted that he fired only one.

Colin Simpson argues that Schweiger’s torpedo flooded the starboard coal bunkers and cased a 15 degree list, but that it was the second explosion that sank the Lusitania, which he believes was caused by the explosion of contraband. He argues that this is supported by the fact that relevant Admiralty papers, including those of Captain Reginald Hall, Director of Naval Intelligence, and Captain Guy Gaunt, Naval Attaché in Washington, were unavailable when he researched his 1972 book.[20] Some of Hall’s papers are now available at Churchill College, Cambridge, but they do not appear to include any from May 1915.

Diana Preston goes through a number of theories to explain the second explosion:[21]

  1. The munitions that were known to be carried. The shells would have remained inert even if they, contrary to the manifest, contained their powder and propellant charges because they would still have lacked their fuses, a standard procedure during transport. The rifle cartridges would not have exploded, as shown by an example in 1972 when a railway wagon full of United States Navy bullets caught fire but did not explode.
  2. Detonation of less stable explosives that it has been rumoured but never proven were secretly on board. The Scientific American concluded soon after the sinking that such as explosion would have blown the Lusitania’s bows off. A survey of the wreck by the oceanographer and underwater archaeologist Robert Ballard showed no such damage.
  3. Aluminium powder that the manifest showed was being transported to the Woolwich Arsenal. This is highly volatile and can ignite spontaneously in air. However, it would also have created a much larger explosion and greater damage than actually occurred. Some of the crew from the cargo area survived, which they would not have done in this case.
  4. Coal dust explosion. This can ignite if exposed to a spark or flame in the right conditions. However, seepage of sea water into the hull, moist air from the boilers and sea water from the flooding that followed the torpedo hit mean that the conditions were not right.
  5. A boiler explosion. This is the only explanation that would have produced the steam reported by survivors. The sound would have been carried up through the funnels and vents, explaining why the explosion sounded loudest to those on deck. The main flaw is that some of the boiler room personnel survived, which would not have been the case if the boilers exploded immediately. However, a delay of a minute or two would have allowed a few men to get out.
  6. Failure of the steamlines that carried high-pressure superheated steam from the boilers to the turbines. The effect of this fits the reports of survivors.

Preston argues convincingly that ‘steamline explosions are easily the most likely source of the second explosion’, quoting Captain Turner as telling the Mayer hearing that ‘The torpedo burst the steampipe and put the engines out of commission.’[22]

However, Preston’s conclusion is that there were probably a number of explosions, and that the main cause of the sinking of the Lusitania was that she was not designed to survive a torpedo hit in a vital area.[23]

It may seem strange that Lusitania, a ship displacing more than 30,000 tons sank about 20 minutes after being hit by a single torpedo. However, three months later the Arabic went down nine minutes after being hit by a torpedo. HMS Aboukir, an armoured cruiser, albeit an elderly one with weak underwater protection, took only nine minutes to sink after being hit by a single torpedo.[24] The old Ottoman battleship Mesudiye also sank after being hit by only one torpedo from HMS B11.

The Germans subsequently claimed that the Lusitania was a Royal Navy auxiliary cruiser. Her construction and that of the Mauretania had been financed by a cheap loan from the British government, which was concerned that Cunard was struggling to compete with its German and US rivals. In return, they were to be built to the Admiralty’s specifications and were to be taken out of passenger service and converted into armed merchant cruisers if hostilities threatened. A set proportion of their crews must be members of the Royal Naval Reserve. In 1913 the Lusitania was refitted to allow her to carry 12 6 inch guns.[25]

However, the Lusitania was never actually fitted with guns. The Admiralty considered doing so at the start of the war, but decided that she was too expensive to fuel relative to her value as a warship. Inspections by US customs officials and film of her leaving New York on her last voyage showed no sign of any armament.[26] Most of the naval reservists on board the Lusitania in 1914 had by May 1915 been called up by the RN, leaving her with an inexperienced crew.[27]

The Germans also alleged that the Lusitania was carrying Canadian troops across the Atlantic. If they were travelling as an armed and organised unit, rather than as individuals, this would have made her a troopship liable to be sunk without warning. There is no evidence in archives or the accounts of survivors to support this claim. One of the dead passengers, Robert Matthews, was a Lieutenant in the 60th Rifles of Canada, a militia unit. However, he had not attended any drills in the winter of 1914-15, had been rejected for a commission in the Canadian Expeditionary Force and was travelling with his mistress.[28]

The other main conspiracy theory is that the British deliberately put the Lusitania in danger in the hope that she would be sunk, bringing the USA into the war on the Allied side. However, the British in 1915 were happy to have the USA as a friendly neutral munitions supplier rather than as an ally that would want to impose its views on a peace settlement.[29]

As with most conspiracy theories, there is no archival evidence to support it, but the proponents of conspiracy theories always argue that the absence of evidence is itself part of the conspiracy. There are some gaps in British government correspondence during the period in question, notably from Winston Churchill, the First Lord of the Admiralty and Admiral Lord Fisher, the First Sea Lord.

However, the two were then mainly pre-occupied with their dispute over the Dardanelles, Churchill was in France at the time of the sinking and Fisher was close to a nervous breakdown. Their by then poor relations make it unlikely that they would have co-operated in a conspiracy or that either would have kept quiet if the other had been responsible for one. The other contender was Hall, but if he did conspire, it is more likely to have been by omission than commission by not passing on intelligence about U-boat movements.[30]

A conspiracy to have the Lusitania sunk left a lot of things to chance. U20 might not have been in the right place to meet her. The Lusitania might not have approached at an angle that gave Schweiger such a good chance. He might not have aimed so well. His torpedo might have suffered a technical failure, as did the one that he fired the next day. One torpedo might not have been enough, although an unsuccessful attempt to sink the Lusitania might have achieved the objective of the alleged conspirators without serious loss of life.

Like Preston, I have a preference for the cock up theory over the conspiracy one.[31] The Lusitania was not warned that U-boats were operating in the area because the Admiralty was then lax in issuing warnings. Initiative was discouraged and information shared even less widely than security dictated. The Lusitania did not have an escort because it was thought that her speed made her safe. The Admiralty’s anti-submarine strategy was then to patrol waters where there was a risk of U-boat attack rather than to escort merchant ships.

Even in the Second World War, when merchant ships normally sailed in escorted convoys, fast liners such as the Queen Elizabeth and Queen Mary carried large number of Canadian and Us troops across the Atlantic unescorted, depending on their high speed to avoid U-boat attack.

The sinking of the Lusitania caused great damage to US-German relations. President Woodrow Wilson wrote a note that stated that:

‘Manifestly, submarines cannot be used against merchantmen…without an inevitable violation of many sacred principles of justice and humanity.’[32]

This comment formed part of a note that was sent to Germany despite the protests of Secretary of State William Jennings Bryan that it was too pro-British. It arrived on 15 May, by when Kaiser Wilhelm had already ordered his U-boats to cease sinking neutral ships. The navy ignored this order, and Wilhelm reiterated it on 1 June, this time adding that enemy passenger liners should also be spared. Admirals Gustav Bachmann, Chief of the Admiralty Staff, and Alfred von Tirpitz, State Secretary of the Imperial Naval Office, both thought that by doing so Germany was admitting that the sinking of the Lusitania had been illegal and was giving up its best weapon against the UK.[33]

Unrestricted U-boat warfare did bring the USA into the war, but not for nearly two years. From a US point of view, the crucial difference between the British blockade and German unrestricted submarine warfare was that the British only interfered with US trade and property, whilst the Germans additionally killed Americans. The German problem in 1915 was that they did not enough U-boats to win the war by submarine warfare, but trying to do so would damage their relations with the USA.

This website contains a great deal of information about Lusitania and her passengers and crew.


[1] D. Preston, Wilful Murder: The Sinking of the Lusitania, Special Centenary edition. ed. (London: Doubleday, 2015 edition, first published 2002), p. xii; C. Simpson, Lusitania (London: Longman, 1972). Frontispiece.

[2] Naval Staff Monograph (Historical) 1925 vol. xiii, Home Waters part iv, February 1915 to July 1915. p. 169.

[3] Preston, Wilful, pp. 152-53.

[4] Ibid., pp. 162-67.

[5] Naval Staff vol. Xiii. pp. 169-72.

[6] A. S. Hurd, The Merchant Navy, 3 vols. (London: HMSO, 1921). vol. i, pp. 411, 413.

[7] R. K. Massie, Castles of Steel: Britain, Germany, and the Winning of the Great War at Sea (London: Jonathan Cape, 2004), p. 531.

[8] Naval Staff vol. Xiii. p. 172.

[9] R. Gray, Conway’s All the World’s Fighting Ships, 1906-1921 (London: Conway Maritime Press, 1985), p. 176.

[10] Preston, Wilful, p. 299.

[11] Ibid., pp. 131-2, 208.

[12] Simpson, Lusitania, p. 165.

[13] Hurd, Merchant. vol. i, pp. 420-24.

[14] Preston, Wilful, p. 394.

[15] Hurd, Merchant. vol. i, p. 414.

[16] Naval Staff vol. Xiii. pp. 171-2. pp. 171-72 and footnote 1 on p. 172.

[17] Simpson, Lusitania, p. 147.

[18] Preston, Wilful, pp. 423-25.

[19] Hurd, Merchant. vol. i, p. 418

[20] Simpson, Lusitania, p. 151.

[21] Preston, Wilful, pp. 436-44.

[22] Ibid., p. 444.

[23] Ibid.

[24] Ibid., p. 432.

[25] Simpson, Lusitania, pp. 20-32.

[26] Preston, Wilful, pp. 391-92.

[27] Ibid., p. 108.

[28] Ibid., pp. 393-94.

[29] Ibid., p. 401.

[30] Ibid., pp. 402-3.

[31] Ibid., pp. 389-90.

[32] Quoted in Massie, Castles, p. 537.

[33] Ibid., pp. 539-40.


7 Comments

Filed under War History

The Royal Navy and the Gallipoli Land Campaign

Allied troops landed on the Gallipoli peninsula on 25 April 1915, two days later than originally planned because of bad weather.

All the troops, equipment and supplies had to be brought, and wounded evacuated, by sea. Warships provided fire support. Submarines raided Ottoman ships bringing reinforcements and supplies. The small Allied air force came from the Royal Naval Air Service. There was even a naval contribution to the land campaign: the Royal Naval Division.

In 1914 the RN found that it had more reservists than it needed to man its ships. It therefore formed the extra men and some Royal Marines into an infantry division. Some men also volunteered directly for the RND.

The RND was landed at Dunkirk on 20 September 1914 in order to help defend Antwerp. Some of its troops managed to return from Antwerp to the UK, arriving on 11 October; others were forced to flee into the Netherlands, where they were interned for the rest of the war.

The division’s infantry battalions were brought back up to strength before it was sent to Egypt in 1915. At this stage of the war it lacked the artillery and other supporting units of an army infantry division.

The invading force consisted of 30,000 Australians and New Zealanders, divided into two divisions; the 17,000 troops of the British 29th Division, made up of regulars who had been serving in remote colonial garrisons; the 10,000 men of the RND; and a 16,000 strong French division. The 29th would land at Cape Helles and the Anzacs 13 miles up the coast at a place now called Anzac Cove. The RND and the French would make diversionary landings at Bulair and Kum Kale on the Asiatic shore respectively. Preparations were slow because ships had been loaded in the wrong order for an invasion, meaning that they had to be unloaded and re-loaded at Alexandria.[1]

The fleet was commanded by Vice Admiral John de Robeck, who had taken over towards the end of the naval attack on the Dardanelles. His Chief of Staff was Commodore Roger Keyes, an aggressive officer who had previously commanded the RN’s submarines, including at the Battle of Helgoland Bight.

De Robeck’s fleet comprised one British dreadnought; 15 British and four French pre-dreadnought battleships; nine British, three French and one Russian cruisers; 24 British and five French destroyers; seven British, one Australian and four French submarines; a British seaplane carrier; and various minesweepers and other auxiliary craft. One each of the French pre-dreadnoughts and the French cruisers did not take part in the events of 25 April.[2]

Security for the operation was poor. Enemy agents in Athens learnt of preparations on the Greek Islands from the crews of Greek caiques; letters were sent by ordinary post from the United Kingdom to Egypt addressed to the ‘Constantinople Force, Egypt’; and there was open speculation in the Egyptian press.[3] Despite the large number of Allied troops in Egypt, it was officially neutral, so the British could not censor its newspapers.

Tim Travers highlights that the army and navy had different views of the invasion, which created confusion. The navy’s emphasis was on a combined attack on the Narrows, but the army believed that the navy’s role was to weaken the defences in order to permit the landing.[4]

A meeting of RN captains on 21 April decided to abandon the original concept of anchoring offshore in order to shell the beaches and approaches. Instead, the beaches would be bombarded before the landing, but the guns would then switch to the coastal ridges. Keyes rejected Captain Hughes Lockyer of the battleship HMS Implacable’s idea of firing on the beaches on the way in as he thought that the gun control system made it impossible to change the range and bearing quickly enough. The orders stated that ‘ships will cover the landings and support its advance.’[5]

This left captains with a fair degree of discretion. They were no longer required to anchor, but Lockyer said that Keyes’s comments meant that some were reluctant to move close to the shore. The casualties were heaviest at the beaches where the ships remained anchored offshore: V and W at Cape Helles. The landings at S and X at Helles and Anzac Cove benefitted from close naval support.[6]

The fifth beach at Helles, Y, was a late addition, intended to threaten any Ottoman retreat and reinforcements. The initial landing met little resistance, but the troops, lacking a clear objective, did not press on and were withdrawn the next day.[7]

W Beach was target of the 1st Lancashire Fusiliers plus 50 men of the Anson Battalion of the RND. They came ashore in cutters which were first towed by steam boats before being rowed the final part of the journey, which was slow because of an unexpectedly strong current. The boats had to come back to carry the second wave. Casualties amongst both the Fusiliers and the sailors were heavy, with some boats being reduced to two rather than six rowers.[8]

The beach was taken thank to the courage of the Lancashire Fusiliers, six of whom were awarded the Victoria Cross. However, their casualties were too heavy for them to link up with V Beach. This beach was later known as Lancashire Landing.[9]

After disembarking the men intended for W Beach, Implacable bombarded X Beach, with Lockyer taking her to within 450 yards of the shore. She and the light cruiser HMS Dublin were so close in that they came under rifle fire. The small number of men defending the beach were so overwhelmed by the bombardment that the 2nd Royal Fusiliers landed without casualties. Implacable helped to repel an Ottoman attack in the evening. This beach was later known as Implacable Beach.[10]

Captain Alexander Davidson of the battleship HMS Cornwallis was concerned about the small size of the landing force at S Beach, which consisted of two companies of the 2nd South Wales Borderers and a detachment of marines. He therefore augmented it with marines and sailors from his ship and also landed himself. The beach was taken with only 63 casualties. However, Davidson was supposed to move Cornwallis to V Beach once S was captured, but stayed longer in order to evacuate wounded and provide fire support.[11]

The first wave at V Beach consisted of three companies of the Dublin Fusiliers and 50 men of the Anson Battalion in boats each crewed by a midshipman and six seaman. They were followed by the rest of the 1st Royal Dublin Fusiliers, the 1st Royal Munster Fusiliers, half the 2nd Hampshires and 50 more men from the Anson Battalion on board the steamer River Clyde, captained by Commander Edward Unwin.[12]

The River Clyde was to be grounded. She would still be too far offshore for the men to land, so a steam hopper and three wooden lighters would provide a bridge for the troops to land from exits cut in her hull. However, problem with the steam hopper prevented the bridge being put into place.[13] The conversion of the River Clyde into a specialist landing ship was Unwin’s idea.[14]

Unwin and Able Seaman William Williams dived into the sea and managed to move two of the lighters into position with the help of Midshipman George Drewry, commanding the hopper. There was nothing that the lighters could be secured to, so Unwin and Williams used their own bodies to weigh it down. This allowed the Munsters to attempt to land, but most were killed or wounded. Some jumped into the water, but many of them, weighed down by heavy packs, drowned. Williams was also hit and Unwin had to release the line in order to stop him drowning.

Lieutenant John Morse and Midshipman Wilfred Malleson managed to restore a bridge of boats. An attempt to land smaller parties failed and the attack was halted.[15] The men would have got ashore more quickly had the hopper and lighters been able to form a bridge as planned, but casualties would still have been heavy.[16]

The few men who had made it ashore were able to shelter behind a sandbank. The naval fire support at V Beach was inadequate. The battleship HMS Albion stayed 1,400 yards offshore, too far to be useful without forward observers. Cornwallis was late arriving and also stayed too far offshore. Unwin was later very critical of Davidson, arguing that he should have been court martialled for lingering at the lightly defended S Beach.[17]

The cruiser HMS Euryalus did provide accurate fire support at V Beach, but she stayed further offshore than Implacable did at X Beach.[18]

It had not originally been intended to use French troops on 25 April, but it was decided that this was a waste, so they were landed at Kum Kale on the Asian shore. The objective was to prevent the Ottomans from bombarding the S Beach invasion force. Fire support was provided by the French battleship Henri IV, the British battleship HMS Prince George and the Russian cruiser Askold. Henri IV came close inshore to provide accurate fire support. The landing was successful, but the troops were withdrawn on 27 April as they could not advance further without reinforcements.[19]

The first part of the feint by the RND at Bulair was to begin just before dusk with men being rowed towards the shore. They would return to their ships without landing once darkness hid them from the Ottomans. A single platoon of the Hood Battalion would then land and light flares, fire rifles and give the impression that a real landing had taken place.

However, Lieutenant Commander Bernard Freyberg argued that this risked unnecessary casualties. A strong swimmer, he proposed that he should swim ashore alone and set off the flares. This was accepted. The movement of Ottoman reserves was delayed for while, but the original plan would have caused more problems.[20]

The final attack was by the Anzacs at Gaba Tepe, now called Anzac Cove. There was confusion over the intended landing spot and charts were poor. Some senior army officers claimed that the troops were landed a mile and a half to two miles too far north. Travers suggests that the choice of place was ‘quite flexible.’[21]

Peter Hart and Nigel Steel argue that the landing was no more than 500 yards away from the planned location. They note that the naval orders used 2,025 yard nautical miles rather than 1,760 yard statute miles.[22]

Lieutenant General Sir William Birdwood, the Anzac commander, and others later said that change in landing beach was beneficial. It took the Ottomans by surprise and steep cliffs protected the troops. However, Travers comments that the Anzacs were confused by landing at the wrong point and that the Ottomans reacted quickly. Units became mixed up, resulting in a loss of cohesion.[23]

Naval gunfire could give little help at first because the situation was unclear, the terrain was difficult and there was no observation. Most ships stayed too far out, but the right flanks was helped by the cruiser HMS Bacchante, which came in as close as the rocks allowed. She and the battleship HMS Triumph, unlike other ships at Anzac, adjusted their fire according to heliographic signals from ashore.[24]

Although the army was now ashore, the navy continued to play a vital role in the Gallipoli campaign. Ships provided fire support to the troops; supplies and reinforcements had to be brought and wounded evacuated 50 or 60 miles to bases on the islands of Lemnos, Mudros and Tenedos. Rear Admiral Rosslyn Wemyss, commanding at Mudros said that there in September there were always between 150-70 ships at Mudros, excluding small ships. The supply chain was threatened by German U-boats, which intelligence reports said correctly were on their way.[25]

Six Victoria Crosses were awarded to sailors for actions at V Beach on 25 April. Four went to Unwin, Williams, Drewry and Malleson. One went to Seaman George Samson, who worked on a lighter all day under fire, helping wounded and putting out lines, before being badly wounded by machine gun fire. The sixth was Sub Lieutenant Arthur Tisdall of the RND, who went to the aid of wounded men on the beach who were under fire. Only Williams’s award was posthumous, although Tisdall was killed on 6 May. Drewry received the Distinguished Service Order.

De Robeck’s despatch, including a list all Special Recommendation to men under his command, which did not include the RND, is listed on naval-history.net, as are all the RN recipients of gallantry awards and all RN men killed, including the RND.

[1] A. Moorehead, Gallipoli. (London: New English Library, 1963), pp. 107-11.

[2] J. S. Corbett, H. Newbolt, Naval Operations, 5 vols. (London: HMSO, 1938). vol. ii, pp. 310-12

[3] Moorehead, Gallipoli., p. 109.

[4] T. Travers, Gallipoli, 1915 (Stroud: Tempus, 2001), p. 56.

[5] Ibid., p. 63.

[6] Ibid., p. 64.

[7] Ibid., pp. 72-74.

[8] Corbett, Newbolt, Naval. vol. ii, pp. 330-32.

[9] N. Steel, P. Hart, Defeat at Gallipoli (London: Papermac, 1995), pp. 86-90, 96.

[10] Corbett, Newbolt, Naval. vol. ii, pp. 325-27.

[11] Travers, Gallipoli, pp. 61-62.

[12] Corbett, Newbolt, Naval. vol. ii, p. 332.

[13] Travers, Gallipoli, pp. 64-65.

[14] Steel, Hart, Defeat, p. 41.

[15] Ibid., pp. 90-96.

[16] Travers, Gallipoli, p. 65.

[17] Ibid., pp. 65-66.

[18] Ibid., pp. 71-72.

[19] Ibid., pp. 75-78.

[20] Steel, Hart, Defeat, pp. 78-80.

[21] Travers, Gallipoli, p. 85.

[22] Steel, Hart, Defeat.

[23] Travers, Gallipoli, p. 83.

[24] Ibid., pp. 89-90.

[25] P. G. Halpern, A Naval History of World War I (London: UCL Press, 1994), p. 116.

8 Comments

Filed under War History